1. Introduction
This manual provides essential instructions for the safe and efficient operation, installation, maintenance, and troubleshooting of your TAZPI Commercial Ice Maker Machine, Model WQ30FT. Please read this manual thoroughly before using the appliance and retain it for future reference.

Image 1.1: TAZPI Commercial Ice Maker Machine WQ30FT. This image displays the ice maker with its two water inlet modes: a top-mounted bottled water dispenser and a side connection for tap water with an inline filter. The ice bin is visible, filled with clear ice cubes.
2. Safety Instructions
- Ensure the ice maker is placed on a stable, level surface.
- Do not operate the appliance with a damaged power cord or plug.
- Keep the ice maker away from heat sources and direct sunlight.
- Ensure proper ventilation around the unit. Maintain at least 5 inches of clearance on all sides.
- Do not immerse the appliance, cord, or plug in water or other liquids.
- Unplug the ice maker before cleaning or performing any maintenance.
- This appliance is not intended for use by persons with reduced physical, sensory, or mental capabilities, or lack of experience and knowledge, unless they have been given supervision or instruction.
- Only use potable water for ice production.
3. What's in the Box
Upon unpacking, verify that all components are present:
- TAZPI Commercial Ice Maker Machine
- Water Supply Hose
- Water Drain Hose
- Adjustable Machine Feet (pre-installed or separate)
- Water Filter
- Ice Scoop
- User Manual (this document)
4. Setup
4.1 Unpacking and Initial Placement
- Carefully remove all packaging materials and inspect the ice maker for any damage.
- Place the ice maker in an upright position on a flat, stable surface.
- Important: Allow the unit to stand upright for at least 24 hours before plugging it in. This allows the refrigerant to settle.
- Ensure adequate ventilation around the machine. The recommended clearance is at least 5 inches (12.7 cm) on all sides.
4.2 Water Inlet Modes
Your ice maker supports two water inlet methods: direct tap water connection or bottled water supply.

Image 4.1: Upgraded 2-Way Water Inlet System. This image illustrates the back of the ice maker with a water inlet port and drain pipe outlet, showing connections for both tap water (with an external filter) and a top-mounted bottled water supply. A blue control switch is shown for selecting the water supply mode.
4.2.1 Tap Water Supply
- Connect one end of the provided water supply hose to the water inlet port at the back of the ice maker.
- Connect the other end of the water supply hose to the included water filter, then connect the filter to your tap water source. Ensure all connections are secure to prevent leaks.
- Turn on the tap water supply.
4.2.2 Bottled Water Supply
- Place a standard gallon-sized bottled water (not included) onto the designated water dispenser on top of the ice maker.
- Ensure the bottle is securely seated and the water flows into the reservoir.
4.3 Drainage Connection
Connect the provided drain hose to the drain pipe outlet at the back of the ice maker. Route the drain hose to a suitable floor drain or a large container to collect melted ice water. Ensure the hose has a continuous downward slope for proper drainage.
4.4 Power Connection
Plug the ice maker into a grounded electrical outlet. Ensure the voltage matches the specifications listed on the product label.

Image 4.2: Compact Size and Placement Options. This image demonstrates the ice maker's versatility, showing it installed neatly under a kitchen counter and also as a freestanding unit in a living area, highlighting its adaptable design for various environments.
5. Operating Instructions
5.1 Control Panel Overview
The ice maker features an intuitive LCD control panel for easy operation.

Image 5.1: Advanced LCD Panel for Intelligent Operation. This image provides a detailed view of the ice maker's control panel, displaying icons for adjustable thickness, automatic cleaning, 24-hour reservation function, water shortage reminder, and ice full reminder. The digital display shows '22'.
- ON/OFF Button: Powers the unit on or off.
- +/- Buttons: Adjust ice-making time (influences thickness) or set the timer.
- Reservation/Clean Button: Initiates the 24-hour timer function or the automatic cleaning cycle.
- Indicators: Ice Making, Add Water, Ice Full, Stoppage, Clean, Reservation.
5.2 Initial Operation
- After the 24-hour settling period and water/drain connections are complete, plug in the unit.
- Press the ON/OFF button to start the ice-making process. The 'Ice Making' indicator will illuminate.
- The machine will automatically begin producing ice. The first few cycles may produce smaller or irregularly shaped ice cubes; this is normal.
5.3 Adjusting Ice Thickness
The ice maker can produce 36 ice cubes per cycle in approximately 8-15 minutes, with a daily capacity of 120 lbs. You can adjust the ice cube thickness by modifying the ice-making time.
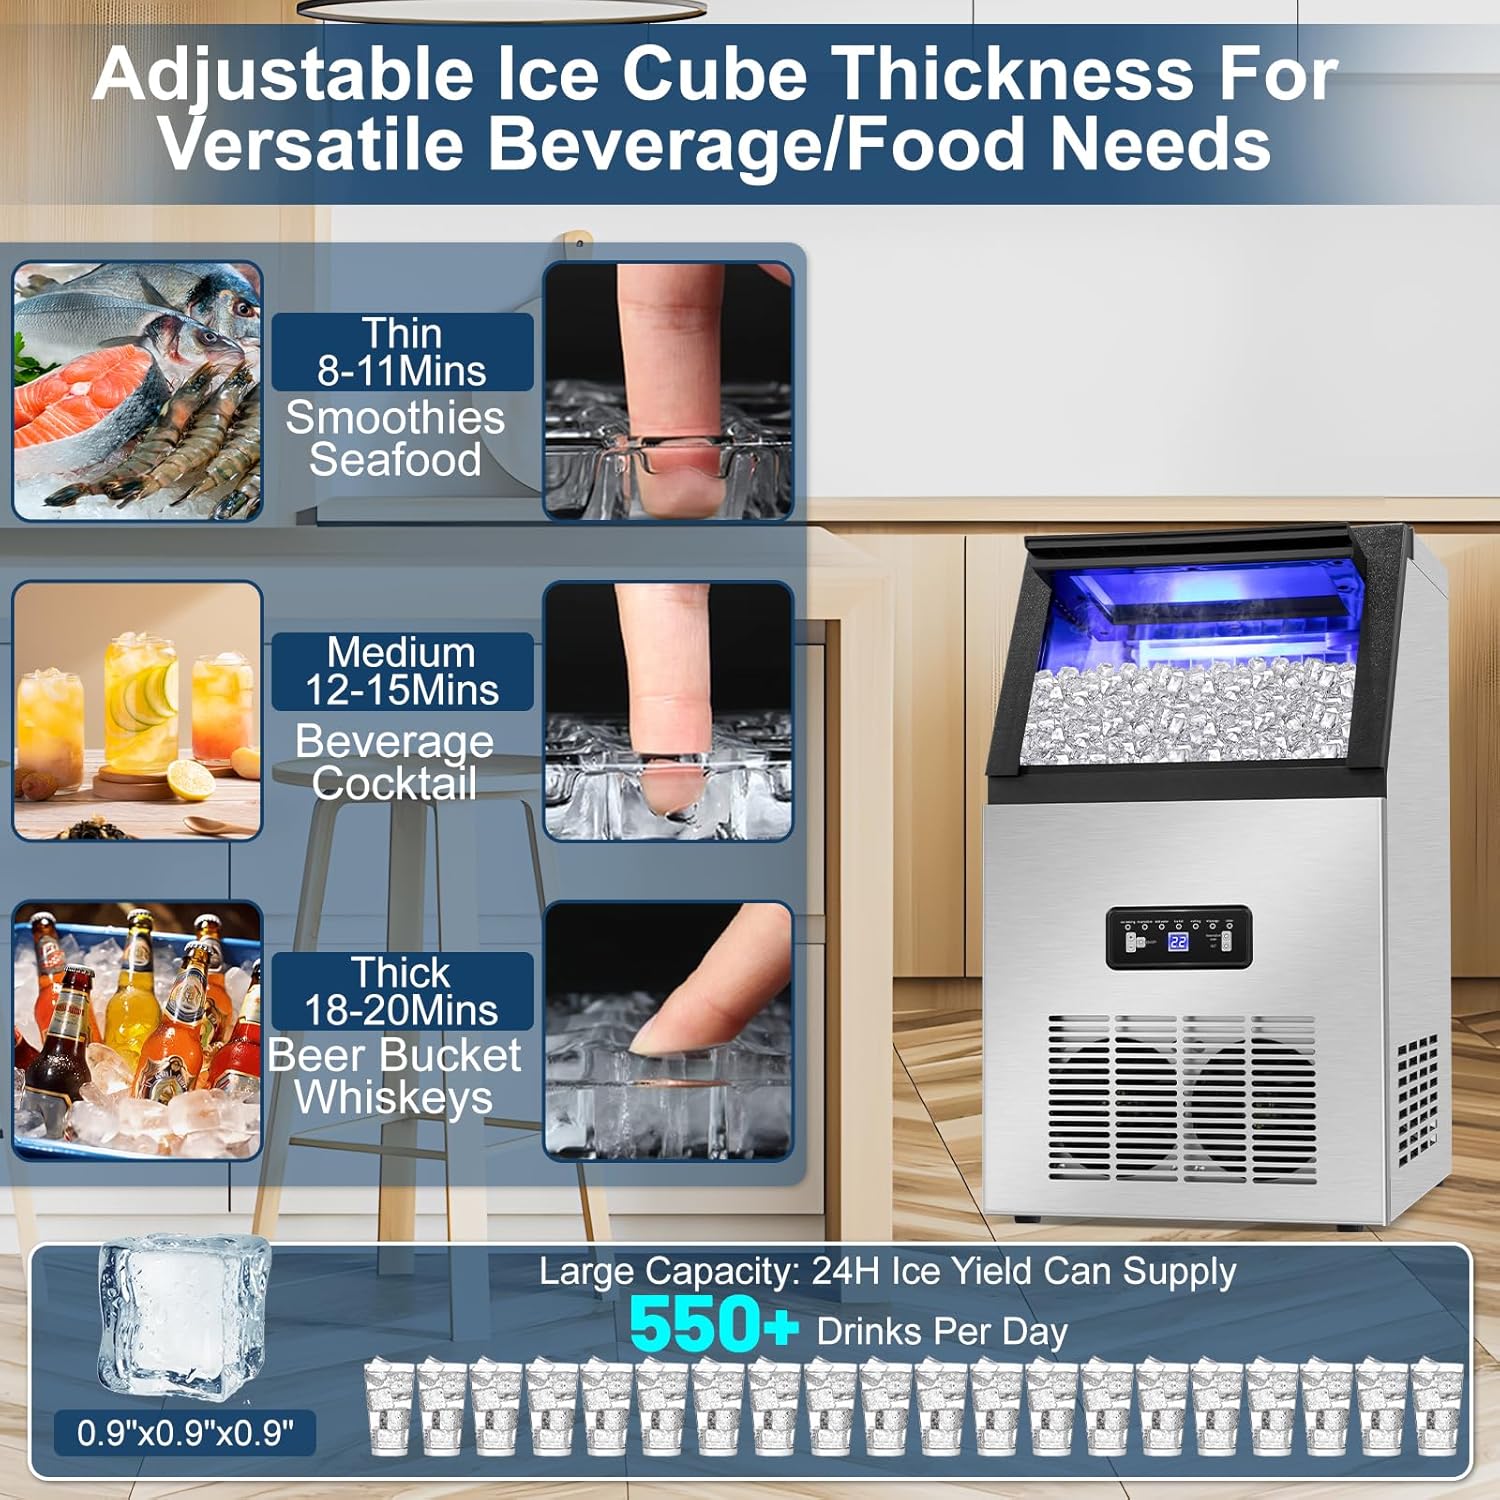
Image 5.2: Adjustable Ice Cube Thickness. This image illustrates how ice cube thickness can be adjusted, showing thin (8-11 mins for smoothies/seafood), medium (12-15 mins for beverages/cocktails), and thick (18-20 mins for beer buckets/whiskeys) options. A large capacity of 550+ drinks per day is also highlighted.
- Use the +/- buttons to increase or decrease the ice-making time. Longer times result in thicker ice cubes.
- Thin Ice: 8-11 minutes (suitable for smoothies, seafood preservation).
- Medium Ice: 12-15 minutes (suitable for beverages, cocktails).
- Thick Ice: 18-20 minutes (suitable for beer buckets, whiskey).
5.4 24-Hour Timer Function
The reservation function allows you to set a delayed start or stop time for the ice maker.
- Press the Reservation/Clean button. The display will show a flashing time.
- Use the +/- buttons to set the desired delay time (up to 24 hours).
- Press the Reservation/Clean button again to confirm. The 'Reservation' indicator will light up.
5.5 Indicators
- Add Water: Illuminates when the water reservoir is low. Refill water or check water supply connection.
- Ice Full: Illuminates when the ice storage bin is full. The machine will pause ice production until ice is removed.
- Stoppage: Indicates an operational error. Refer to the Troubleshooting section.

Image 5.3: Daily Ice Production Capacity. This image shows the ice maker in a kitchen environment, emphasizing its ability to produce up to 120 lbs of ice per day, equivalent to over 5500 ice cubes or 550 drinks, suitable for various settings.
6. Maintenance
6.1 Automatic Cleaning Function
The self-cleaning function helps maintain internal cleanliness and extends the machine's life.
- Ensure the drain hose is properly connected to a drain.
- Hold the Reservation/Clean button for 5 seconds. The 'Clean' indicator will illuminate, and the machine will enter the self-cleaning program.
- The cleaning cycle will run for a set period, flushing water through the system.
- Once complete, the machine will automatically stop.
6.2 Regular Cleaning
- Exterior: Wipe the stainless steel exterior with a soft cloth and mild detergent. Do not use abrasive cleaners.
- Interior: Periodically clean the ice bin and water reservoir with a solution of water and white vinegar or a food-grade ice maker cleaner. Rinse thoroughly with clean water.
- Water Filter: Replace the water filter every 3-6 months, or as needed, depending on water quality and usage.
- Drainage: Ensure the drain hose is clear of obstructions.
7. Troubleshooting
Refer to the following table for common issues and their solutions.
| Problem | Possible Cause | Solution |
|---|---|---|
| Ice maker does not turn on. | No power supply. | Check if the power cord is securely plugged into a working outlet. Check circuit breaker. |
| No ice production or very little ice. |
|
|
| Ice cubes are too thin or melt quickly. |
|
|
| Ice maker is noisy. | Normal compressor operation or ice dropping. | Some operational noise is normal. Ensure the unit is on a level surface to minimize vibrations. |
| 'Ice Full' indicator is on, but bin is not full. | Ice sensor obstruction or malfunction. | Clear any ice blocking the sensor. Clean the sensor if necessary. |
| Water leakage. | Loose connections or blocked drain. | Check all water supply and drain hose connections for tightness. Ensure the drain hose is not kinked or blocked. |
8. Specifications
| Feature | Specification |
|---|---|
| Model | WQ30FT |
| Brand | TAZPI |
| Daily Ice Production | Up to 120 lbs (54.4 kg) |
| Ice Storage Capacity | 28 lbs (12.7 kg) |
| Ice Cube Per Cycle | 36 pieces |
| Ice Making Cycle Time | 8-15 minutes (adjustable) |
| Water Inlet Modes | Tap Water (with filter) / Bottled Water |
| Product Dimensions (D x W x H) | 16.93" x 13.78" x 25.2" (43cm x 35cm x 64cm) |
| Weight | Approximately 40 lbs (18.1 kg) |
| Wattage | 350 watts |
| Material | Stainless Steel |

Image 8.1: Product Specification and Dimensions. This image provides a visual representation of the ice maker's dimensions (16.93 inches wide, 13.78 inches deep, 25.2 inches high) and suggests its suitability for home, office, restaurant, and bar environments.
9. Warranty and Support
TAZPI is committed to providing quality products and customer satisfaction. Your TAZPI Commercial Ice Maker Machine is backed by a professional service team ready to provide technical support and assistance with any issues you may encounter.
For warranty information, technical support, or service inquiries, please refer to the contact information provided with your purchase documentation or visit the official TAZPI website.


