1. Introduction and Overview
This Docooler Wireless Digital Thermometer provides simultaneous display of indoor and outdoor temperatures, along with the current time. It utilizes wireless technology for convenient outdoor temperature monitoring from an indoor receiver. The device records maximum and minimum indoor/outdoor temperatures and offers selectable temperature units (Celsius/Fahrenheit) and time formats (12H/24H).

Image 1.1: Docooler Wireless Digital Thermometer main unit and outdoor transmitter.
2. Product Components
The package includes the following items:
- Main Temperature Unit (Receiver)
- Wireless Outdoor Transmitter
- User Manual (this document)
Note: 2x AA 1.5V batteries for the transmitter and 2x AAA 1.5V batteries for the main unit are not included and must be purchased separately.

Image 2.1: Front and back view of the main temperature unit.
3. Setup
3.1 Battery Installation
- For the Main Temperature Unit: Open the battery compartment cover on the back of the main unit. Insert 2x AAA 1.5V batteries, ensuring correct polarity (+/-). Close the cover.
- For the Wireless Outdoor Transmitter: Open the battery compartment cover on the back of the transmitter. Insert 2x AA 1.5V batteries, ensuring correct polarity (+/-). Close the cover.

Image 3.1: Battery compartment of the main temperature unit.

Image 3.2: Battery compartment of the wireless outdoor transmitter.
3.2 Placement
- Main Temperature Unit: Place the main unit indoors on a flat surface using its integrated kickstand or mount it on a wall using the hanging hole. Ensure it is away from direct sunlight or heat sources that could affect indoor temperature readings.
- Wireless Outdoor Transmitter: Place the outdoor transmitter in a sheltered location outdoors, protected from direct rain and sunlight. For optimal wireless signal, ensure it is within 100 meters (unobstructed) of the main unit. Avoid placing it near large metal objects or electrical appliances that may cause interference.

Image 3.3: Diagram illustrating wireless data transmission.
4. Operating Instructions
The main unit features an LCD screen displaying indoor temperature, outdoor temperature, and current time. Control buttons are located below the display.

Image 4.1: Main unit display and control buttons.
4.1 Display Functions
- OUTDOOR: Displays the temperature measured by the wireless outdoor transmitter.
- INDOOR: Displays the temperature measured by the main unit's internal sensor.
- TIME: Displays the current time.
4.2 Button Functions
The main unit has several buttons for control:
- SET / ℃/℉: Press to switch between Celsius (℃) and Fahrenheit (℉). Press and hold to enter time setting mode.
- ▲ / MAX/MIN: Press to view maximum and minimum recorded temperatures. Press and hold to clear MAX/MIN records. In time setting mode, press to increase value.
- ▼ / 12/24: Press to switch between 12-hour and 24-hour time format. In time setting mode, press to decrease value.
4.3 Setting the Time
- Press and hold the SET / ℃/℉ button for approximately 3 seconds until the hour digits begin to flash.
- Use the ▲ / MAX/MIN and ▼ / 12/24 buttons to adjust the hour.
- Press the SET / ℃/℉ button again to confirm the hour and move to setting the minutes.
- Use the ▲ / MAX/MIN and ▼ / 12/24 buttons to adjust the minutes.
- Press the SET / ℃/℉ button one last time to confirm the minutes and exit time setting mode.
5. Maintenance
5.1 Battery Replacement
When the display becomes dim or readings are inconsistent, it is time to replace the batteries in both the main unit and the outdoor transmitter. Follow the battery installation steps in Section 3.1.
5.2 Cleaning
Wipe the device with a soft, damp cloth. Do not use abrasive cleaners or immerse the unit in water. Ensure the device is completely dry before re-inserting batteries or operating.
5.3 Storage
If the device will not be used for an extended period, remove all batteries to prevent leakage and store it in a cool, dry place.
6. Troubleshooting
- No outdoor temperature reading or '---' displayed:
- Check if the outdoor transmitter batteries are correctly installed and not depleted.
- Ensure the outdoor transmitter is within the 100m wireless range and there are no major obstructions (e.g., thick walls, large metal objects) between the transmitter and the main unit.
- Try repositioning both units closer to each other.
- Inaccurate temperature readings:
- Ensure both units are not exposed to direct sunlight, heat sources, or extreme drafts.
- Replace batteries in both units.
- Time is incorrect:
- Follow the time setting instructions in Section 4.3 to reset the time.
- Display is dim or blank:
- Replace the batteries in the main unit.
7. Specifications
| Feature | Specification |
|---|---|
| Material | ABS (Acrylonitrile Butadiene Styrene) |
| LCD Screen Size | 94 x 54 mm |
| Indoor Temperature Range | 0 ℃ ~ 50 ℃ / 32 ℉ ~ 122 ℉ |
| Outdoor Temperature Range | -20 ℃ ~ 70 ℃ / -4 ℉ ~ 158 ℉ |
| Temperature Accuracy | ± 1 ℃ |
| Indoor Temp. Detection Period | Once every 30 seconds |
| Outdoor Temp. Detection Period | Once every 57 seconds |
| Transmitter Power Source | 2x 1.5V AA Batteries (not included) |
| Main Unit Power Source | 2x 1.5V AAA Batteries (not included) |
| Transmitter Dimensions | 130 x 40 x 22 mm |
| Main Unit Dimensions | 150 x 86 x 23 mm |
| Wireless Transmission Range | Up to 100m (unobstructed) |
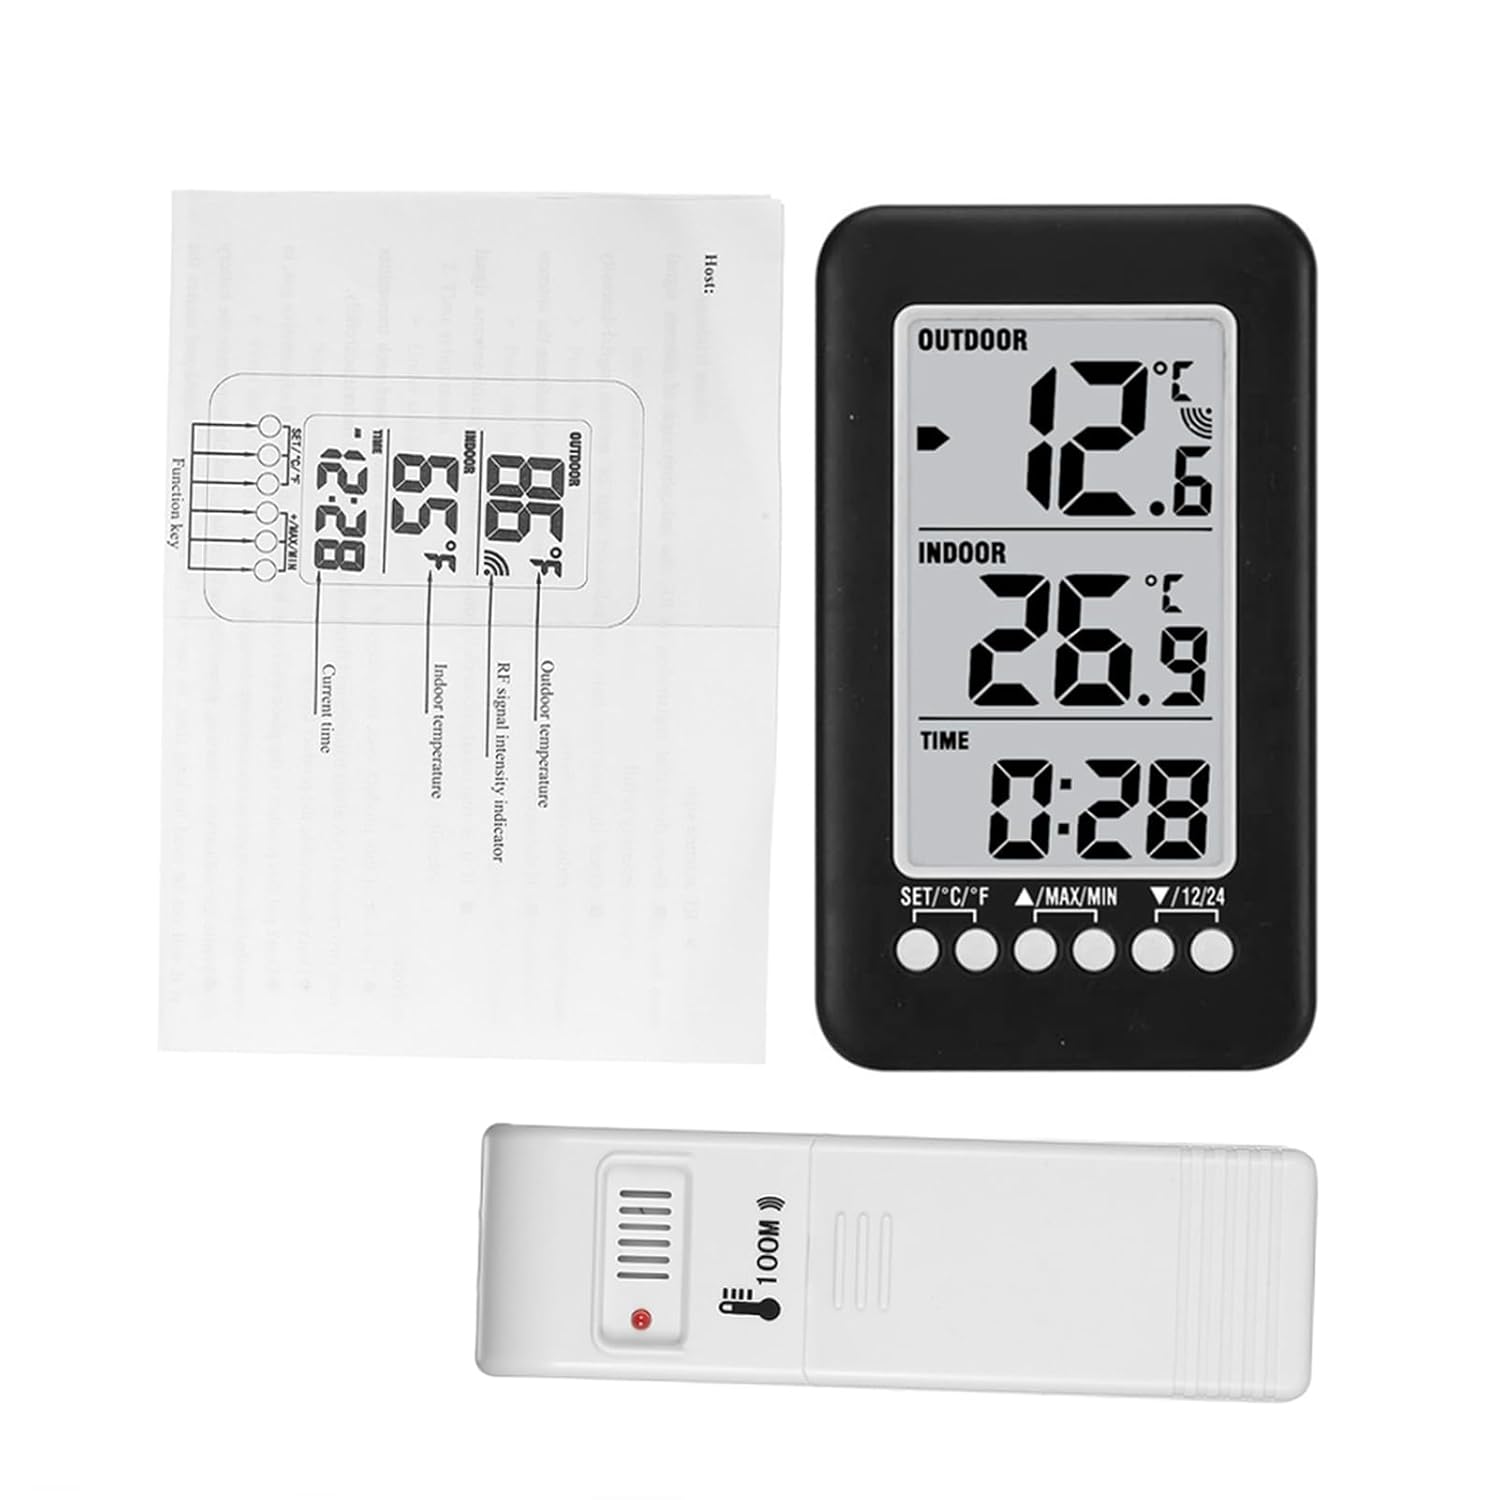
Image 7.1: Dimensions of the main unit and outdoor transmitter.
8. Safety Information
- Do not expose the device to extreme temperatures, direct sunlight, or high humidity.
- Avoid dropping or subjecting the device to strong impacts.
- Do not attempt to disassemble or modify the device. This will void any potential warranty.
- Dispose of used batteries responsibly according to local regulations.
9. Warranty and Support
For warranty information or technical support, please refer to the retailer where the product was purchased or visit the official Docooler website. Please have your product model number (36ea5cd0-0bae-43c6-b51b-88b35e12f8b8) available when contacting support.


