1. Introduction
This manual provides detailed instructions for the proper installation, operation, and maintenance of your Nebakne 71 Keys Fireproof Key Lock Box. Please read this manual thoroughly before using the product to ensure safe and efficient operation. Keep this manual for future reference.
2. Package Contents
Verify that all items listed below are included in your package:
- 1 × Nebakne 71 Keys Fireproof Key Lock Box
- 2 × Emergency Keys
- 7 × Adjustable Hook Plates
- 71 × Color-Coded Key Tags
- 1 × External Battery Box
- 1 × Mounting Hardware Set (bolts, anchors)
- 1 × User Manual (this document)
3. Product Features
- Robust Construction: Made from solid cold rolled steel, offering anti-pry, anti-rust, and high-temperature resistance. Features 2 solid bolts and a thickened front door for enhanced security.
- High Capacity: Designed to store up to 71 keys, suitable for various applications.
- Adjustable Key Organization: Includes 7 adjustable hook plates and 71 color-coded key tags for efficient key classification and tracking.
- Multiple Access Methods: Can be opened using an emergency key, a user/master digital code, or an external battery box in case of power loss.
- Security Alarm System: Activates a warning beep if an incorrect code is entered multiple times.
- Sound Control: Option to turn the keypad sound on or off.
- Convenient Drop Box: Features a side opening for easy key drop-off without needing to open the main door.
- Internal LED Light: Provides illumination for quick key access in low-light conditions.
- Wall Mountable: Designed for secure wall installation to prevent tipping and unauthorized removal.
4. Setup Instructions
4.1 Wall Mounting
The key lock box is designed for secure wall mounting. Ensure the chosen wall can support the weight of the unit (approximately 23.1 pounds or 11 kilograms) and its contents. Use the provided mounting hardware for installation.
- Select a suitable location on a solid wall.
- Mark the drilling points using the key box as a template.
- Drill holes at the marked points.
- Insert wall anchors into the drilled holes (if applicable for your wall type).
- Align the key box with the holes and secure it to the wall using the mounting bolts. Ensure it is firmly attached to prevent tipping.

Image: Nebakne Key Lock Box wall-mounted, illustrating its use in various professional settings.
4.2 Battery Installation
The key lock box requires 4 AA batteries (not included) for the electronic keypad to function. The battery compartment is located inside the safe door.
- Open the key lock box using an emergency key.
- Locate the battery compartment on the inside of the door.
- Insert 4 AA batteries, ensuring correct polarity (+/-).
- Close the battery compartment cover.

Image: Overview of the key lock box dimensions and included components, including the battery compartment location.
5. Operating Instructions
5.1 Unlocking the Key Box
Your Nebakne key lock box offers three methods for unlocking:
- Emergency Key: Insert the emergency key into the keyhole, turn it, and then turn the knob to open the door.
- User/Master Code: Enter your 3-8 digit user or master code, press the "#" key, and then turn the knob to open the door.
- External Battery Box (if internal batteries are depleted):
- Connect the external battery box (with 4 AA batteries installed) to the external power jack on the keypad.
- Enter your 3-8 digit user or master code, press the "#" key, and then turn the knob to open the door.
Important: Do not keep the emergency keys inside the key safe.

Image: Visual guide to the three unlocking methods for the key lock box.
Video: Tutorial demonstrating the three ways to unlock the Nebakne key safe.
5.2 Setting the User Code
The initial user code is 159. Follow these steps to set your personal user code:
- Open the key lock box.
- Locate and press the red reset button on the inside of the door. The keypad will beep, and the indicator light will flash.
- On the keypad, enter your desired 3-8 digit code.
- Press the "#" key to confirm. The indicator light will stop flashing, and the keypad will beep to confirm the new code.
- Before closing the door, test the new user code to ensure it works correctly.
5.3 Setting the Master Code
The master code provides an additional layer of access. Follow these steps to set your master code:
- Open the key lock box.
- On the keypad, enter "00" and then press the "#" key.
- Locate and press the red reset button on the inside of the door. The keypad will beep, and the indicator light will flash.
- On the keypad, enter your desired 3-8 digit master code.
- Press the "#" key to confirm. The indicator light will stop flashing, and the keypad will beep to confirm the new code.
- Before closing the door, test the new master code to ensure it works correctly.
Video: Guide on how to set the user code and master code for the key lock box.
5.4 Alarm and Silent Mode
The key lock box is equipped with an alarm system to deter unauthorized access:
- If an incorrect code is entered 3 times continuously, the keypad will lock for 20 seconds, and a warning beep will sound for 20 seconds. The keypad will be disabled during this period.
- If an incorrect code is entered 6 times continuously, the warning beep will activate for 5 minutes.
You can control the keypad sound:
- To turn off the sound: Press "*633".
- To turn on the sound: Press "*66".
Video: Demonstration of the alarm mode and how to turn the keypad sound on or off.
5.5 Using the Drop Box Feature
The key lock box includes a small opening on the side, allowing keys to be dropped into the safe without requiring the main door to be opened. This is useful for key returns or temporary deposits.

Image: Illustrating the use of the side opening as a key drop box.
5.6 Key Organization
Utilize the adjustable hook plates and color-coded key tags to maintain an organized system for your keys.
- Adjustable Hook Plates: The hook plates can be repositioned to accommodate keys of various sizes.
- Color-Coded Key Tags: Each tag allows for labeling, making it easy to identify and locate specific keys.

Image: Interior view of the key lock box with adjustable hook plates.
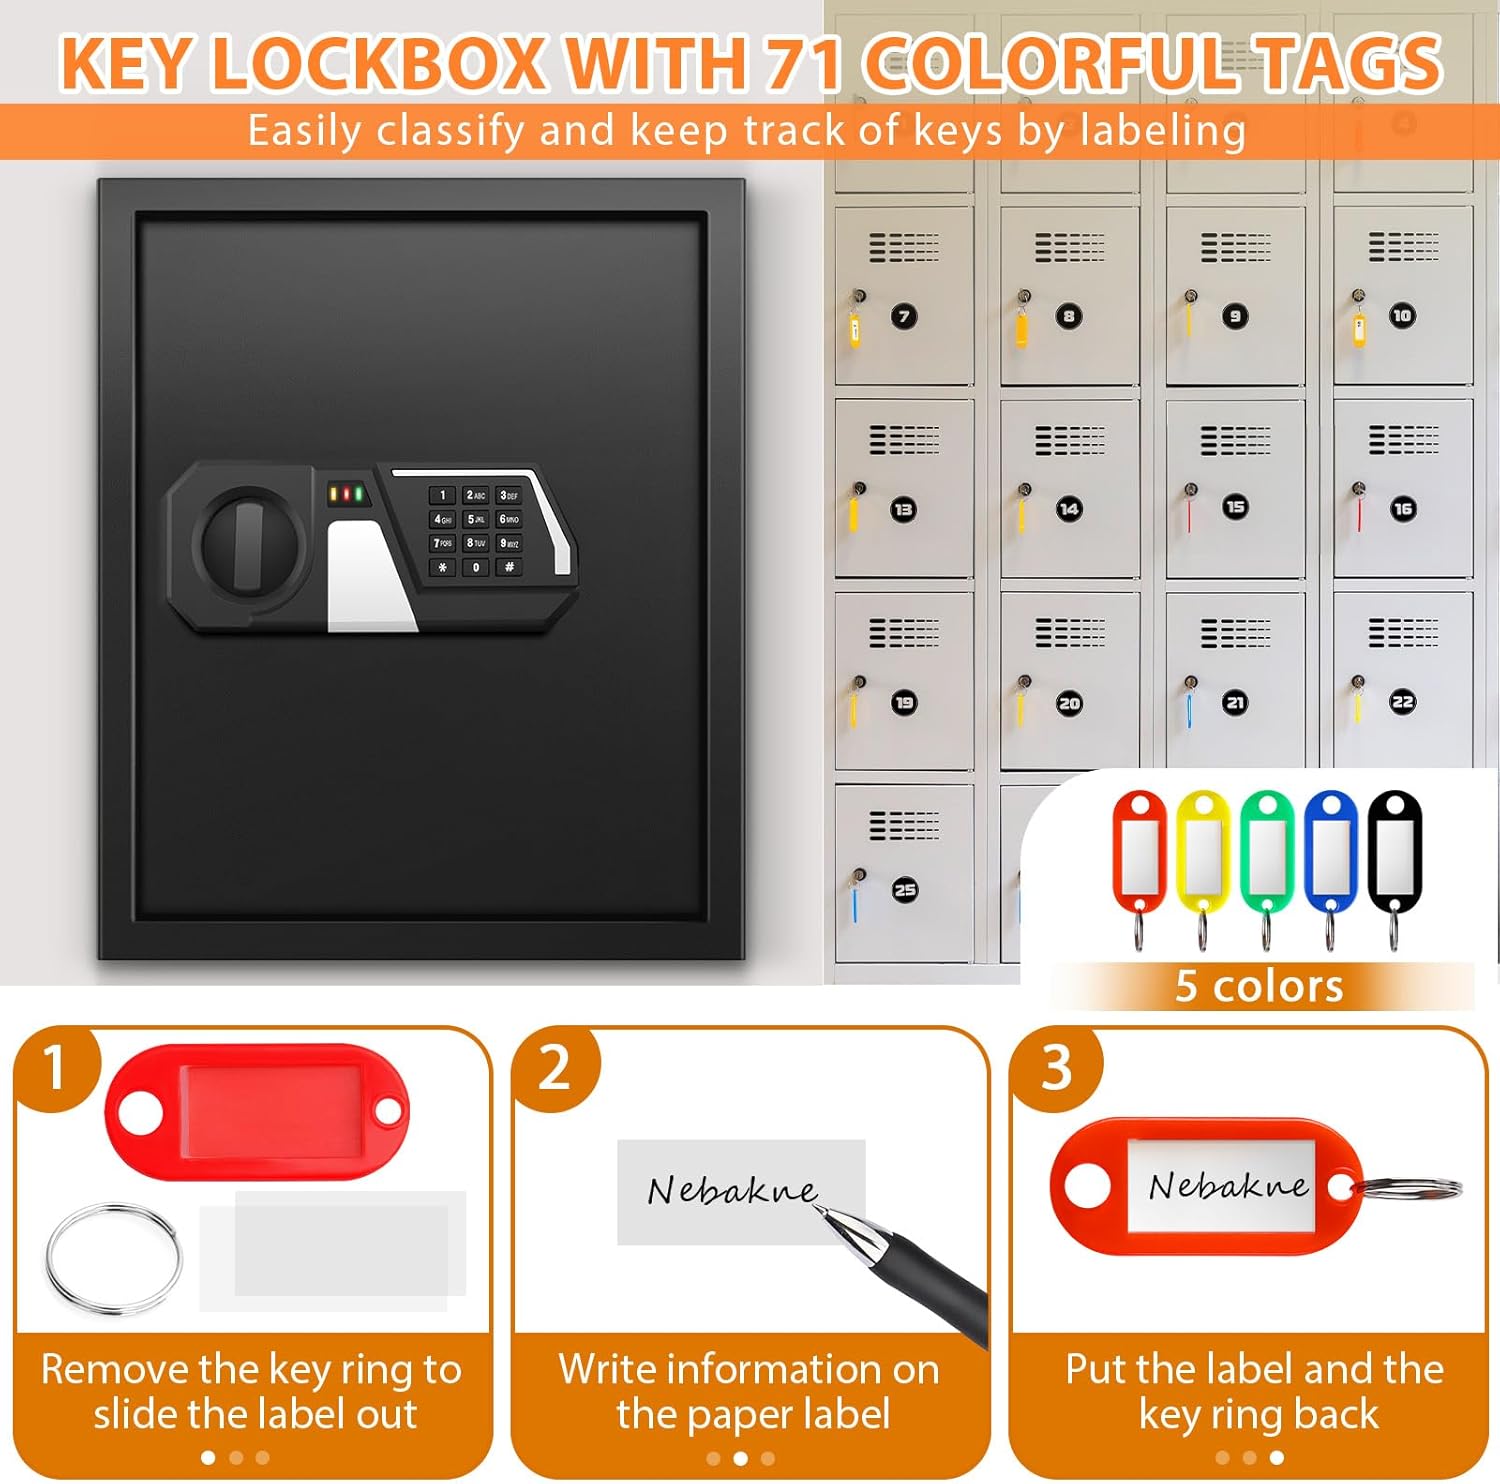
Image: Guide on how to use the color-coded key tags for labeling.
6. Maintenance
- Cleaning: Wipe the exterior with a soft, damp cloth. Avoid abrasive cleaners or solvents.
- Battery Replacement: Replace batteries promptly when the low battery indicator appears or if the keypad becomes unresponsive. Always use 4 new AA batteries.
- Emergency Key Storage: Store emergency keys in a secure location away from the key lock box.
- Internal Mat: The soft mat inside helps prevent keys from dropping, being scratched, or damaged. Ensure it remains in place.
7. Troubleshooting
- Keypad Unresponsive: Check if the batteries are correctly installed and have sufficient charge. Use the external battery box if needed.
- Code Not Working: Ensure you are entering the correct 3-8 digit code followed by the "#" key. If you recently changed the code, try the new one. If issues persist, try resetting the code (refer to sections 5.2 and 5.3).
- Alarm Sounds Unexpectedly: This indicates multiple incorrect code entries. Wait for the alarm to clear or enter the correct code. If the alarm sounds without interaction, check for any obstructions or tampering.
- Static Electricity Causing Memory Loss: In rare cases, strong static shocks may cause the keypad to lose its programmed codes. If this occurs, you will need to use the emergency key to open the box and then reprogram your user and master codes. Avoid placing the unit in areas prone to static buildup.
- Door Not Opening After Code Entry: Ensure the knob is turned immediately after entering the correct code and pressing "#". If the door is stiff, gently apply pressure while turning the knob.
8. Specifications
| Feature | Detail |
|---|---|
| Brand | Nebakne |
| Model Name | Key lock box03 |
| Size | 71 Keys |
| Color | Black |
| Product Dimensions (D x W x H) | 4.72"D x 14.17"W x 17.71"H (12cm D x 36cm W x 45cm H) |
| Item Weight | 23.1 pounds (11 Kilograms) |
| Material | Alloy Steel |
| Mounting Type | Wall Mount |
| Lock Type | Key / Digital Code |
| Batteries Required | Yes (4 x AA, not included) |
| Special Features | Lockable, Fireproof, Anti-Theft, Adjustable Hook Plates, Side Opening, Internal LED Light, Alarm Mode, Silent Mode |

Image: The Nebakne 71-Key Fireproof Key Lock Box with its door open, revealing the key hooks and digital keypad.

Image: Visual representation of the key lock box's anti-theft, anti-prying, and fire-resistant properties.
9. Customer Support
If you have any questions or require assistance with your Nebakne 71 Keys Fireproof Key Lock Box, please contact our customer service team. We are committed to resolving your inquiries within 24 hours.


