Geevorks EVK0631302350327WD
Geevorks Mini Angle Grinder Instruction Manual
Model: EVK0631302350327WD

1. Safety Information
Always read and understand all safety warnings, instructions, illustrations, and specifications provided with this power tool. Failure to follow all instructions listed below may result in electric shock, fire, and/or serious injury.
General Power Tool Safety Warnings
- Work Area Safety: Keep work area clean and well lit. Cluttered or dark areas invite accidents. Do not operate power tools in explosive atmospheres, such as in the presence of flammable liquids, gases, or dust.
- Electrical Safety: Do not expose power tools to rain or wet conditions. Water entering a power tool will increase the risk of electric shock.
- Personal Safety: Always wear eye protection. Use appropriate personal protective equipment such as dust mask, non-skid safety shoes, hard hat, or hearing protection when appropriate.
- Tool Use and Care: Do not force the power tool. Use the correct power tool for your application. The correct power tool will do the job better and safer at the rate for which it was designed.
- Battery Tool Use and Care: Prevent unintentional starting. Ensure the switch is in the off-position before connecting to battery pack, picking up or carrying the tool. Disconnect the battery pack from the tool before making any adjustments, changing accessories, or storing power tools.
Specific Angle Grinder Safety Warnings
- This power tool is intended to function as a grinder, sander, wire brush or cut-off tool. Read all safety warnings, instructions, illustrations and specifications provided with this power tool.
- Do not use accessories which are not specifically designed and recommended by the tool manufacturer.
- Always ensure the guard is properly installed and adjusted for the specific operation.
- Hold the tool firmly with both hands. A loss of control can result in personal injury.
- Keep hands clear of the rotating accessory.
2. Product Overview
The Geevorks Mini Angle Grinder is a compact and powerful cordless tool designed for various cutting, grinding, and polishing tasks. Its ergonomic design and high-speed motor make it efficient for both professional and home improvement projects.
Components Included
- 1 x Mini Angle Grinder 12V
- 2 x 2000mAh Lithium-Ion Battery
- 1 x Adapter/Charger
- 4 x Nylon Cutting Blades
- 1 x Grinding Disc
- 2 x Metal Cutting Discs
- 1 x Pair of Gloves
- 1 x Wrench
- 1 x Guideline (Instruction Manual)

Image: Complete package contents of the Geevorks Mini Angle Grinder.
Key Features
- High Speed & Efficiency: Brushed motor with 19500 RPM for fast material removal.
- Cordless Design: Powered by 12V 2.0Ah lithium batteries for portability.
- Enhanced Safety: Thickened baffle design reduces debris splash.
- Heat Dissipation: Vent holes in housing prevent overheating.
- Ergonomic Handle: Designed for comfortable one-handed operation with convenient side switches.
- Easy Disc Swapping: Humanized spindle lock for quick accessory changes.
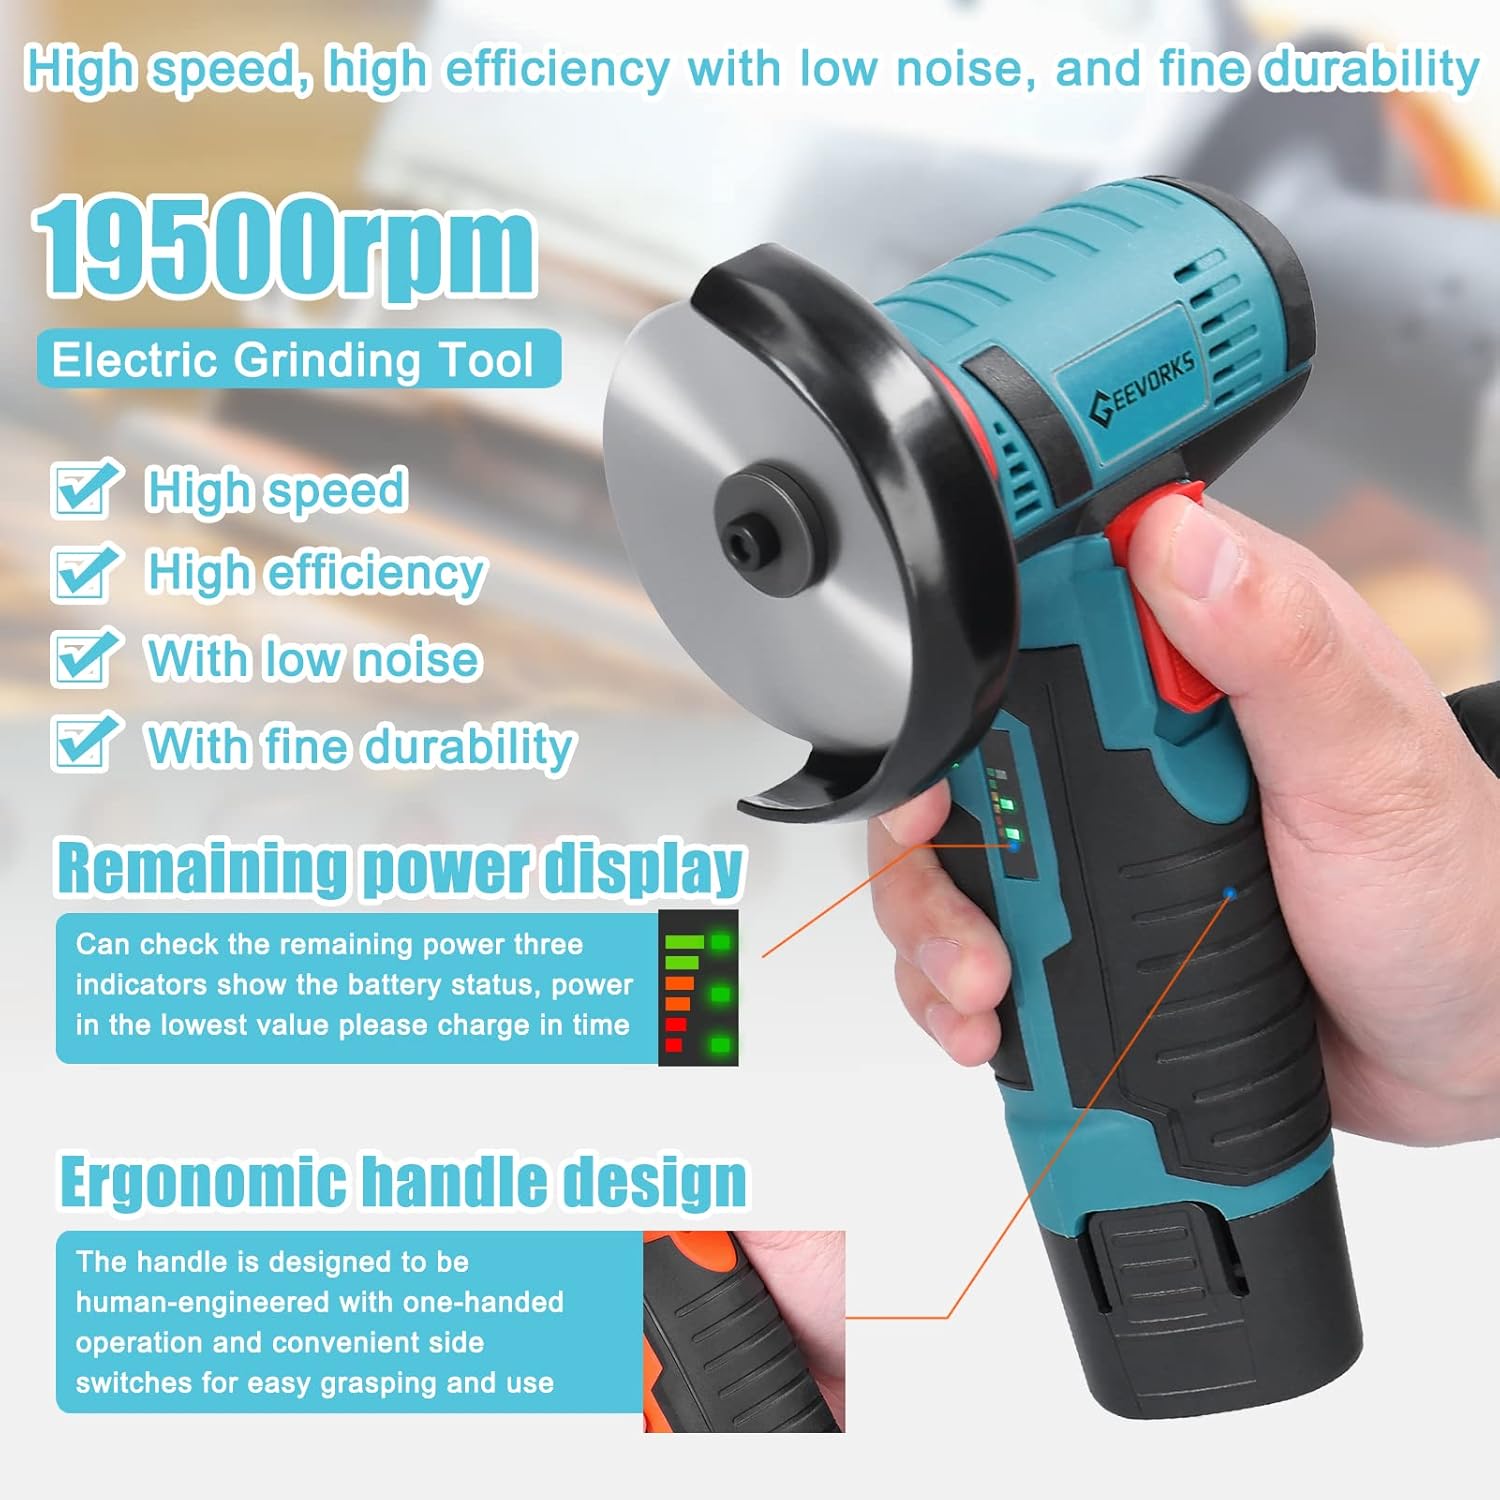
Image: Features highlighting the grinder's high speed, efficiency, and ergonomic handle with power display.
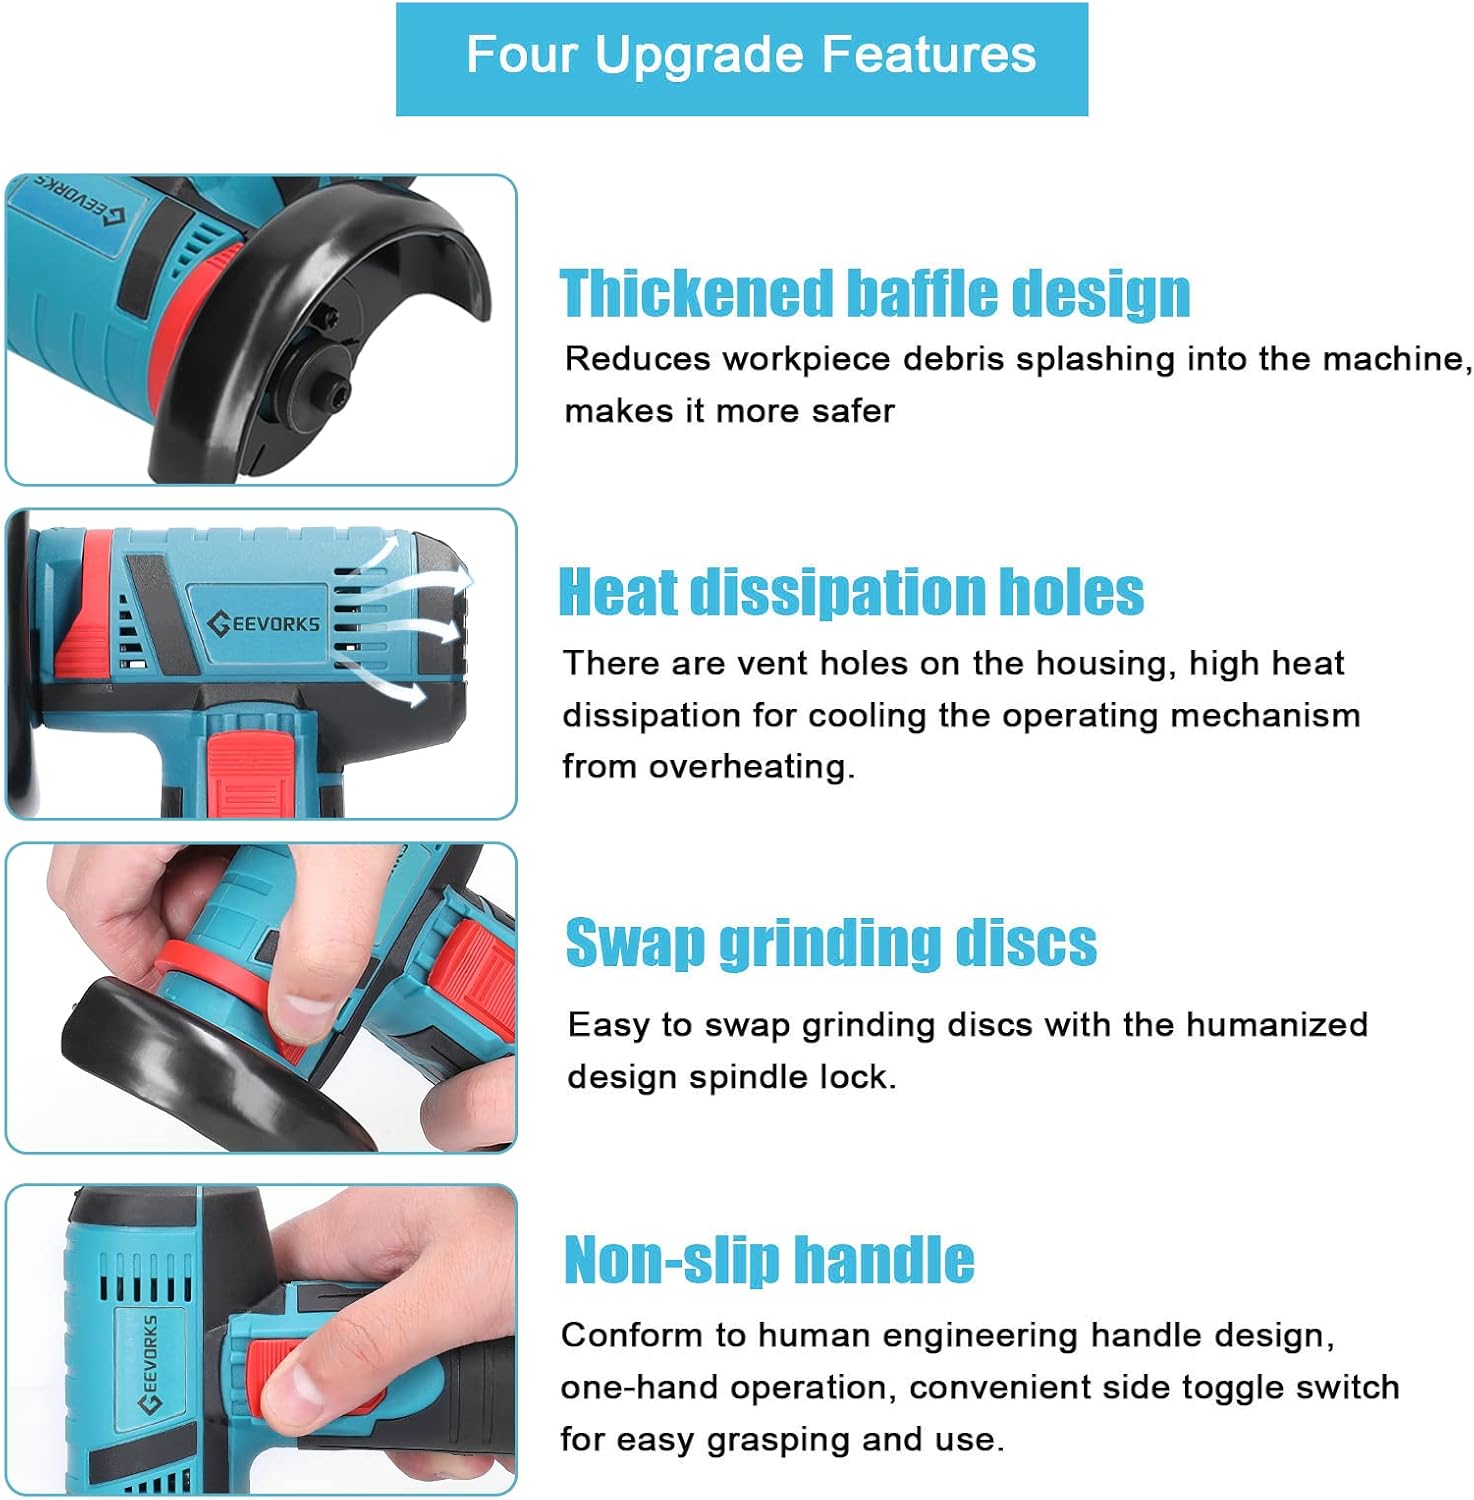
Image: Detailed view of the thickened baffle, heat dissipation holes, easy disc swap, and non-slip handle.
3. Setup
Battery Charging
Before first use, fully charge both 12V 2000mAh lithium-ion batteries. Connect the adapter to a power outlet and then to the battery. The charging indicator on the battery or charger will show the charging status. Ensure the battery is securely seated in the charger.

Image: Illustration of the two 12V 2000mAh batteries included with the grinder.
Disc Installation
Always ensure the tool is switched off and the battery is removed before installing or changing discs.
- Press and hold the spindle lock button located on the top of the grinder.
- Place the inner flange onto the spindle.
- Position the desired cutting or grinding disc onto the spindle, ensuring it sits flush against the inner flange.
- Thread the outer flange (nut) onto the spindle.
- Use the provided wrench to tighten the outer flange securely while still holding the spindle lock button.
- Release the spindle lock button.

Image: Step-by-step guide for safely installing and securing a disc on the angle grinder using the spindle lock and wrench.
Guard Adjustment
The protective guard can be easily adjusted without tools to suit your working angle and provide optimal protection from sparks and debris. Simply rotate the guard to the desired position.

Image: Demonstrates how to easily adjust the protective guard on the angle grinder without requiring additional tools.
4. Operating Instructions
Powering On/Off
- To Turn On: Ensure a charged battery is inserted. Press the side toggle switch to the 'ON' position. The disc will begin to rotate.
- To Turn Off: Release the side toggle switch to the 'OFF' position. The disc will stop rotating.
Usage Tips
- Always wear appropriate personal protective equipment, including safety glasses, gloves, and hearing protection.
- Secure your workpiece firmly before beginning any operation.
- Allow the grinder to reach full speed before making contact with the workpiece.
- Apply light, consistent pressure. Do not force the tool, as this can lead to kickback or damage to the tool/disc.
- Move the grinder smoothly across the material for an even cut or grind.
- Monitor the battery indicator lights to ensure sufficient power during operation. Recharge when the power is low.
Applications
This cordless angle grinder is versatile and can be used for:
- Metal cutting and grinding
- Tile cutting
- Wood cutting and shaping
- Polishing various surfaces
- Grooving wall panels
- Cutting PVC pipes

Image: Examples of the angle grinder's diverse applications, including polishing, cutting marble, plastic, and wood.

Image: Demonstrations of the angle grinder's wide range of uses, such as metal grinding, tile cutting, metal cutting, and metal polishing.
5. Maintenance
Cleaning
After each use, disconnect the battery and clean the tool. Use a soft, damp cloth to wipe down the exterior. Do not use harsh chemicals or abrasive cleaners. Ensure the ventilation slots are clear of dust and debris to maintain proper heat dissipation.
Storage
Store the angle grinder and its accessories in a clean, dry place, away from direct sunlight and extreme temperatures. Keep out of reach of children. If storing for an extended period, ensure batteries are partially charged (around 50%) to prolong their lifespan.
Battery Care
- Do not expose batteries to water or extreme heat.
- Only use the charger provided by Geevorks for charging the batteries.
- Avoid fully discharging the batteries before recharging them, as this can reduce their overall lifespan.
- If a battery is damaged or no longer holds a charge, dispose of it responsibly according to local regulations.
6. Troubleshooting
This section addresses common issues you might encounter with your Geevorks Mini Angle Grinder.
| Problem | Possible Cause | Solution |
|---|---|---|
| Tool does not start | Battery not charged or improperly inserted. | Ensure battery is fully charged and correctly inserted until it clicks into place. |
| Tool stops under light pressure | Low battery charge; excessive pressure; worn disc. | Recharge battery. Reduce pressure on the tool. Replace the disc if worn. |
| Excessive vibration | Disc improperly installed or damaged; loose components. | Check disc installation and tighten securely. Inspect disc for damage and replace if necessary. Check for any loose parts. |
| Tool overheats | Blocked ventilation slots; continuous heavy use. | Clear all ventilation slots. Allow the tool to cool down during prolonged use. |
| Battery not charging | Charger or battery fault; improper connection. | Ensure charger is properly plugged in. Check battery and charger for visible damage. Try another battery if available. |
7. Specifications
Detailed technical specifications for the Geevorks Mini Angle Grinder.
| Specification | Value |
|---|---|
| Brand | Geevorks |
| Model Number | EVK0631302350327WD |
| Power Source | Battery Powered |
| Voltage | 12 Volts |
| Wattage | 24 watts |
| Maximum Rotational Speed | 19500 RPM |
| Wheel Diameter | 75 Millimeters (3 inches) |
| Material | Metal, Acrylonitrile Butadiene Styrene |
| Product Dimensions (L x W x H) | 8.54" x 4.84" x 3.35" |
| Item Weight | 1.97 pounds (894 Grams) |
| Battery Type | Lithium Ion |
| Battery Capacity | 2000mAh (per battery) |

Image: Visual representation of the angle grinder's dimensions and key specifications.
8. Warranty and Support
For warranty information and customer support, please refer to the documentation included with your purchase or contact Geevorks customer service directly. Keep your purchase receipt as proof of purchase for any warranty claims.
Geevorks is committed to providing quality tools and an optimal user experience. For technical assistance or inquiries, please reach out to the manufacturer's support channels.
Ask a question about this manual
Ask about setup, troubleshooting, compatibility, parts, safety, or missing instructions. Manuals+ will review the question and use this page’s manual context to help answer it.