1. Introduction
Thank you for choosing the FTes RFKits V70 Wireless Video Intercom System. This system provides enhanced home security and convenience, allowing you to see, hear, and speak to visitors at your door, and even remotely unlock it via a smartphone application. This manual will guide you through the installation, operation, and maintenance of your new intercom system.
Important Note on Connectivity: While the system offers wireless control via the Tuya app (connecting the indoor monitor to your home WiFi network), the connection between the outdoor camera unit and the indoor monitor unit is wired. This wired connection ensures stable power and video transmission for reliable performance.
2. Product Overview
2.1 Key Features
- 7-inch TFT LCD Screen: High-resolution display for clear visitor viewing.
- 1080P Outdoor Camera: Provides sharp video quality with a 120-degree wide viewing angle.
- Tuya App Remote Control: Manage your intercom system from anywhere using your smartphone (2.4GHz WiFi required).
- Two-Way Intercom: Communicate with visitors at your door.
- Remote Unlock: Grant access to visitors remotely via the indoor monitor or Tuya app.
- Motion Detection: Automatically detects movement and can trigger recording.
- Automatic Recording & Snapshot: Captures video or images when a visitor presses the doorbell, stored on a TF card (not included).
- Infrared Night Vision: Automatic IR LED activation for clear images in low-light conditions.
- Waterproof Outdoor Unit: Designed for outdoor use with a rain cover.
- Do Not Disturb Mode: Silence doorbell notifications when needed.
2.2 Package Contents
- Indoor Monitor Unit
- Outdoor Camera Unit
- Power Adapter for Indoor Monitor
- Mounting Screws and Brackets
- Wiring Cables
- User Manual
3. Safety Information
- Read all instructions carefully before installation and use.
- Ensure the power supply is disconnected before performing any wiring or installation.
- Do not expose the indoor monitor to moisture or extreme temperatures.
- Only use the provided power adapter.
- Keep the outdoor camera lens clean for optimal image quality.
- Consult a qualified electrician if you are unsure about any wiring procedures.
4. Setup and Installation
4.1 Component Identification

This image displays the indoor monitor and outdoor camera units with their respective dimensions. Key features are highlighted with icons, including 7-inch TFT LCD screen, 1080P resolution, intercom function, monitoring, unlock capability, 120-degree view angle, IR LEDs for night vision, day & night mode, waterproof design, and do not disturb mode.

This detailed view of the outdoor camera unit highlights its components: a rain cover for protection, a microphone, the camera lens, white light for full-color night vision, a photoresistance sensor, call buttons, and a customizable nameplate area for room numbers.

This image provides a detailed look at the indoor monitor. The front panel shows touch buttons for unlock, left select, monitor/confirm, right select, and answer/return. The rear panel indicates the TF card slot, speaker, wiring port, DC15V 1.2A power interface, and adjustment controls for color, light brightness, and intercom volume.
4.2 Mounting the Outdoor Camera
- Choose a suitable location near your door, approximately 1.5-1.6 meters (5-5.3 feet) from the ground, ensuring a clear view of visitors.
- Mount the rain cover first using screws.
- Insert the outdoor camera unit into the rain cover.
- If applicable, customize the nameplate with your room number or name.
4.3 Mounting the Indoor Monitor
- Select a convenient indoor location, such as a wall in your living room or hallway.
- Secure the mounting bracket to the wall using screws.
- Connect the necessary wires to the indoor monitor (refer to section 4.4).
- Attach the indoor monitor to the mounting bracket.
4.4 Wiring Diagram
The outdoor camera and indoor monitor are connected via a wired connection. Ensure proper wiring for stable operation.
- Connect the video and power cables from the outdoor unit to the corresponding ports on the indoor monitor.
- If connecting to an electronic lock, ensure the lock wires are properly connected to the indoor monitor's unlock output.
- Connect the DC15V 1.2A power adapter to the indoor monitor.
4.5 Tuya App Installation and Pairing

This image illustrates the Tuya mobile application interface. It shows how to install the Tuya app on Android and Apple devices and demonstrates the remote unlock function, allowing users to answer the door and unlock it from their smartphone, even when away from home.
- Download the 'Tuya Smart' app from the App Store (iOS) or Google Play Store (Android).
- Register or log in to your Tuya account.
- Ensure your indoor monitor is powered on and connected to your 2.4GHz WiFi network.
- In the Tuya app, tap '+' to add a new device. Follow the on-screen instructions to pair your indoor monitor with the app.
4.6 TF Card Installation
To enable automatic video recording and snapshots, insert a TF card (not included) into the designated slot on the indoor monitor. Ensure the card is inserted correctly.
5. Operating Instructions
5.1 Receiving Calls
- When a visitor presses the call button on the outdoor unit, the indoor monitor will ring and display the visitor's image.
- Simultaneously, you will receive a notification on your smartphone via the Tuya app.
- To answer from the indoor monitor, press the 'Answer' button.
- To answer from the Tuya app, tap the notification and accept the call.
5.2 Two-Way Communication
After answering a call, you can speak with the visitor through the built-in microphone and speaker on both the indoor monitor and the outdoor unit. The Tuya app also supports two-way audio.
5.3 Door Unlocking
If an electronic lock is connected, you can unlock the door:
- From the indoor monitor: Press the 'Unlock' button.
- From the Tuya app: Tap the 'Unlock' icon during a call or monitoring session.
5.4 Monitoring Live View
You can view the live feed from the outdoor camera at any time:
- From the indoor monitor: Press the 'Monitor' button.
- From the Tuya app: Open the app and select your intercom device to view the live feed.
5.5 Snapshot and Video Recording
With a TF card installed:
- Automatic Recording: When a visitor presses the doorbell, the system automatically records a short video.
- Manual Snapshot/Recording: During a live view or call, you can manually capture snapshots or start video recording via the indoor monitor or Tuya app.
- Recorded files can be reviewed on the indoor monitor or through the Tuya app.
5.6 Adjusting Settings
The indoor monitor allows you to adjust various settings:
- Ringtone: Select from available ringtones.
- Volume: Adjust the ringtone and intercom volume.
- Brightness/Color: Adjust the display settings of the screen.
- Do Not Disturb: Activate this mode to silence the indoor monitor's ringtone.
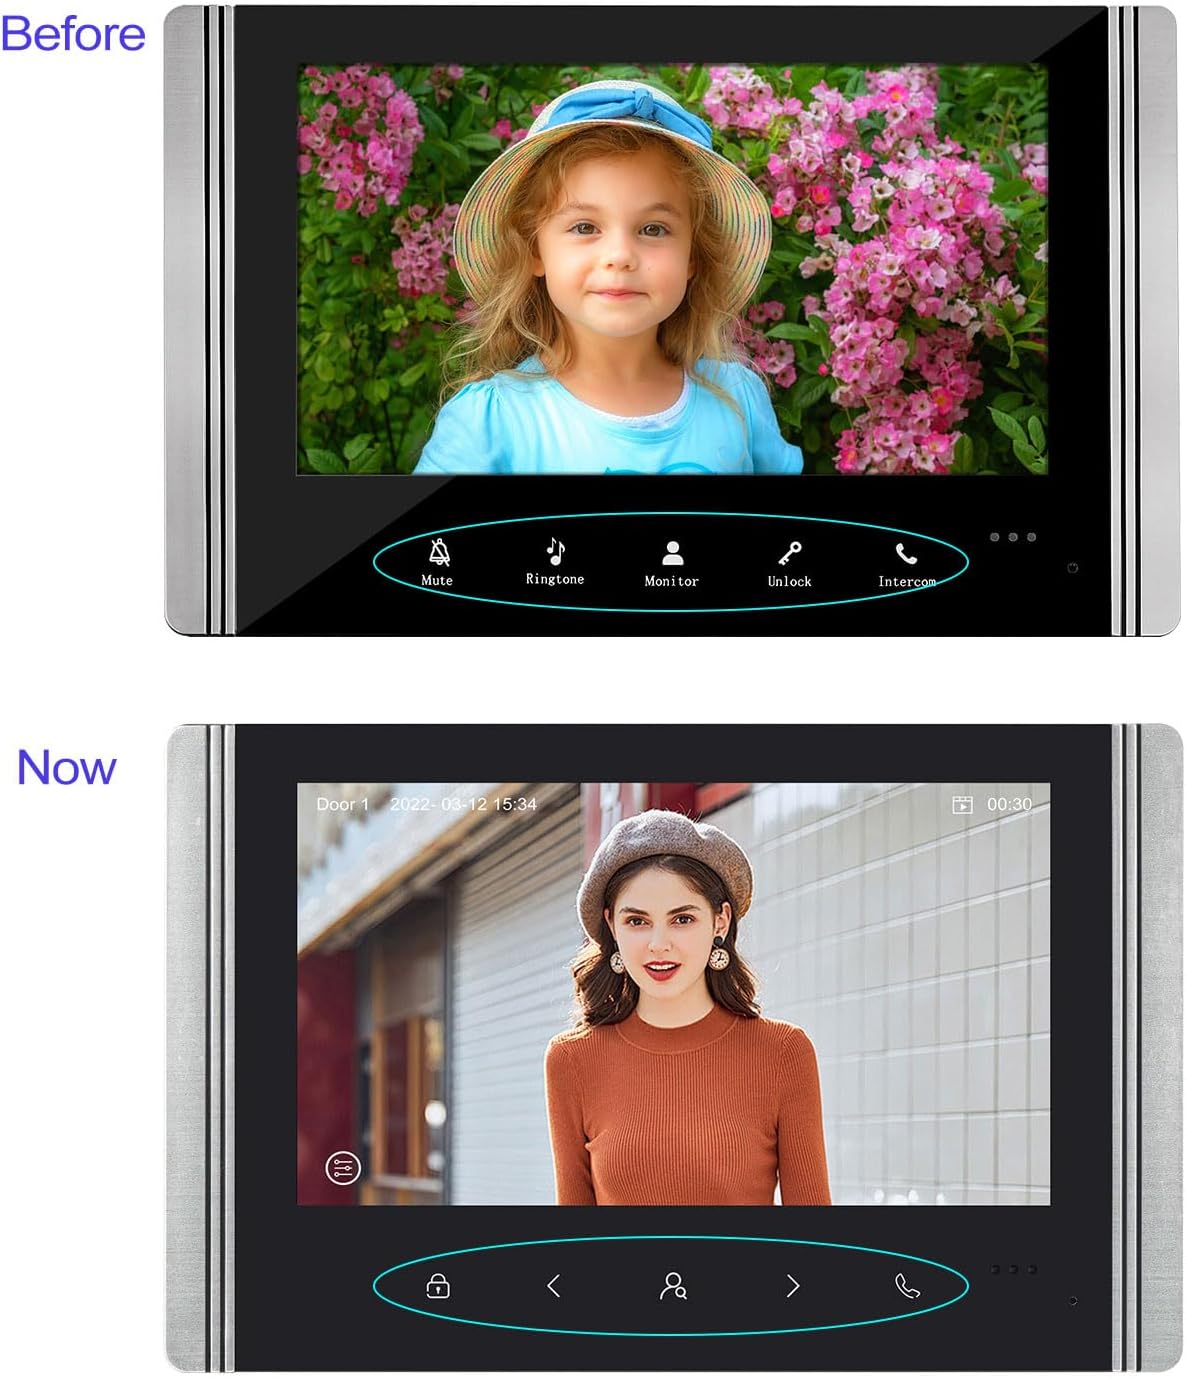
This image compares the 'Before' and 'Now' versions of the indoor monitor's user interface. The 'Before' interface shows buttons for Mute, Ringtone, Monitor, Unlock, and Intercom. The 'Now' interface features a redesigned button layout with icons for unlock, navigation, and call, along with a date and time display.
6. Maintenance
- Cleaning: Use a soft, dry cloth to clean the indoor monitor and outdoor camera. Avoid abrasive cleaners or solvents.
- Outdoor Unit: Regularly check the outdoor unit for any obstructions to the camera or microphone. Ensure the rain cover is securely in place.
- Wiring: Periodically inspect all wired connections for any signs of wear or damage.
- Firmware Updates: Check the Tuya app or manufacturer's website for any available firmware updates to ensure optimal performance and security.
7. Troubleshooting
| Problem | Possible Cause | Solution |
|---|---|---|
| No image on indoor monitor | Loose wiring connection; Power issue; Camera malfunction | Check all wired connections between outdoor and indoor units. Ensure power adapter is correctly plugged in. Contact support if issue persists. |
| No sound during intercom | Volume too low; Microphone/speaker obstruction; Wiring issue | Adjust volume settings on the indoor monitor. Check for obstructions on outdoor unit's microphone/speaker. Verify audio wiring. |
| Cannot connect to Tuya app | Incorrect WiFi password; 5GHz WiFi network; Indoor monitor not in pairing mode; App issues | Ensure you are using a 2.4GHz WiFi network. Double-check WiFi password. Restart indoor monitor and try pairing again. Reinstall Tuya app if necessary. |
| Door unlock not working | Electronic lock not connected; Wiring issue; Lock malfunction | Verify the electronic lock is properly connected to the indoor monitor. Check wiring for the unlock function. Test the electronic lock independently. |
| Poor night vision | IR LEDs obstructed; Lens dirty | Clean the outdoor camera lens. Ensure no objects are blocking the IR LEDs. |
8. Specifications
| Feature | Detail |
|---|---|
| Brand | FTes RFKits |
| Model Number | V70 |
| Indoor Monitor Screen | 7-inch TFT LCD (New versions: 1024 x 600 pixels) |
| Outdoor Camera Resolution | 1080P (New versions: 2.0 Megapixels) |
| Camera Viewing Angle | 120 degrees |
| Night Vision | Infrared LED with light sensor |
| Connectivity (Monitor to App) | 2.4GHz WiFi |
| Connectivity (Monitor to Camera) | Wired |
| Storage | TF Card (not included) |
| Compatible Devices | Smartphone (via Tuya App) |
| Power Supply | DC15V 1.2A (for indoor monitor) |
| Item Weight | 1.2 Kilograms |
| Product Dimensions | 20 x 11 x 37 cm |
| Batteries Required | No |
Note: As of July 10, 2025, new versions of the indoor unit may feature a redesigned button and a resolution of 1024 x 600 pixels. Outdoor units in new versions may feature 2.0-megapixel cameras. Other functions remain unchanged.
9. Warranty and Support
For warranty information and technical support, please refer to the product packaging or contact your retailer. You may also visit the official FTes RFKits website for further assistance and updated information.