Introduction
This manual provides essential information for the safe and effective operation, maintenance, and cleaning of your Ykall 700W HVLP Power Paint Sprayer. Please read all instructions carefully before initial use to ensure optimal performance and product longevity.
Product Overview
The Ykall 700W HVLP Power Paint Sprayer is designed for various painting projects, offering a powerful and efficient spraying experience. It features an 800ml detachable container, multiple copper nozzles, and adjustable spray patterns for versatile application.

Included Components:
- 1 x Paint Sprayer Main Unit
- 1 x 800ml Container
- 4 x Copper Nozzles (1.0mm, 1.3mm, 1.8mm, 2.5mm)
- 1 x Labor Protection Glove
- 1 x Cleaning Needle
- 1 x Cleaning Brush
- 1 x Viscosity Cup
- 1 x User Manual
Setup
1. Assembly
- Ensure the power cord is unplugged before assembly.
- Align the spray attachment with the main unit, ensuring the grooves match. Insert the spray attachment into the main housing and twist clockwise until it locks securely into place.
- Attach the 800ml container to the bottom of the spray attachment by screwing it on tightly.
2. Paint Preparation and Viscosity Test
Proper paint viscosity is crucial for optimal spraying results and to prevent clogging. Always test the paint's viscosity using the provided viscosity cup.
- Fill the viscosity cup with the paint.
- Measure the time it takes for the paint to completely drain from the cup.
- For water-based paints, the runout time should be between 20-45 seconds. For solvent-based paints, it should be 45-60 seconds.
- If the paint drains too slowly, dilute it with the appropriate thinner (water for water-based paints, or paint thinner for solvent-based paints) and stir thoroughly. Re-test until the desired viscosity is achieved.
3. Nozzle Selection
The sprayer includes four copper nozzles of different sizes (1.0mm, 1.3mm, 1.8mm, 2.5mm) for various applications. Copper nozzles offer enhanced durability compared to plastic.
- Smaller Nozzles (1.0mm, 1.3mm): Ideal for thinner paints, stains, sealers, and varnishes, providing a finer, smoother finish.
- Larger Nozzles (1.8mm, 2.5mm): Suitable for thicker paints, latex, and chalk paint, offering faster coverage.
To change a nozzle, unscrew the union nut, remove the current nozzle, place the desired nozzle, and re-secure the union nut. Ensure a new O-ring is in place to prevent leaks.

4. Initial Setup and Paint Filling
- Once paint is prepared, pour it into the 800ml container.
- Securely attach the container to the sprayer.
Video 1: This video demonstrates the assembly of the Ykall paint sprayer, preparation of paint by testing viscosity, and filling the container. It also shows how to adjust spray patterns and flow control.
Operating Instructions
1. Adjusting Spray Patterns
The sprayer offers three adjustable spray patterns: vertical, horizontal, and circular. To change the pattern, rotate the air cap to align with the desired pattern.
- Vertical: For horizontal surfaces.
- Horizontal: For vertical surfaces (e.g., fences).
- Circular: For small areas or detailed work.
2. Flow Control
Adjust the paint flow rate using the flow control knob located near the trigger. Turning the knob clockwise increases flow, while counter-clockwise decreases it. This allows for precise control and avoids paint waste.
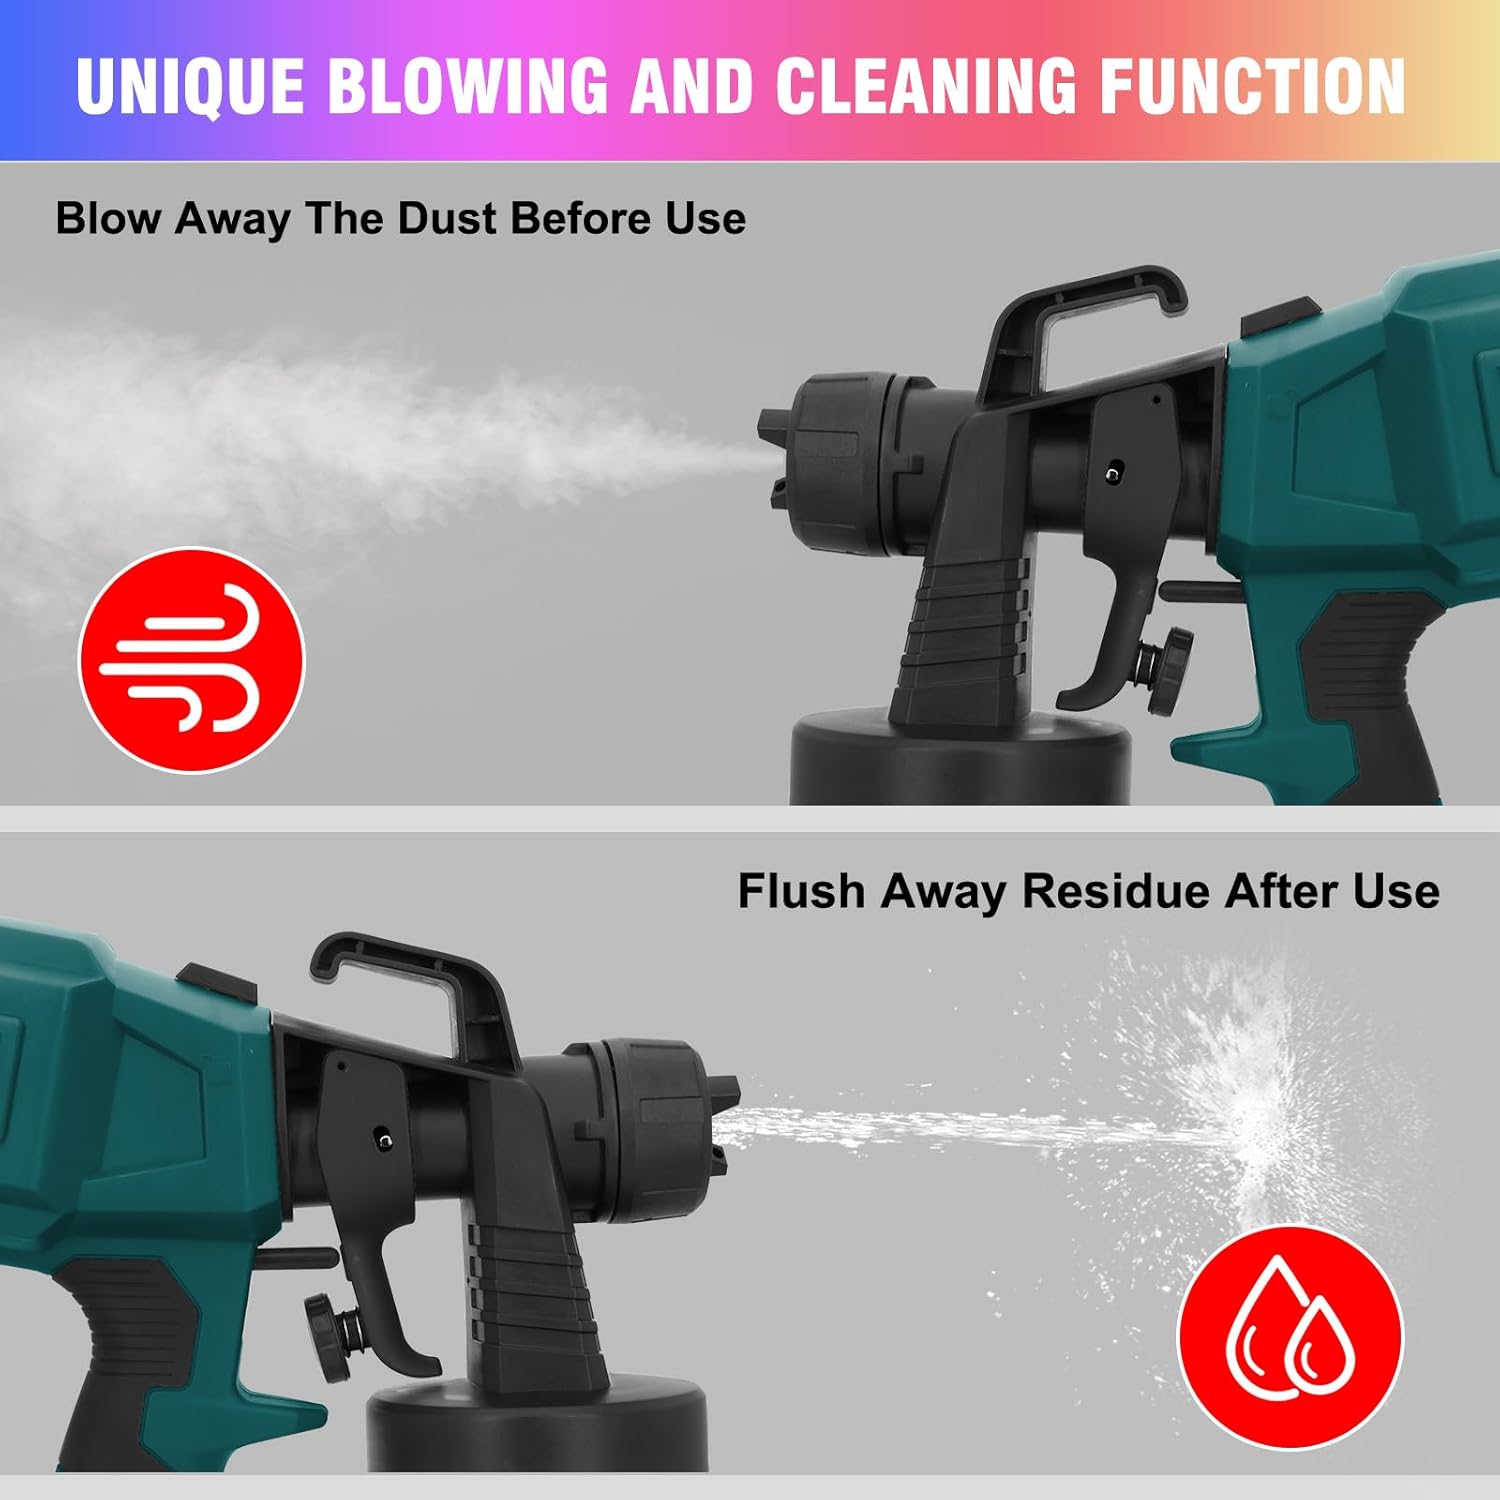
3. Pre-Spray Dust Removal (Blowing Function)
This unique feature allows you to use the sprayer to blow away dust from the surface before painting. Simply remove the container and activate the sprayer to utilize its blowing function.

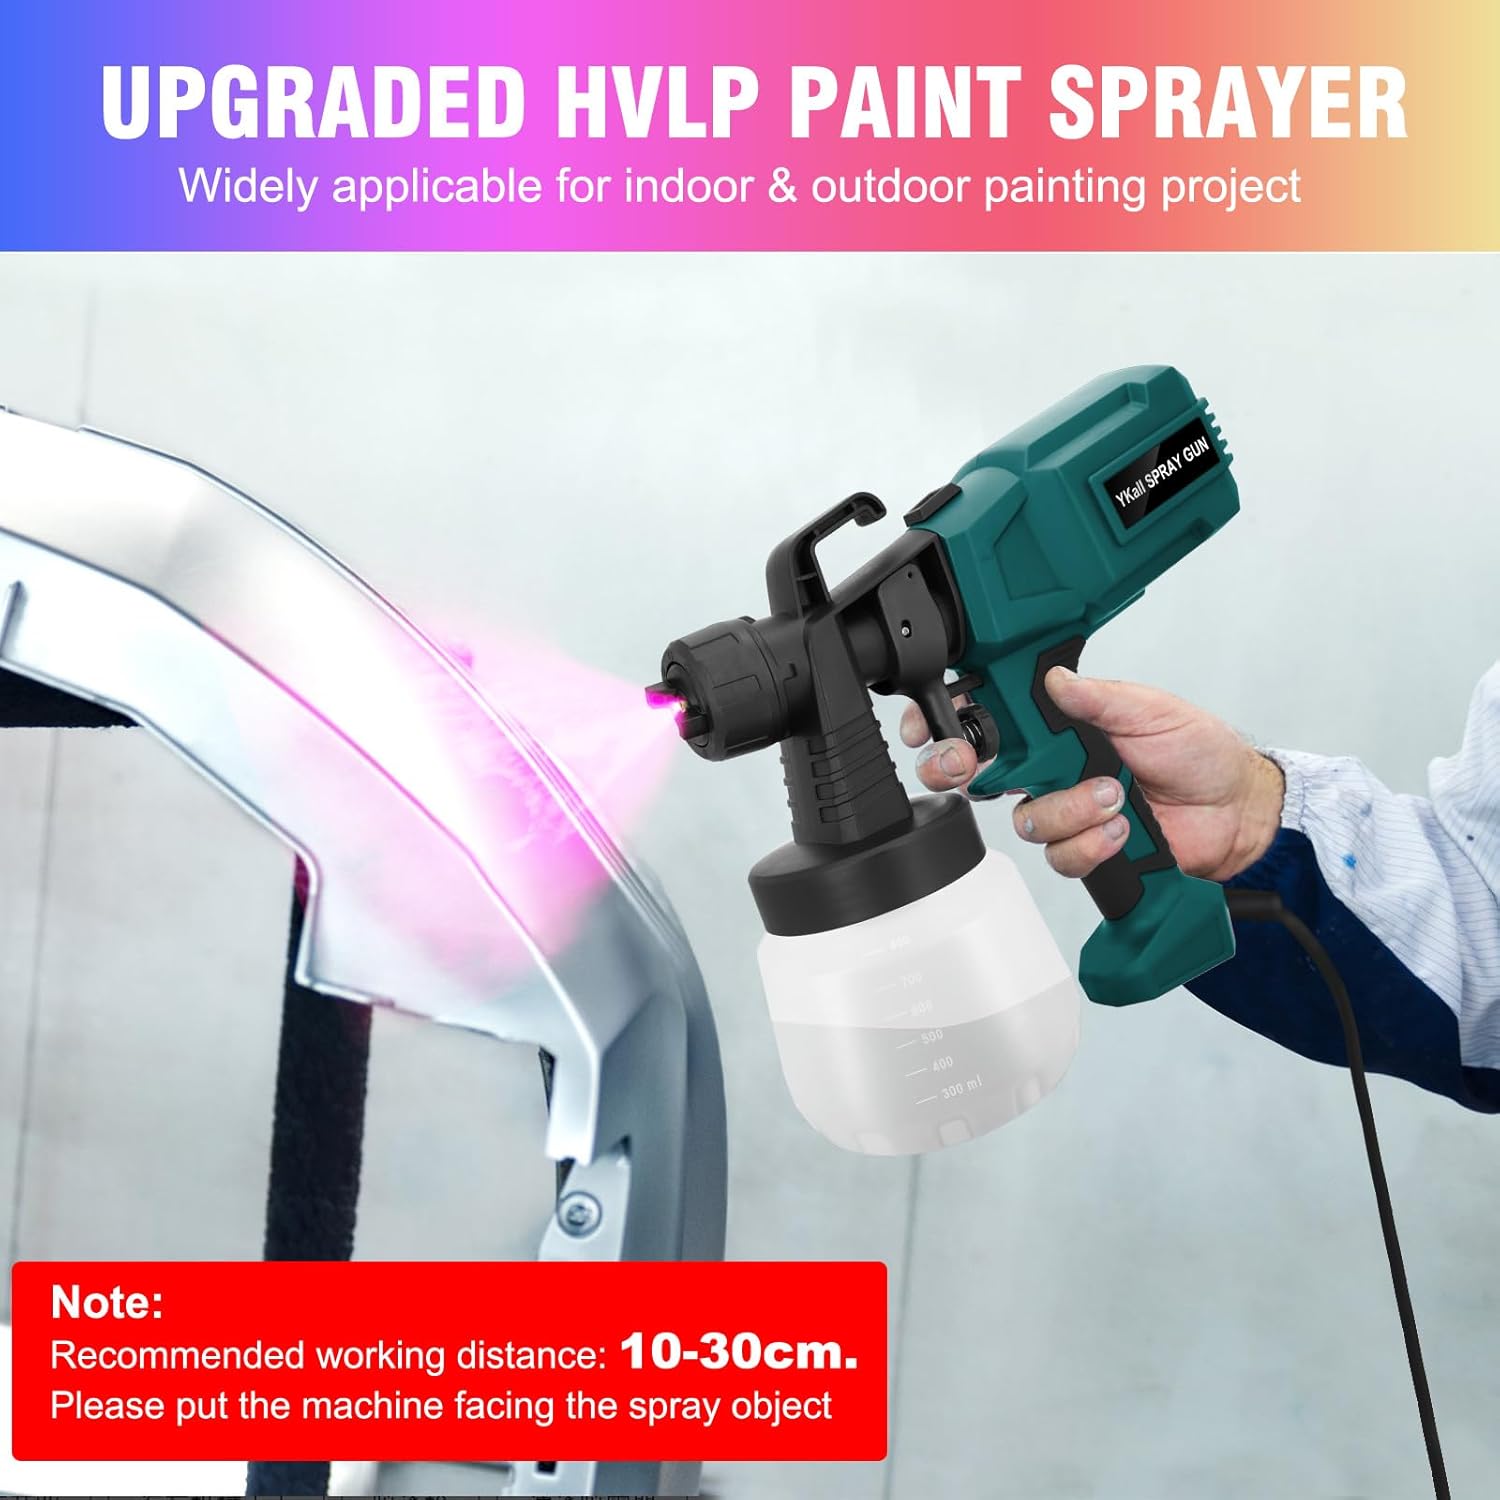
4. Spraying Technique
Maintain a recommended working distance of 10-30cm (4-12 inches) from the target object for an even and smooth finish. Keep the machine facing the spray object and use consistent, even motions.
Video 2: This video demonstrates the Ykall paint sprayer in action, showcasing its spraying capabilities on various surfaces.
Maintenance and Cleaning
Thorough cleaning after each use is essential to maintain the sprayer's performance and prevent paint from hardening and clogging the nozzles. Clean immediately after spraying.
1. Disassembly for Cleaning
- Unplug the power cord.
- Press the release button and twist the spray attachment counter-clockwise to detach it from the main unit.
- Unscrew the paint container.
- Unscrew the union nut and remove the air cap and nozzle.
2. Cleaning Process
- Empty any remaining paint from the container.
- For water-based paints, fill the container with clean water and spray it through the gun until the water runs clear. For solvent-based paints, use the appropriate cleaning solvent.
- Use the provided cleaning brush and needle to thoroughly clean all disassembled parts, especially the nozzle and air cap, to remove any paint residue.
- Wipe down the exterior of the sprayer with a damp cloth.
- Ensure all parts are completely dry before reassembling and storing the sprayer.

Video 3: This video demonstrates the cleaning process for the Ykall paint sprayer, including flushing with water and disassembling components for thorough cleaning.
Troubleshooting
- No Spray or Weak Spray:
- Check if the power cord is securely plugged in.
- Ensure the paint container is properly attached and contains enough paint.
- Verify that the nozzle and air cap are clean and free of clogs. Use the cleaning needle if necessary.
- Confirm paint viscosity is within the recommended range. Adjust thinning if needed.
- Uneven Spray Pattern:
- Check for blockages in the nozzle or air cap.
- Ensure the air cap is correctly aligned for the desired spray pattern.
- Adjust the flow control knob for an even output.
- Paint Leaking:
- Ensure all parts, especially the container and union nut, are tightly secured.
- Check the O-ring for damage or improper placement. Replace if necessary.
Specifications
| Feature | Detail |
|---|---|
| Brand | Ykall |
| Model Name | YQ |
| Power | 700W |
| Container Volume | 800ml |
| Nozzle Sizes | 1.0mm, 1.3mm, 1.8mm, 2.5mm (Copper) |
| Spray Patterns | Vertical, Horizontal, Circular |
| Max Viscosity | 130DIN-s |
| Power Source | DC (Corded) |
| Cord Length | 6.5ft (2m) |
| Item Weight | 2.75 pounds |
| Product Dimensions | 11"W x 10"H |
Warranty and Support
For any questions or concerns regarding your Ykall Paint Sprayer, please contact our customer support team through your order platform. Our technical and after-sales teams are available to provide assistance and will respond within 18 hours.