Introduction
The Kiddieware Ear and Forehead Baby Thermometer is designed for accurate and rapid temperature measurement for individuals of all ages, from infants to adults. This device offers both ear and forehead measurement modes, along with an object temperature function, providing versatility for various needs. Its user-friendly design includes a clear display, silent mode, and memory storage for tracking temperature trends.

Image: The Kiddieware Ear and Forehead Baby Thermometer shown with its packaging, highlighting its dual measurement capabilities.
Safety Information
- This thermometer is intended for household use only. Consult a physician for medical advice.
- Do not attempt to disassemble or repair the device.
- Keep the thermometer out of reach of children and pets.
- Avoid direct sunlight and extreme temperatures.
- Ensure the probe lens is clean before each use to maintain accuracy.
- Do not use the thermometer if the probe or device is damaged.
Package Contents
Verify that all items are present in the package:
- Kiddieware Ear and Forehead Thermometer
- Storage Pouch
- User Manual (this document)
- Quick Start Guide
- 2 x AAA Batteries
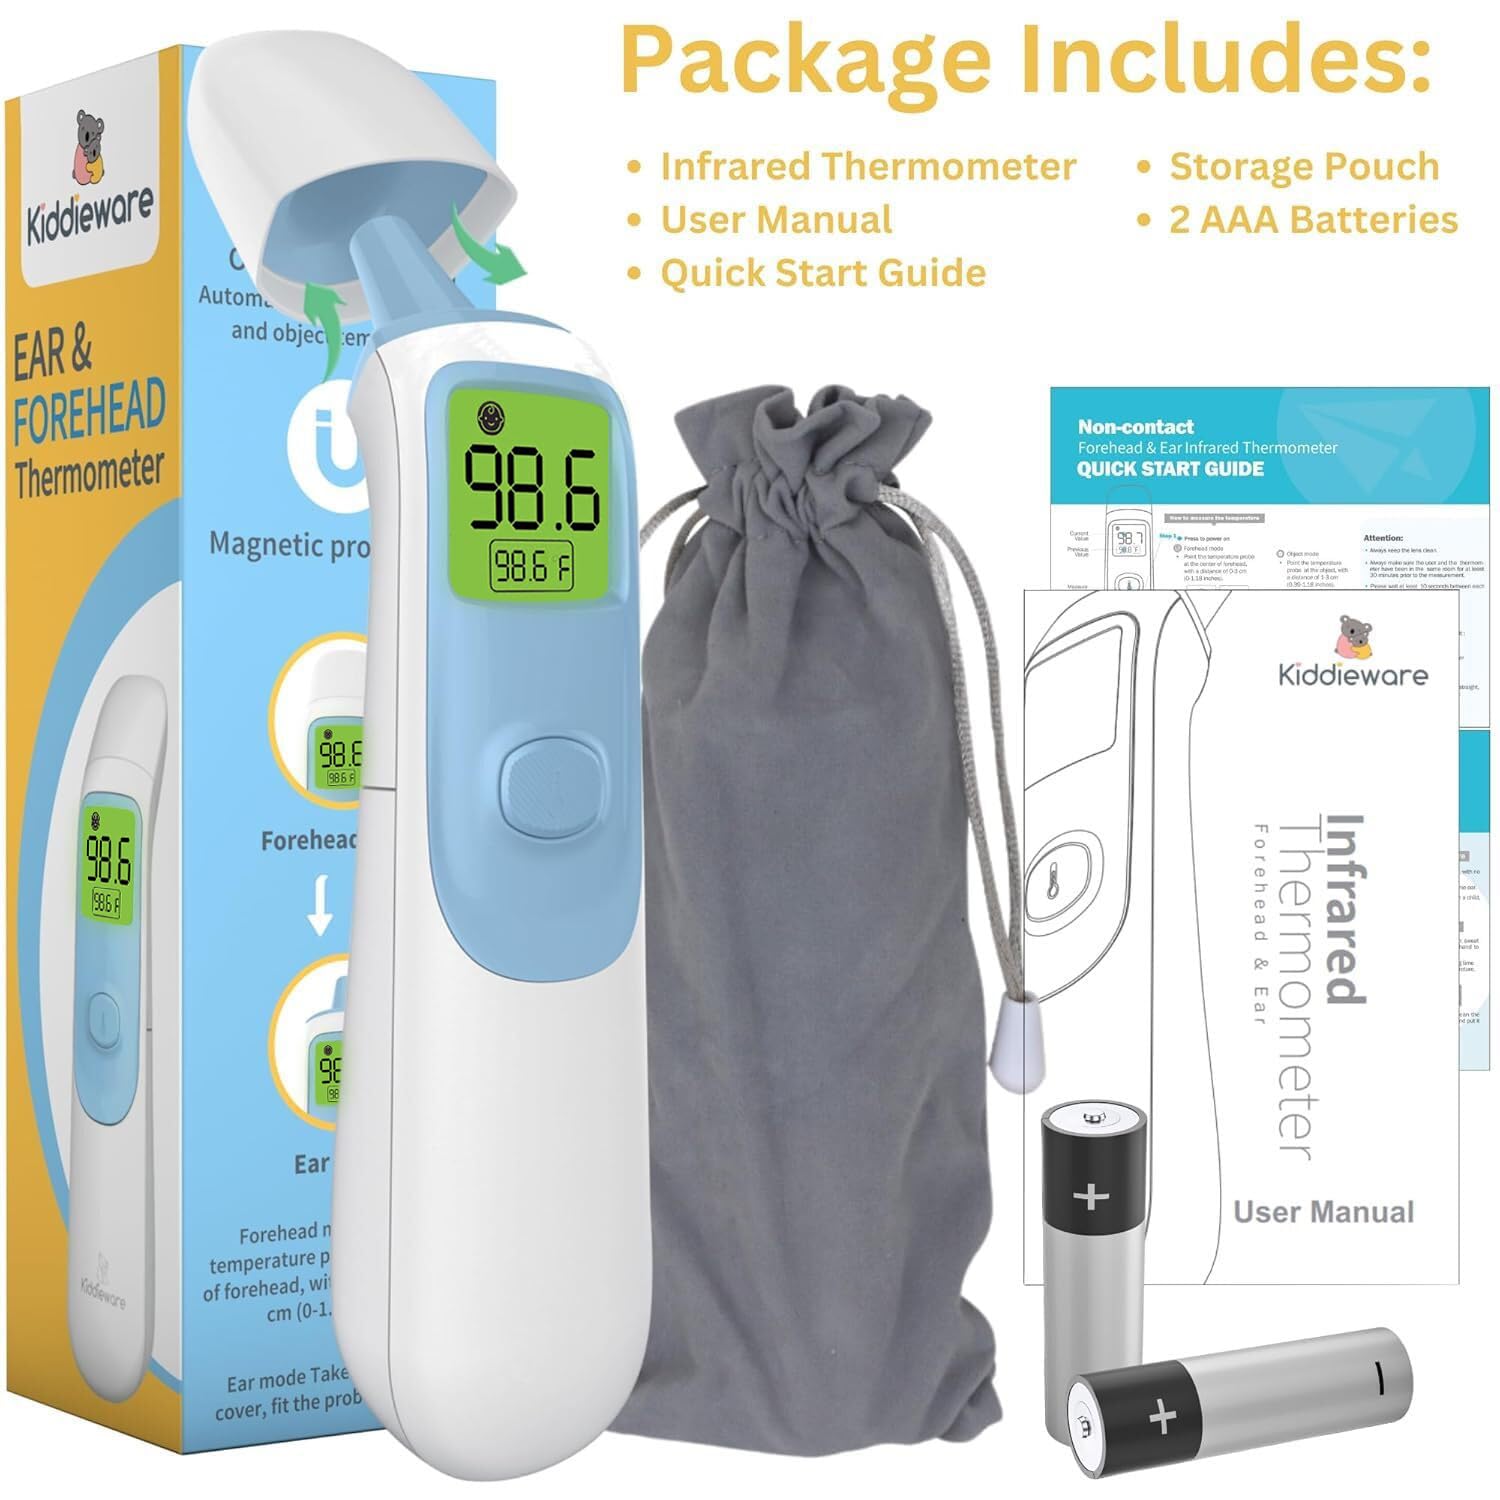
Image: The complete package contents, including the thermometer, storage pouch, user manual, quick start guide, and two AAA batteries.
Product Features
- Dual Measurement Modes: Easily switch between ear and forehead temperature readings.
- Instant Read: Provides accurate results in approximately 1 second.
- Memory Storage: Stores up to 20 previous temperature readings for tracking.
- Fever Indicator: Large backlit display changes color (Green, Yellow, Red) to indicate temperature status.
- Silent Mode: Allows temperature measurement without beeps, ideal for sleeping individuals.
- Object Temperature Mode: Capable of measuring the temperature of surfaces or liquids, such as baby bottles.
- Unit Switching: Easily toggle between Fahrenheit (°F) and Celsius (°C).
- Automatic Shut-off: Conserves battery life by turning off after a period of inactivity.
- Ergonomic Design: Comfortable grip for easy handling.
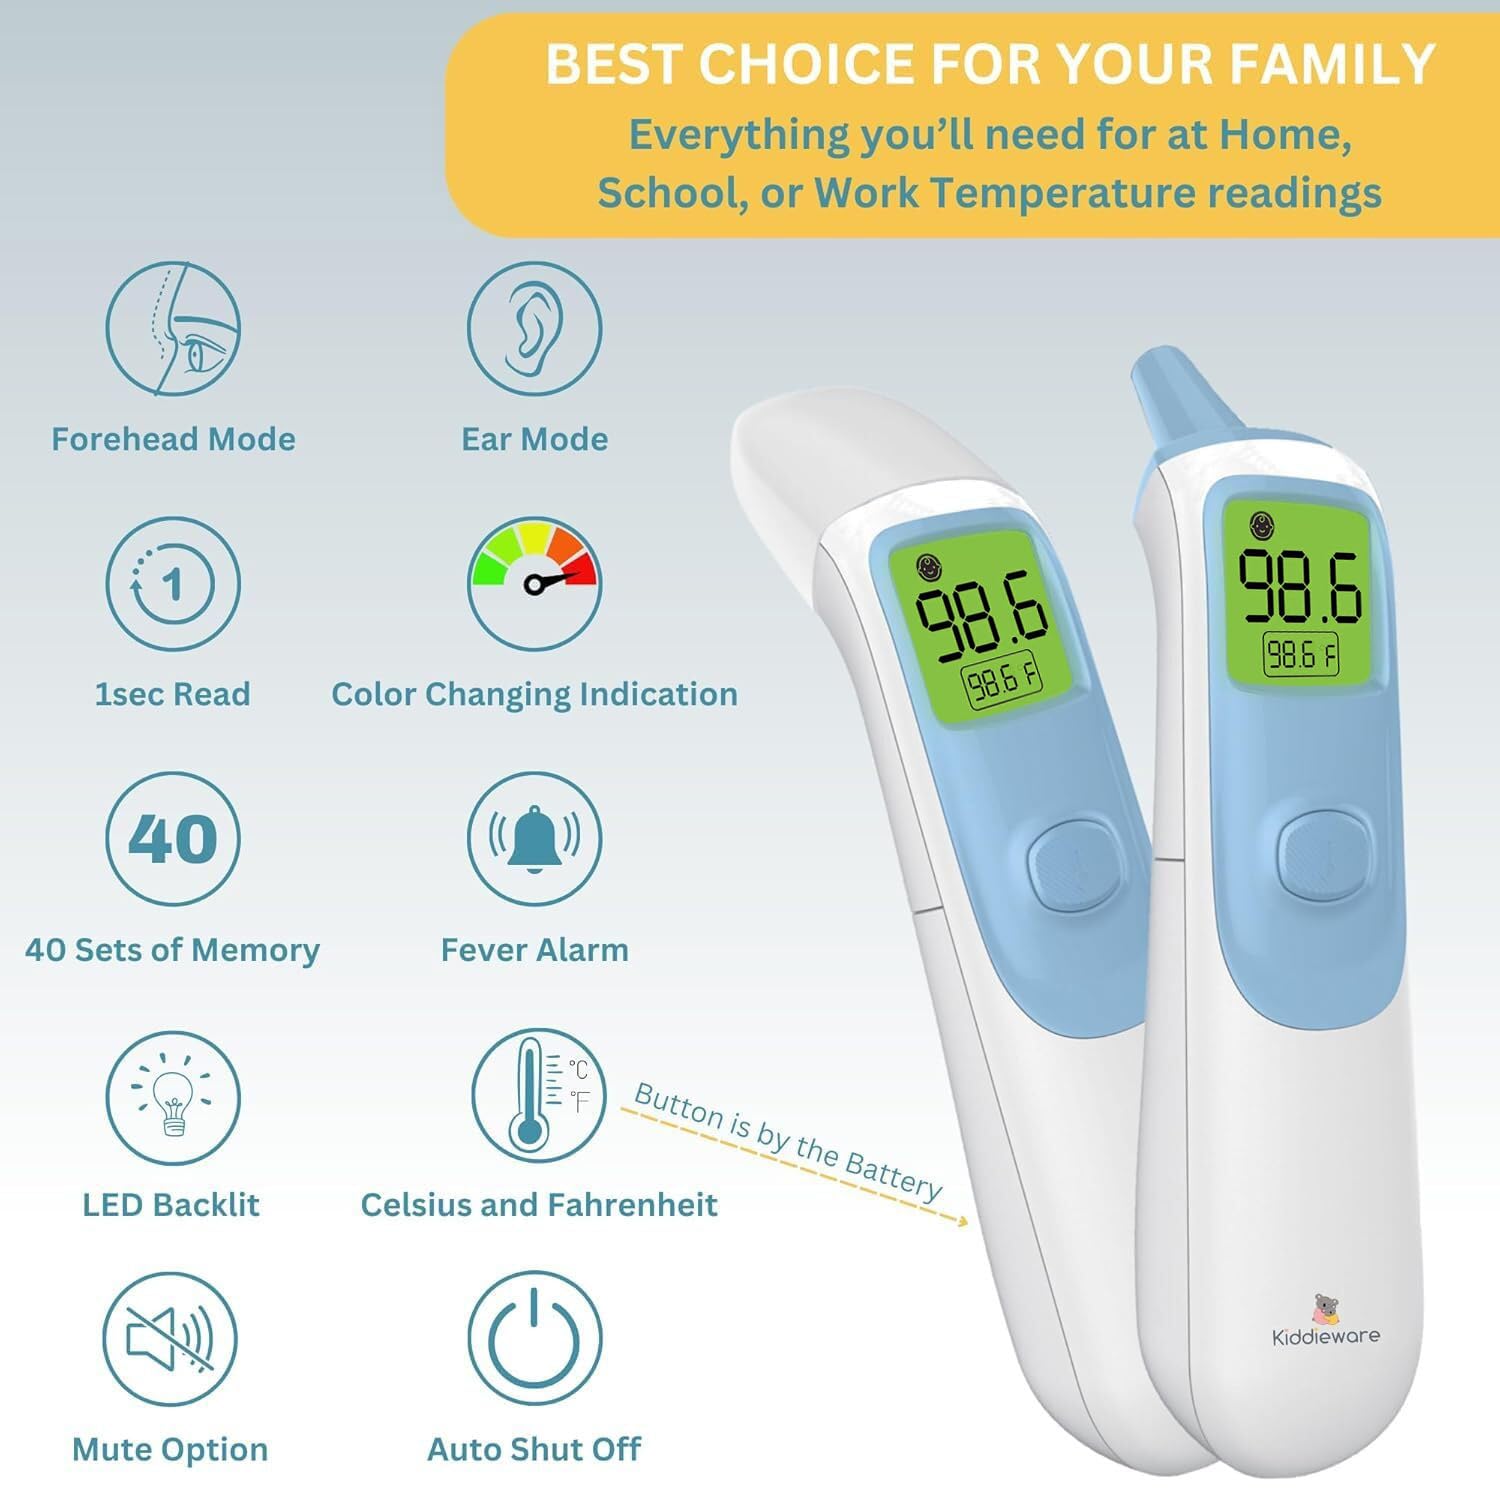
Image: An illustration detailing the various features of the thermometer, such as its dual modes, quick reading, and display options.
Setup
Battery Installation
- Locate the battery compartment cover on the back of the thermometer.
- Slide the cover open.
- Insert the two AAA batteries, ensuring correct polarity (+ and -).
- Close the battery compartment cover securely.
The thermometer will emit a short beep and the display will briefly show all segments before entering standby mode.
Operating Instructions
1. Forehead Measurement Mode
- Ensure the probe cover is attached.
- Press the power button once to turn on the thermometer.
- Point the thermometer at the center of the forehead, maintaining a distance of 0 to 1.18 inches (0-3 cm).
- Press the measurement button. The reading will appear on the display in approximately 1 second.

Image: Visual guide for taking temperature readings using both the ear and forehead modes.
2. Ear Measurement Mode
- Gently remove the magnetic probe cover.
- Press the power button once to turn on the thermometer.
- Carefully insert the probe into the ear canal.
- Press the measurement button. The reading will appear on the display in approximately 1 second.
Note: Ear temperature is generally considered more accurate for infants and young children. Ensure the ear canal is clear of obstructions.
3. Object Temperature Mode
- Ensure the probe cover is attached.
- Press the power button once to turn on the thermometer.
- Point the thermometer at the object or liquid you wish to measure, maintaining a distance of 0 to 1.18 inches (0-3 cm).
- Press the measurement button. The reading will appear on the display.

Image: The thermometer being used to measure the temperature of a baby bottle, demonstrating its object temperature function.
4. Switching Temperature Units (°F/°C)
With the thermometer turned off, press and hold the measurement button for approximately 3-5 seconds until the unit changes on the display. Release the button, and the new unit will be set.
5. Silent Mode
To activate or deactivate silent mode, press and hold the power button for approximately 3-5 seconds while the thermometer is on. A speaker icon will appear or disappear on the display to indicate the mode change.

Image: The thermometer's display indicating the mute mode, LED backlight, and fever alarm features.
6. Memory Recall
When the thermometer is off, briefly press the measurement button to view the last 20 readings. Each press will cycle through the stored temperatures.
7. Fever Indicator (Color-Coded Display)
- Green: Normal temperature (e.g., 32°C to < 37.5°C / 89.6°F to < 99.5°F)
- Orange: Slight fever (e.g., 37.6°C to 38.0°C / 99.7°F to 100.4°F)
- Red: High fever (e.g., > 38.0°C / > 100.4°F)
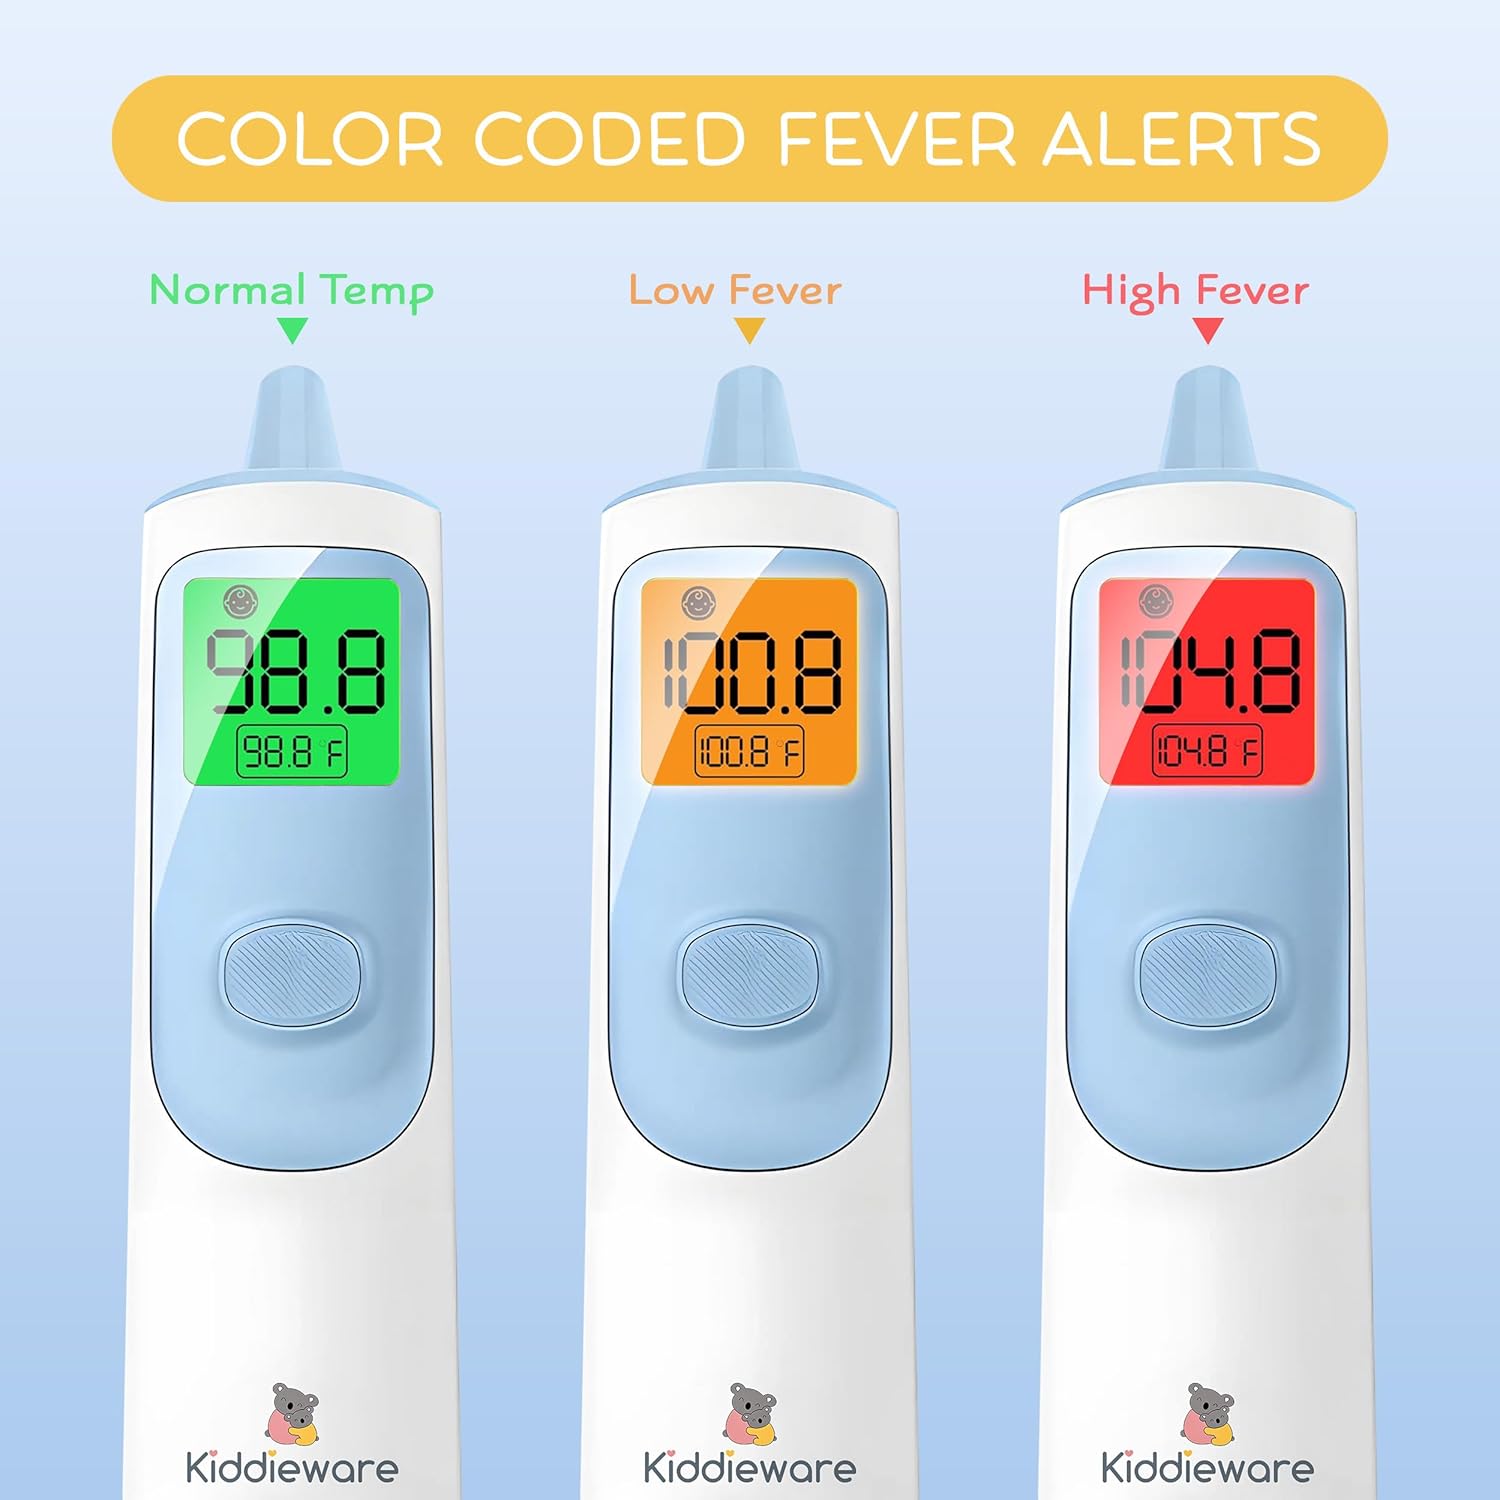
Image: The thermometer's display showing color changes (green, orange, red) to indicate different temperature ranges, from normal to high fever.
Maintenance
Cleaning
- Wipe the thermometer body with a soft, damp cloth.
- For the probe lens, use a cotton swab lightly moistened with alcohol. Allow it to dry completely before use.
- Do not immerse the thermometer in water or any cleaning solutions.
- Avoid abrasive cleaners or harsh chemicals.
Storage
- Store the thermometer in its protective storage pouch when not in use.
- Keep in a cool, dry place, away from direct sunlight and extreme temperatures.
- Remove batteries if the device will not be used for an extended period to prevent leakage.
Troubleshooting
| Problem | Possible Cause | Solution |
|---|---|---|
| No display/Device won't turn on | Dead or incorrectly installed batteries. | Replace batteries with new AAA batteries, ensuring correct polarity. |
| Inaccurate readings | Dirty probe lens, incorrect measurement technique, or device not acclimatized. | Clean the probe lens. Ensure proper distance for forehead mode or correct insertion for ear mode. Allow thermometer to sit in the measurement environment for 30 minutes. |
| "LO" or "HI" displayed | Temperature is outside the measurable range. | Ensure the measurement is taken within the specified operating temperature range. |
| Error message (e.g., "Err") | Device malfunction or environmental conditions. | Turn off the thermometer, wait a few minutes, and restart. If the error persists, contact customer support. |
Specifications
| Feature | Detail |
|---|---|
| Model Name | Kiddieware Ear and Forehead Baby Thermometer |
| Measurement Modes | Forehead, Ear, Object |
| Measurement Time | Approximately 1 second |
| Memory Storage | Up to 20 readings |
| Display Type | Digital, Backlit with Color-Coded Fever Indicator |
| Temperature Units | Celsius (°C) / Fahrenheit (°F) |
| Power Source | 2 x AAA Batteries |
| Outer Material | Plastic |
| Special Feature | Fast Reading System |
| Specification Met | FDA |
| Product Care Instructions | Wipe Clean |
| Package Dimensions | 6.73 x 1.89 x 1.85 inches |
| Weight | 4.16 ounces (without batteries) |
Warranty and Support
For warranty information or technical support, please refer to the contact details provided on the product packaging or visit the official Kiddieware website. Keep your purchase receipt as proof of purchase.