1. Product Overview
This manual provides essential information for the safe and efficient use of your GEARZAAR Portable Level 2 EV Charger. Please read these instructions carefully before operation and retain them for future reference.
Key Features:
- Universal Compatibility: Designed to meet SAE J1772 standards, compatible with most electric vehicles and plug-in hybrid vehicles.
- Adjustable Charging: Offers selectable charging currents of 8A, 10A, 13A, and 16A for flexible charging speeds.
- Time Delay Function: Allows scheduling of charging start times to utilize off-peak electricity rates.
- Extended Cable Length: Features a 20-foot (6-meter) charging cable for convenient reach.
- Durable and Safe: Constructed with robust materials and includes multiple safety protections, suitable for various weather conditions.
- Portable Design: Comes with a carrying bag for easy transport and storage.
2. Setup Instructions
2.1 Package Contents
Verify that all items are present in the package:
- GEARZAAR EV Charger (Control Box with J1772 Connector and Power Plug)
- NEMA 5-15 to NEMA 6-20 Adapter Cable
- User Manual
- Carrying Bag

Image 2.1: Package contents and dimensions of the EV charger components.
2.2 Compatibility
The GEARZAAR EV Charger is designed to be compatible with electric vehicles and plug-in hybrid vehicles that adhere to the SAE J1772 (Type 1) standard. This includes a wide range of popular EV models.

Image 2.2: Compatibility with various electric vehicle brands using the SAE J1772 standard.
2.3 Power Connection
The charger supports both 120V (Level 1) and 240V (Level 2) power sources. Use the appropriate adapter for your wall outlet.
- For 120V (Level 1) Charging: Connect the charger's NEMA 5-15 plug directly to a standard 120V household outlet.
- For 240V (Level 2) Charging: Use the provided NEMA 5-15 to NEMA 6-20 adapter cable. Connect the charger's NEMA 5-15 plug to the adapter, then plug the NEMA 6-20 end into a dedicated 240V NEMA 6-20 outlet.

Image 2.3: Power connection options for 120V and 240V outlets.
2.4 Vehicle Connection
- Ensure your vehicle is parked and turned off.
- Open the charging port cover on your electric vehicle.
- Firmly insert the SAE J1772 connector into your vehicle's charging port until it clicks into place.
- Confirm that the charger's display indicates a connection and charging status.

Image 2.4: Connecting the charger to the vehicle's charging port.
3. Operating Instructions
3.1 Adjusting Charging Current
The charger allows you to select the charging current (8A, 10A, 13A, or 16A) to suit your needs and available power supply. This can be adjusted via the control box display.
- With the charger connected to power but not yet to the vehicle (or before charging starts), press the 'A' button on the control box.
- Each press will cycle through the available current options (8A, 10A, 13A, 16A).
- Select your desired current. The display will show the chosen amperage.
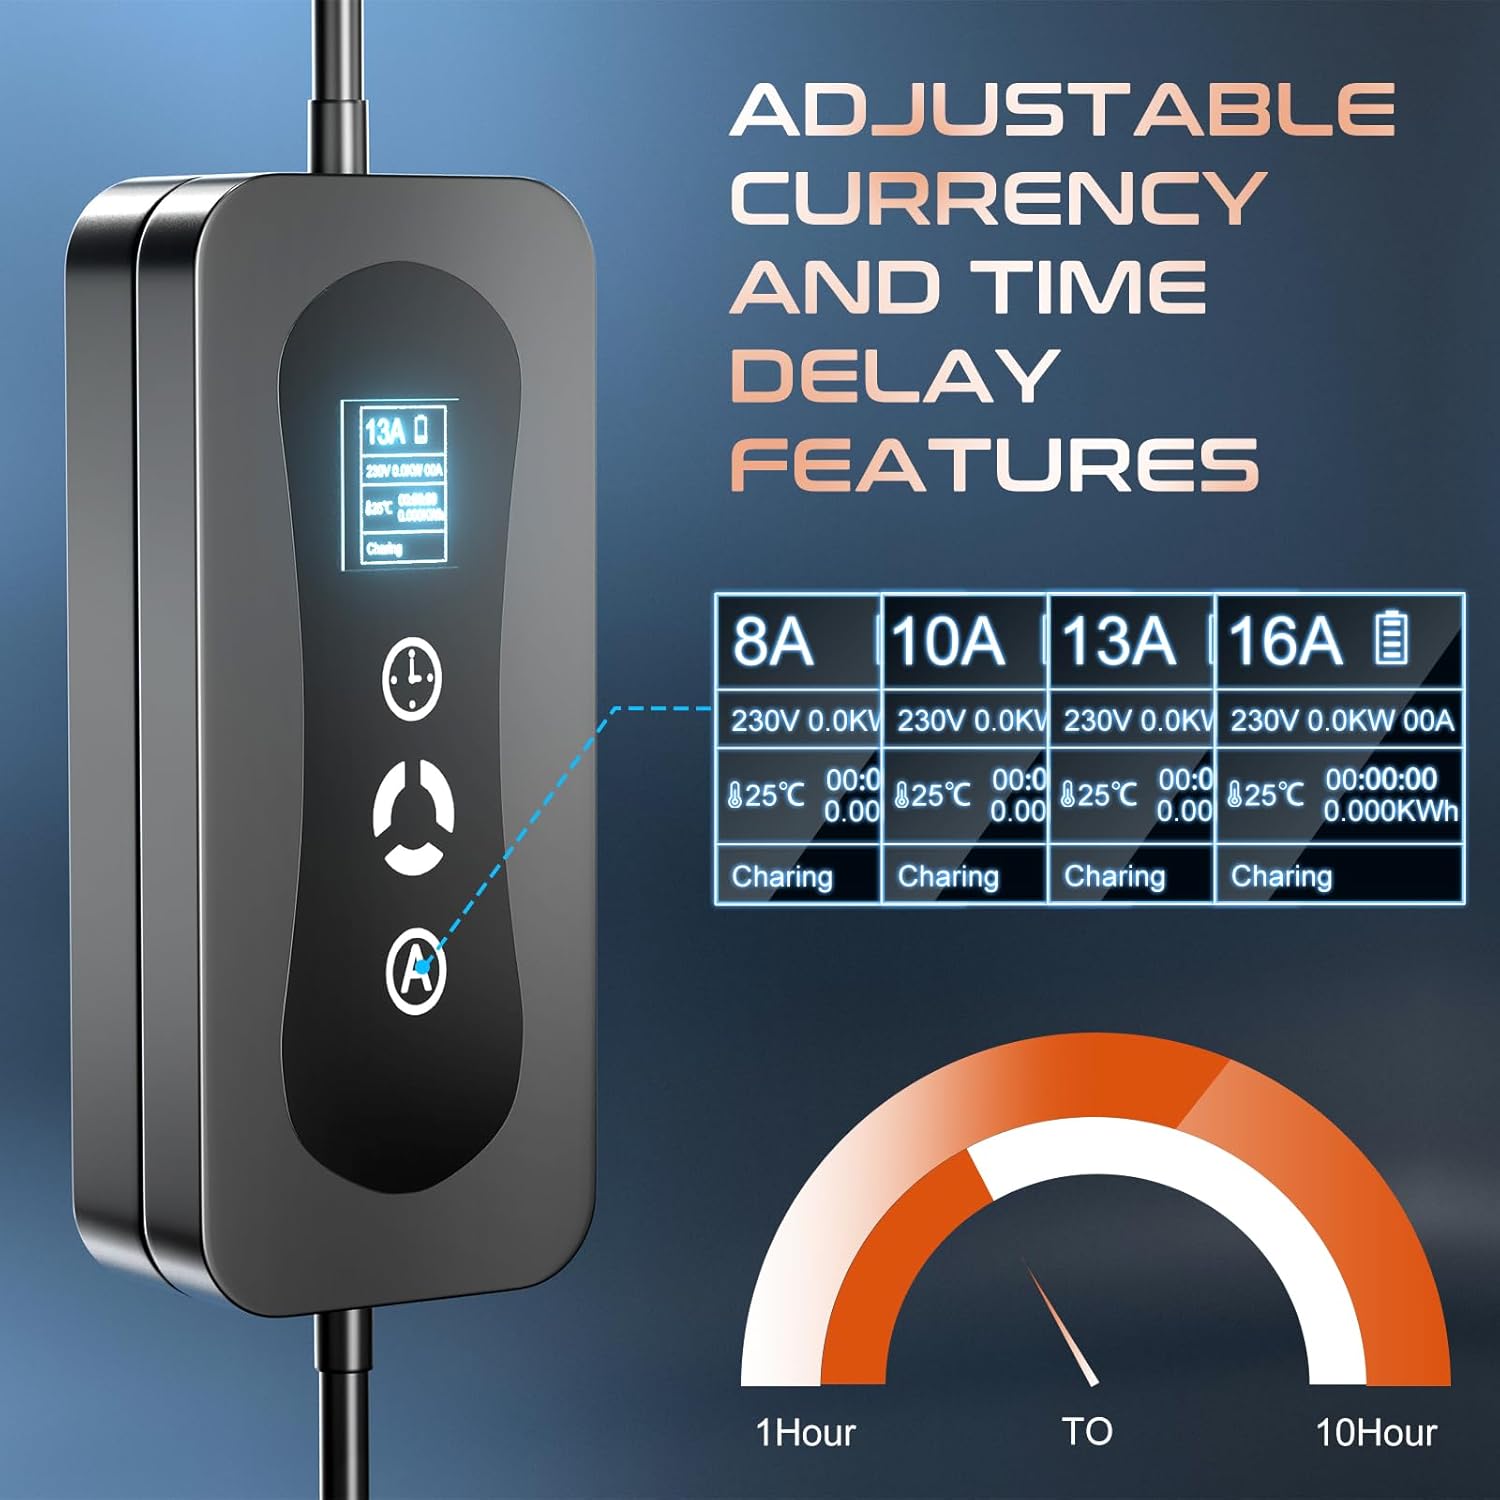
Image 3.1: Control box display showing adjustable current settings.

Image 3.2: Detailed view of the charger display indicating current selection.
3.2 Time Delay Feature
The time delay function allows you to schedule the charging start time, which can be beneficial for taking advantage of lower electricity rates during off-peak hours.
- With the charger connected to power and the vehicle, press the clock icon button on the control box.
- Each press will increase the delay time. The display will show the set delay.
- Charging will begin automatically after the set delay period.
3.3 Charging Process
- After connecting the charger to power and your vehicle, and setting the desired current and any time delay, the charging process will initiate.
- The control box display will show real-time charging status, including current, voltage, power, and charging duration.
- Once charging is complete, or if you need to stop charging, disconnect the J1772 connector from your vehicle first, then unplug the charger from the power outlet.
4. Maintenance
4.1 General Care
- Keep the charger clean and free from dust and debris. Use a soft, dry cloth for cleaning. Do not use harsh chemicals or abrasive cleaners.
- Ensure the charging cable is not kinked, twisted, or run over by vehicles. Inspect the cable and connectors regularly for any signs of damage.
- Store the charger in its provided carrying bag when not in use to protect it from environmental elements and physical damage.

Image 4.1: The included carrying bag for convenient storage and transportation.
4.2 Safety Protections
The charger is equipped with multiple safety features to ensure reliable operation:
- Over-Current Protection
- Over-Voltage Protection
- Over-Heating Protection
- Over-Discharge Protection
- Overload Protection
- Leakage Protection
- Lightning Protection
- All-Weather Resistance

Image 4.2: Overview of the charger's integrated safety protection features.
5. Troubleshooting
5.1 Common Issues
- Charger Not Activating:
- Ensure the charger is securely plugged into a functional power outlet.
- Verify that the J1772 connector is fully inserted into the vehicle's charging port.
- Check the vehicle's charging settings to ensure it is ready to accept a charge.
- "Ungrounded" Error Message:
- This error typically indicates an issue with the grounding of the electrical outlet.
- Ensure the outlet you are using is properly grounded according to local electrical codes.
- If using a 240V outlet, confirm it was professionally installed and meets all safety standards.
- Test the charger with a different, known-good grounded outlet if possible. If the error persists, consult a qualified electrician.
- Slow Charging:
- Check the selected charging current on the control box display. Ensure it is set to the desired amperage (e.g., 16A for faster charging).
- Verify that the power source (120V vs. 240V) is appropriate for your charging needs. 240V provides significantly faster charging.
- Display Not Working:
- Ensure the charger is receiving power from the wall outlet.
- If the display remains blank, try unplugging and re-plugging the charger.
For issues not covered here, please contact customer support.
6. Product Specifications
| Brand | GEARZAAR |
| Model Number | F-CPAMZ00029 |
| Connector Type | SAE J1772 (Type 1) |
| Input Voltage | 100V-240V AC |
| Amperage | Adjustable: 8A, 10A, 13A, 16A |
| Cable Length | 20 feet (approx. 6 meters) |
| Special Features | Charging Indicator, Fast Charging, Travel, Waterproof |
| Compatible Devices | Electric Cars and Plug-in Hybrid Vehicles (SAE J1772 standard) |
| Item Weight | 6.49 pounds |
| Package Dimensions | 16.1 x 15.7 x 4.6 inches |
7. Warranty Information
GEARZAAR products are manufactured to high-quality standards. For specific warranty terms and conditions, please refer to the warranty card included with your product or contact GEARZAAR customer support. The warranty typically covers defects in materials and workmanship under normal use.
8. Customer Support
If you have any questions, require technical assistance, or encounter issues with your GEARZAAR EV Charger, please contact our customer support team. We aim to provide solutions within 24 hours.
Contact Information:
- Refer to your product packaging or the official GEARZAAR website for the most current contact details.