Introduction
This manual provides detailed instructions for the setup, operation, and maintenance of your SENXINGYAN Kids Digital Alarm Clock. Designed to assist children with time management and daily routines, this clock features a vibrant 7-inch LED display, customizable alarm settings, and a sleep training function. Please read this manual thoroughly to ensure proper use and to maximize the benefits of your new device.
Important Safety Information
- Ensure the device is placed on a stable, flat surface to prevent accidental falls.
- Keep the device away from water or excessive moisture.
- Do not expose the device to extreme temperatures or direct sunlight for prolonged periods.
- Use only the provided power adapter. Using unauthorized adapters may damage the device or pose a safety risk.
- Keep out of reach of very young children to prevent entanglement with cords.
Package Contents
- SENXINGYAN Kids Digital Alarm Clock (SDC-K701)
- Power Adapter
- User Manual
Product Overview
The SENXINGYAN Kids Digital Alarm Clock features a clear 7-inch LED display and intuitive controls for easy operation. Below is an overview of the device's main components and their functions.

Figure 1: Front View of the Digital Alarm Clock. This image displays the clock's 7-inch LED screen showing "MONDAY MORNING 7:30 25 DECEMBER 2023" in vibrant, child-friendly fonts. The pink frame of the clock is visible.
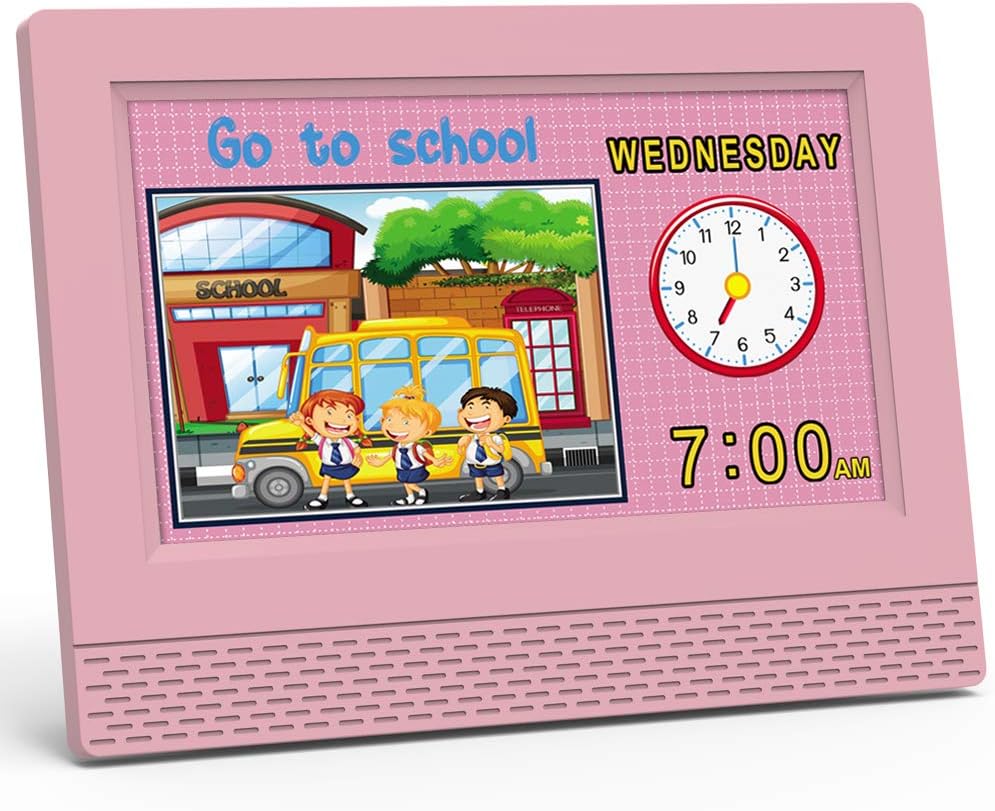
Figure 2: Side View with Dimensions. This image illustrates the physical dimensions of the clock, highlighting its 7.5-inch width and 5.5-inch height, with a depth of 3.3 inches at the base. The screen shows "MONDAY MORNING 7:30 25 DECEMBER 2023".

Figure 3: Rear View and Control Panel. The back of the clock features a control panel with directional buttons (up, down, left, right), an OK button, a power button, and a menu button. The power input port is also visible.
Control Buttons:
- Power Button (⏻): Turns the device on/off.
- Directional Buttons (▲ ▼ ◄ ►): Navigate through menu options and adjust values.
- OK Button: Confirms selections or switches display modes (long press).
- Menu Button: Accesses the main settings menu.
Setup
- Power Connection: Connect the provided power adapter to the DC 5V input port on the back of the clock and plug it into a standard electrical outlet. The clock will power on automatically.
- Initial Time and Date Setting:
- Press the Menu button to enter the settings interface.
- Use the directional buttons to navigate to "Time Set" and "Date Set".
- Press OK to select, then use directional buttons to adjust the hour, minute, year, month, and day. Press OK to confirm each setting.
- Language Selection: From the settings menu, navigate to "Language Set" and use the directional buttons to choose between English, French, or Dutch. Press OK to confirm.
- Brightness Adjustment (Auto Dimming):
- In the settings menu, select "Auto Dimming".
- Choose "Auto" for automatic brightness adjustment based on ambient light, or manually select "Low", "Mid", or "High" (or specific percentage if available) using the directional buttons. Press OK to confirm.

Figure 4: Auto Dimming Feature. This image demonstrates the clock's auto-dimming capability, which adjusts screen brightness to ensure undisturbed sleep. The clock displays "MONDAY EVENING 22:30" in a dimly lit room.
Video 1: Kids Digital Alarm Clock Usage Settings. This video, provided by the seller, demonstrates how to navigate the settings menu and adjust various clock parameters, including time, date, and alarm settings.
Operating Instructions
1. Setting Alarms (Normal and Scene Alarms)
The clock supports 5 normal daily alarms and 12 specific scene alarms to help establish routines.
- Press the Menu button.
- Navigate to "Daily Reminder Set" or "Alarm Set" (depending on the menu structure).
- Select an alarm slot (e.g., Alarm1, Alarm2, or a specific scene reminder).
- Set the desired time using the directional buttons and OK.
- Choose the alarm mode: "Once" (sounds once) or "Repeat" (sounds daily or on selected days).
- For scene alarms, the clock will display a cartoon image and play a specific voice broadcast related to the activity (e.g., "Go to school", "Brush teeth").

Figure 5: Daily Reminder Interface. This image shows a grid of 17 different daily reminder interfaces, each with a specific time (e.g., 7:00, 6:00, 7:30) and a corresponding cartoon image depicting an activity like "Eat dinner", "Homework time", "Brush your teeth", "Go to school", or "Sleeping".
Video 2: Kids Digital Alarm Clock Usage Settings. This video, provided by the seller, demonstrates how to navigate the settings menu and adjust various clock parameters, including time, date, and alarm settings, specifically highlighting the daily reminder interface.
2. Switching Time Display Modes
The clock can display time in both digital and analog formats.
- From the main time display, long-press the OK button to toggle between digital-only and digital-plus-analog clock displays.

Figure 6: Digital and Analog Display Modes. This image shows the clock displaying time in two modes: a digital-only format (12H) and a combined digital and analog format (24H), illustrating the flexibility in time presentation.
3. Adjusting Volume
The alarm and voice broadcast volume can be adjusted.
- In the settings menu, navigate to "Volume Set".
- Use the directional buttons to increase or decrease the volume level (e.g., from 0 to 100). Press OK to confirm.
4. Daylight Saving Time
The clock supports Daylight Saving Time adjustments.
- In the settings menu, navigate to "Daylight Saving Time".
- Select "On" or "Off" as required. Press OK to confirm.
5. Background Settings
Customize the background color of the display.
- In the settings menu, navigate to "Background setting".
- Choose your preferred background color (e.g., Pink, Blue, Yellow, Green). Press OK to confirm.

Figure 7: Multiple Color Options. This image showcases the digital alarm clock in various frame colors (pink, yellow, green, blue), demonstrating the customizable aesthetic options available.
Maintenance
- Cleaning: Gently wipe the screen and body of the clock with a soft, dry cloth. Do not use abrasive cleaners or solvents.
- Storage: If storing the device for an extended period, unplug it from the power source and keep it in a cool, dry place.
Troubleshooting
| Problem | Possible Solution |
|---|---|
| Clock does not power on. | Ensure the power adapter is securely connected to both the clock and a working electrical outlet. |
| Alarm does not sound. | Check alarm settings to ensure it is enabled and the volume is not set to zero. Verify the correct time and day settings for the alarm. |
| Display is too bright/dim. | Adjust the "Auto Dimming" setting in the menu. If set to "Auto", ensure the ambient light sensor is not obstructed. |
| Time/Date is incorrect. | Re-enter the correct time and date settings via the "Time Set" and "Date Set" options in the menu. Check Daylight Saving Time settings if applicable. |
Specifications
| Feature | Detail |
|---|---|
| Brand | SENXINGYAN |
| Model Number | SDC-K701 |
| Display Type | Digital LED |
| Screen Size | 7 inches |
| Product Dimensions | 7.5"W x 5.5"H |
| Power Source | Corded Electric (5V-1000mA) |
| Special Features | Adjustable Volume, Auto Dimmable, Calendar Display, Large Display, Multilingual, Sleep Trainer, Situational Alarms |
| Number of Alarms | 5 Normal Alarms, 12 Scene Alarms (Total 17) |
| Frame Material | Acrylonitrile Butadiene Styrene |
| Item Weight | 10.6 ounces (300 Grams) |
Warranty and Support
For warranty information, technical support, or customer service inquiries, please refer to the contact details provided on the product packaging or visit the official SENXINGYAN website. Keep your purchase receipt for warranty claims.