Introduction
This manual provides detailed instructions for the assembly, operation, and maintenance of your VISULAPEX 120 Inch Projection Screen with Stand. Designed for versatility, this 4K HD 16:9 foldable screen offers a 160° viewing angle and is suitable for various environments, including home cinema, office presentations, and outdoor events. Please read these instructions carefully before use to ensure proper setup and optimal performance.
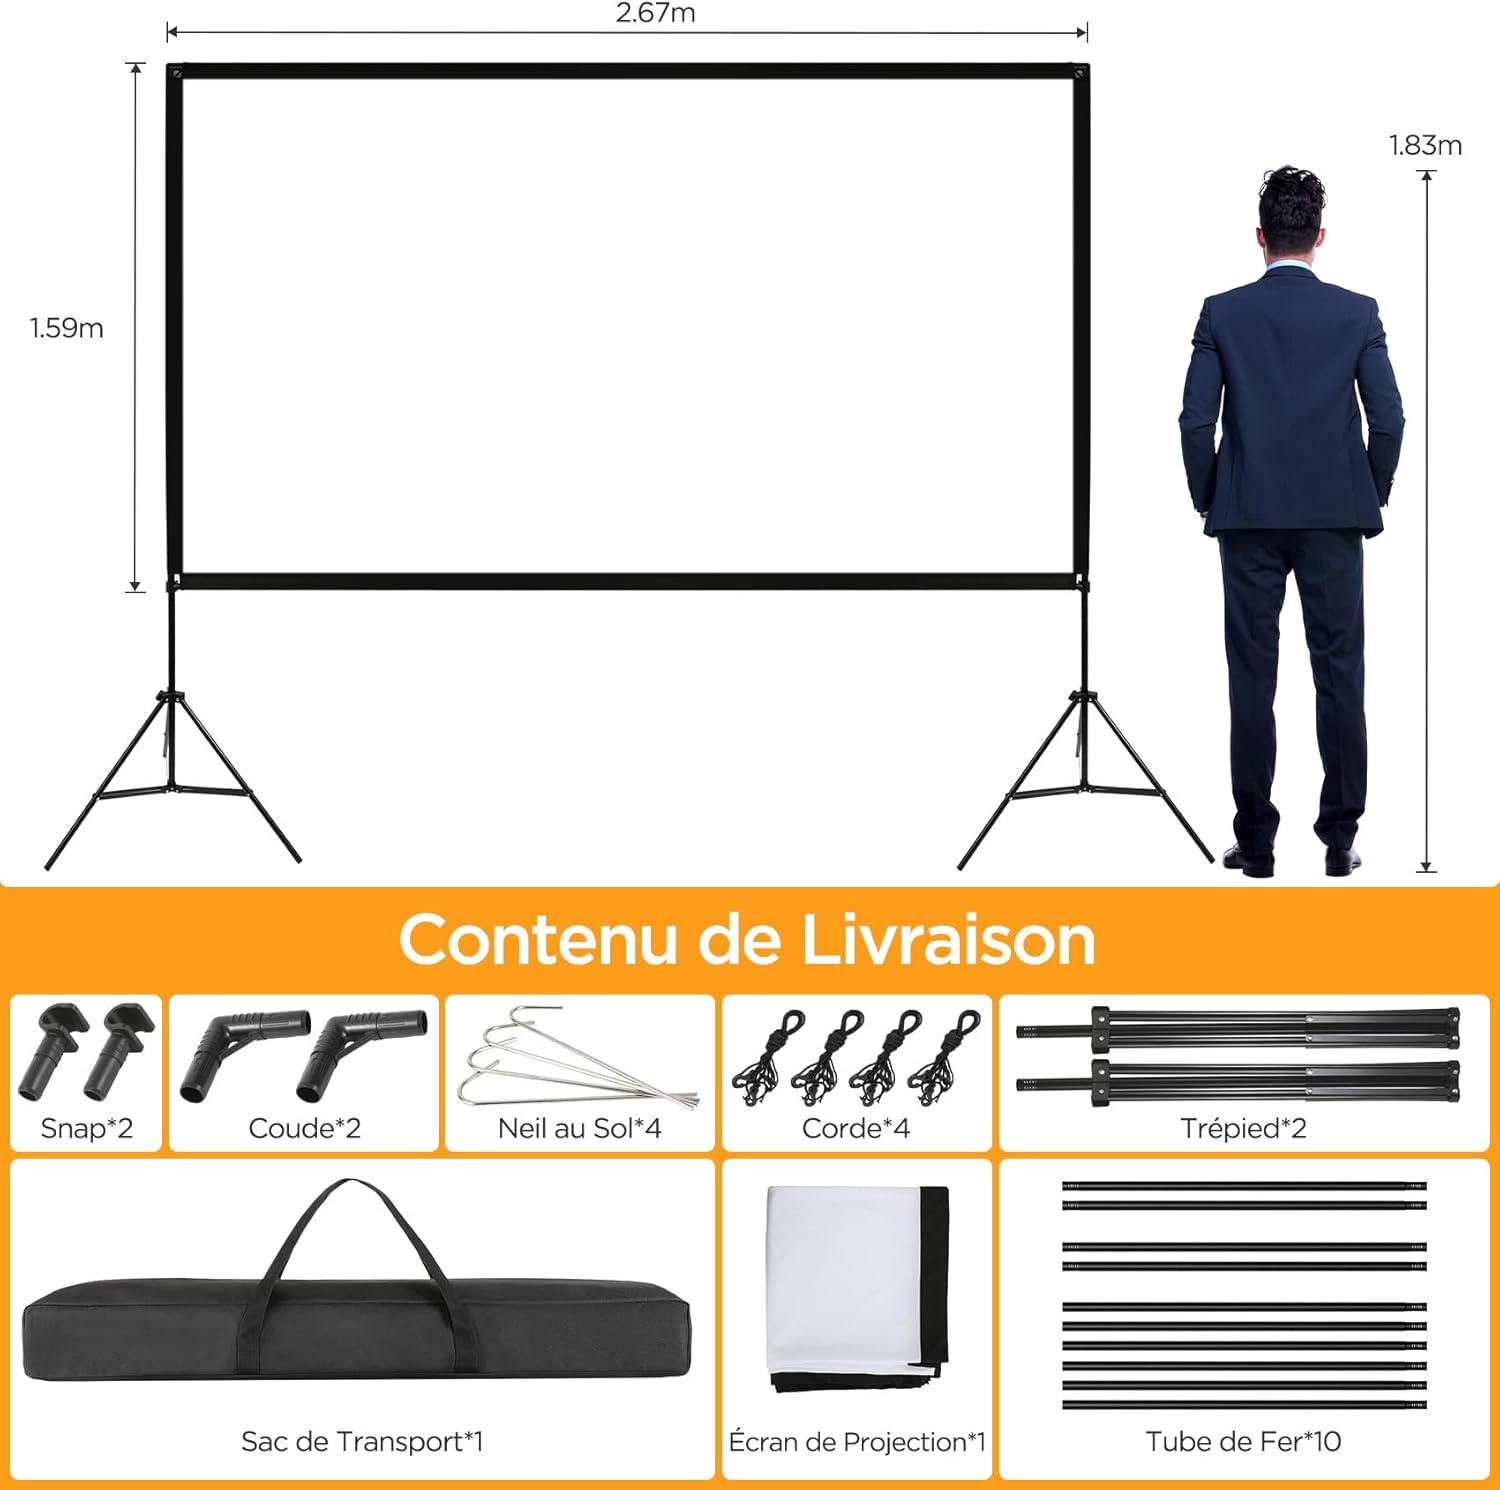
Package Contents
Verify that all components listed below are included in your package. If any parts are missing or damaged, please contact customer support.
- 1x Projection Screen (120 inches, 16:9 aspect ratio)
- 2x Tripod Stands
- 10x Iron Tubes (for frame assembly)
- 2x Elbow Connectors
- 2x Snap Connectors
- 4x Ground Nails
- 4x Ropes
- 1x Portable Carry Bag
Setup Instructions
Follow these steps to assemble your projection screen. It is recommended to have two people for easier assembly.
Step 1: Assemble the Frame
Connect the iron tubes to form the rectangular frame. Ensure all connections are secure. The tubes are designed to fit together easily.

Step 2: Set Up the Tripod Stands
Extend the legs of both tripod stands to the desired height and tighten the screws to secure them. Ensure the tripods are stable on a flat surface.

Step 3: Attach the Screen to the Frame and Tripods
Insert the assembled frame into the sleeves of the projection screen. Then, attach the screen frame to the top of the two tripod stands, securing them with the provided screws or connectors.

Step 4: Secure the Screen (Optional, for outdoor use)
For outdoor use or in windy conditions, use the ground nails and ropes to further stabilize the screen. Attach the ropes to the frame and secure them to the ground with the nails.

The screen also features Velcro fasteners along the edges to ensure a taut, wrinkle-free display surface.

Operating Instructions
Once assembled, the VISULAPEX projection screen is ready for use with your projector. Ensure your projector is positioned correctly to fill the screen area.
- Placement: Position the screen on a flat, stable surface. For optimal viewing, place the screen at a height where the bottom edge is comfortable for the audience.
- Projector Alignment: Align your projector lens with the center of the screen. Adjust the projector's keystone correction and zoom settings to fit the image perfectly within the screen borders.
- Viewing Angle: The screen offers a wide 160° viewing angle, ensuring clear images from various positions.
- Usage Environments: This screen is suitable for indoor use (home cinema, office, training) and outdoor use (camping, parties, garden events).


Maintenance
Proper care and maintenance will extend the life of your projection screen.
- Cleaning the Screen: The screen is made of natural polyester fabric and is wrinkle-free. To clean, gently wipe the surface with a soft, damp cloth. Do not use harsh chemicals or abrasive materials, as this may damage the screen surface.
- Storage: When not in use, disassemble the screen and store all components in the provided portable carry bag. Store in a cool, dry place away from direct sunlight and extreme temperatures.
- Wrinkle Prevention: The screen material is designed to be wrinkle-free. If minor creases appear from prolonged storage, gently stretch the screen or allow it to hang for a period to naturally smooth out.


Troubleshooting
If you encounter any issues with your projection screen, refer to the following common problems and solutions.
| Problem | Possible Cause | Solution |
|---|---|---|
| Screen is not stable. | Tripod legs not fully extended or tightened; uneven surface; windy conditions. | Ensure tripod legs are fully extended and screws are tightened. Place on a flat surface. For outdoor use, utilize ground nails and ropes for added stability. |
| Image appears distorted or not centered. | Projector not aligned with the screen; keystone correction needed. | Adjust projector position and use its keystone correction feature to square the image. Ensure the screen is facing the projector directly. |
| Screen surface has wrinkles. | Improper storage; screen not stretched tautly. | Ensure the screen is properly attached to the frame and stretched taut using the Velcro fasteners. For minor wrinkles, allow the screen to hang for a period or gently stretch it. Store the screen folded neatly in its bag. |
| Difficulty assembling the frame. | Tubes not aligned correctly. | Ensure each tube is inserted straight and fully into its connector. Apply gentle pressure and twist slightly if needed. Refer to the assembly diagrams. |
Specifications
| Feature | Detail |
|---|---|
| Screen Size | 120 Inches (diagonal) |
| Aspect Ratio | 16:9 |
| Resolution Support | 4K HD |
| Viewing Angle | 160 Degrees |
| Screen Material | Natural Polyester Fabric (Wrinkle-free, Matte) |
| Frame Material | Iron |
| Stand Material | Iron (Tripod) |
| Product Dimensions (Packed) | Approximately 84 cm (length) x 17 cm (width) x 10 cm (height) |
| Item Weight | 3.9 Kilograms |
| Mounting Type | Tripod Stand |
| Model Number | 120 Inches |
| UPC | 794697442679 |
Warranty and Support
VISULAPEX is committed to providing high-quality products and customer satisfaction.
- Return Policy: This product is eligible for a 30-day return policy. Please refer to your purchase platform for specific return instructions.
- Customer Service: For any questions, technical support, or assistance with your product, please contact our customer service team.
- Contact Email: customerservice-visulapex@outlook.com
- Support Availability: We aim to respond to inquiries within 24 hours.


