Product Overview
The HITOSINO 5MP IP PoE Turret Camera is a high-performance surveillance solution designed for both outdoor and indoor environments. It features advanced imaging capabilities, intelligent detection, and robust construction to ensure reliable security monitoring.

Figure 1.1: Overview of the HITOSINO 5MP IP PoE Turret Camera.
Key Features:
- 5.3MP Clarity: Delivers stunning 3072x1728 resolution for detailed surveillance.
- Smart Color Night Vision: Provides full-color images in low-light conditions when human/vehicle detection is triggered, or clear infrared night vision up to 98ft.
- Human/Vehicle Detection: Utilizes deep learning for accurate detection, reducing false alarms.
- Built-in Microphone: Captures real-time audio for enhanced monitoring.
- Flexible Storage: Supports SD card (up to 512GB), NAS, or FTP.
- IP67 Weatherproof: Durable metal housing designed for extreme temperatures (-30°C to 60°C / -22°F to 140°F) and harsh weather.
- Wide Angle View: 114° diagonal field of view for broad coverage.
What's in the Box
- Camera
- Quick Start Guide
- Hexagon socket
- Screws
- Positioning stickers (Note: No power supply, network cable, or PoE switch included)
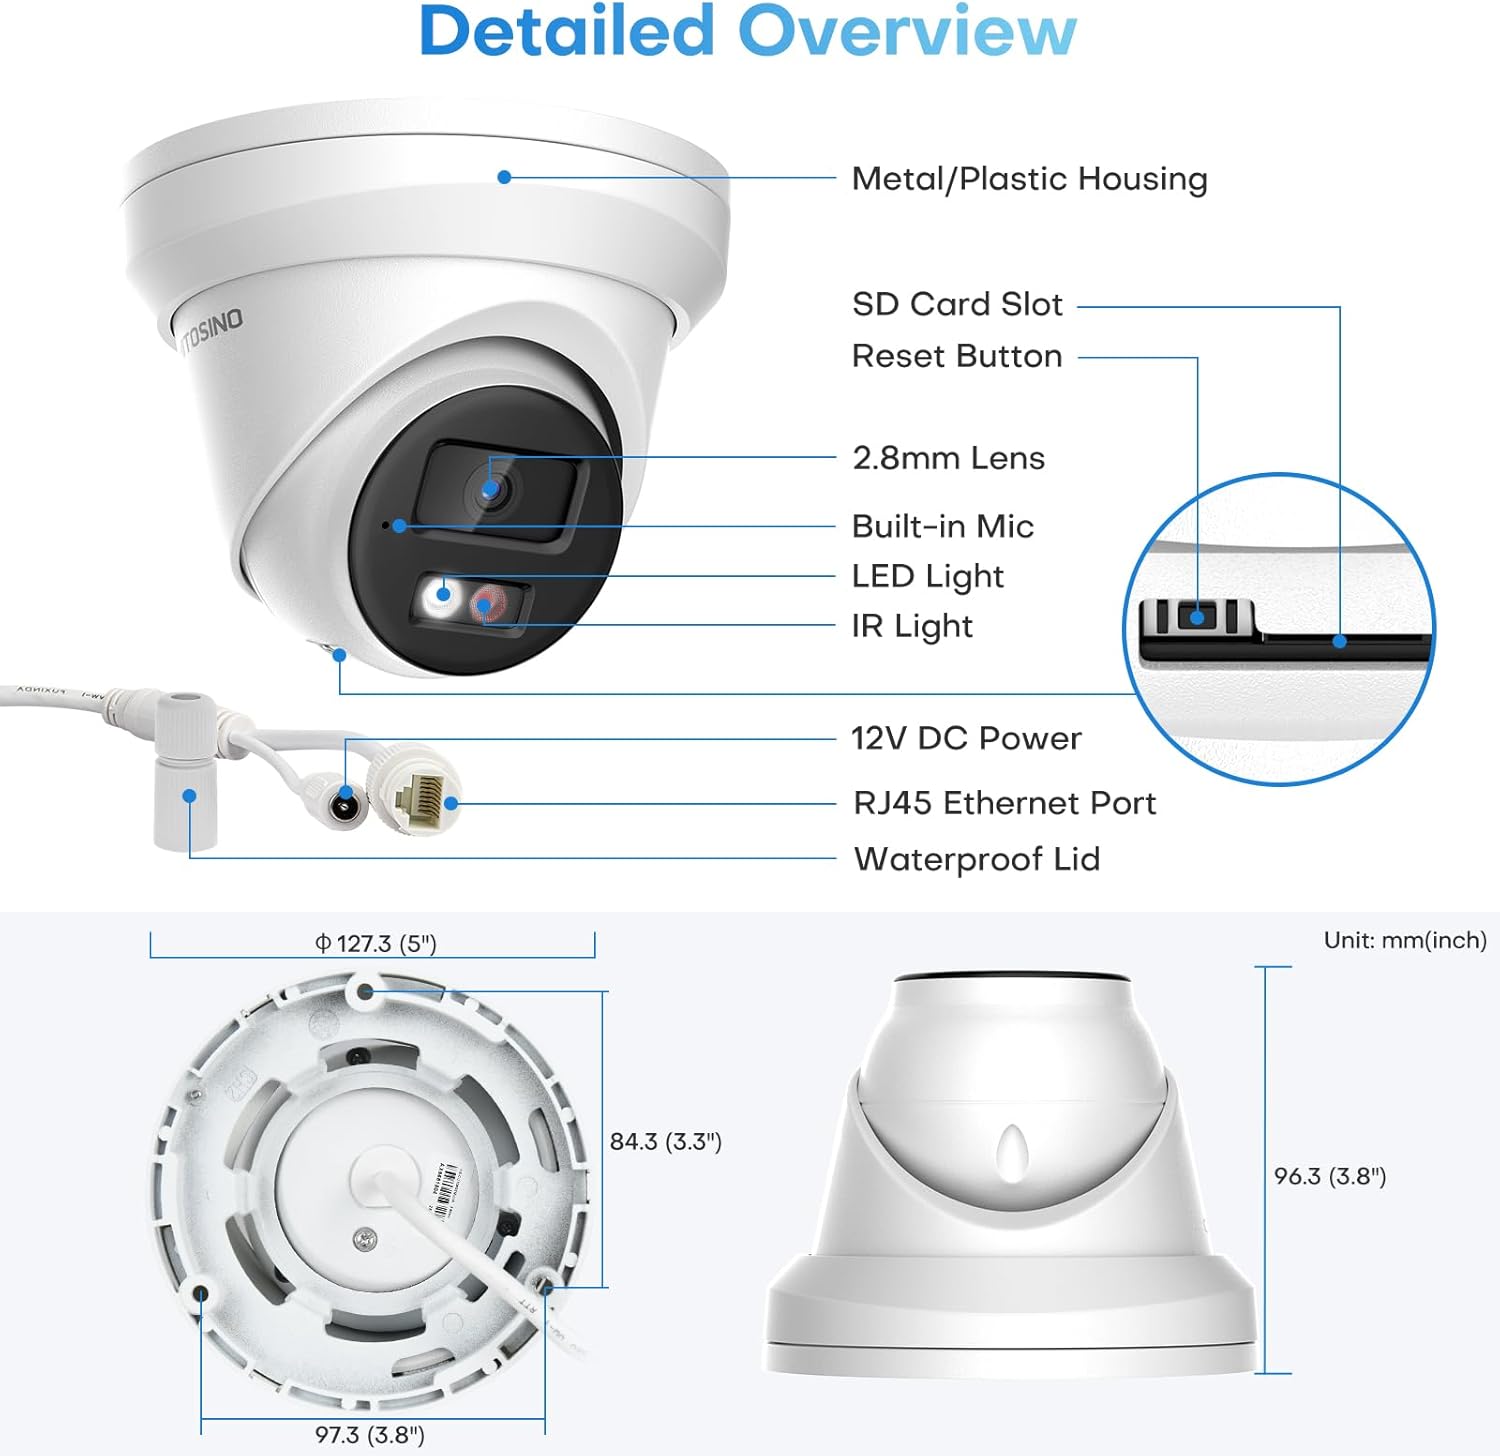
Figure 1.2: The camera and included accessories, excluding power supply and network cables.
Specifications
| Feature | Specification |
|---|---|
| Model Name | HS-CUT05G2-LIA |
| Video Capture Resolution | 5MP (3072x1728) |
| Night Vision Range | Up to 98 feet (IR) / 100 feet (Color) |
| Viewing Angle | 114 Degrees (Diagonal FOV) |
| Connectivity Protocol | IP, Ethernet, RTSP, ONVIF |
| Power Source | Corded Electric (12V DC) / PoE |
| Material | Metal Housing |
| Water Resistance Level | IP67 Weatherproof |
| Operating Temperature | -30°C to 60°C (-22°F to 140°F) |
| Flash Memory Installed Size | 512 GB (SD Card Slot) |
| Item Dimensions L x W x H | 4.33 x 11 x 9 inches |
| Item Weight | 1.63 pounds |
Setup
1. Powering the Camera
The camera can be powered in two ways: via a 12V/1A power adapter or through Power over Ethernet (PoE).
Video 2.1: This video demonstrates how to connect the camera using either a 12V/1A adapter or a PoE switch for power and data transmission.
Standalone Use with 12V 2A Power Adapter:
Connect the camera to a 12V 2A power adapter and then connect the camera's Ethernet port to your router using a network cable. Your PC or phone can then access the camera via the router.

Figure 2.2: Connection diagram for standalone use with a 12V 2A power adapter.
Standalone Use with PoE Switch:
Connect the camera directly to a PoE switch using a single network cable. The PoE switch will provide both power and data. The PoE switch then connects to your router, allowing access from your PC or phone.

Figure 2.3: Connection diagram for standalone use with a PoE switch.
Connecting to HITOSINO/Hikvision PoE NVR:
For seamless integration, connect the camera to a HITOSINO or Hikvision PoE NVR. The NVR provides power and manages recordings. Connect the NVR to a monitor for local viewing and to your router for remote access.

Figure 2.4: Connection diagram for integrating the camera with a PoE NVR system.
Connecting to HITOSINO/Hikvision Non-PoE NVR:
If using a non-PoE NVR, you will need a separate PoE switch to power the camera. The camera connects to the PoE switch, which then connects to the NVR. The NVR connects to a monitor and router as usual.

Figure 2.5: Connection diagram for integrating the camera with a non-PoE NVR system, requiring an external PoE switch.
2. App Setup (Guarding Vision)
To add your camera to the Guarding Vision app for remote viewing and management, follow these steps:
- Download and install the Guarding Vision app on your smartphone.
- Open the app and select 'Add Device'.
- Choose 'Scan QR Code' and scan the QR code located on your camera. Alternatively, you can manually enter the camera's serial number.
- Follow the on-screen prompts to connect the device to your network and enable Guarding Vision service.
- Enter the device password or verification code you set for Hik-Connect or Guarding Vision. This code can be found on the camera's webpage settings.
- Create a verification code for encryption if prompted.
- Name your device for easy identification.
Video 2.6: A step-by-step guide on how to add your HITOSINO camera via the Guarding Vision mobile application.
3. Mounting the Camera
The camera can be wall-mounted or ceiling-mounted. Use the provided drill template for accurate installation.

Figure 2.7: Various mounting options for the turret camera, including wall and ceiling mounts.
For cables routed through the wall, use Hole A on the drill template. For mounting the base, use the screw holes indicated by '1'.
Operating the Camera
1. Night Vision Modes
The camera offers three night vision modes for optimal surveillance in varying light conditions:
- White Light: Provides 24/7 full-color imaging up to 100ft.
- IR Supplement Light: Offers crystal clear white and black imaging up to 100ft using infrared.
- Smart Dual Light: Automatically switches to color on human/vehicle detection, minimizing light pollution.

Figure 3.1: Visual representation of the three available night vision modes.
Video 3.2: This video explains the Smart Dual Light feature, demonstrating how the camera switches from IR to white light upon human detection.
Video 3.3: Learn when and how the camera switches to full color night vision based on detected events.
2. Human/Vehicle Detection (Motion Detection 2.0)
Leveraging deep learning technology, the camera provides 98% accurate human and vehicle detection, significantly reducing false alarms compared to traditional motion detection. This intelligent feature helps you focus on relevant events.

Figure 3.4: Motion Detection 2.0 accurately identifies humans and vehicles, minimizing irrelevant alerts.
3. Built-in Microphone
The integrated microphone captures and transmits audio in real-time, adding an extra layer of security and situational awareness to your surveillance.

Figure 3.5: The camera's built-in microphone allows for real-time audio capture, enhancing surveillance capabilities.
4. Flexible Storage Options
Maximize recording time with H.265+ compression. The camera supports various storage options including a Micro SD card (up to 512GB, not included), Network Attached Storage (NAS), or File Transfer Protocol (FTP).

Figure 3.6: The camera features a Micro SD card slot for convenient local storage without monthly fees.
H.265+ video compression technology can save up to 70-80% in bandwidth and storage compared to H.264, without compromising video quality.

Figure 3.7: H.265+ compression offers significant savings in bandwidth and storage.
5. Remote Access
Access your camera feed and settings remotely via the Hik-Connect or Guarding Vision mobile apps (available on Google Play and App Store) or through PC software like iVMS4200 and web browsers.

Figure 3.8: The camera supports easy access from phones, tablets, and PCs for remote viewing.
Maintenance
Regular maintenance ensures optimal performance and longevity of your HITOSINO camera.
- Cleaning: Periodically clean the camera lens and housing with a soft, damp cloth. Avoid abrasive cleaners or solvents.
- Firmware Updates: Check the official HITOSINO website or app for available firmware updates to ensure your camera has the latest features and security enhancements.
- Cable Inspection: Regularly inspect all cables for any signs of wear, damage, or loose connections, especially for outdoor installations.
- Storage Management: If using an SD card, periodically review and manage recorded footage to prevent the card from becoming full.
Troubleshooting
Helpful Tips for Connectivity:
- Ensure all devices (camera, router, NVR, PoE switch) are properly powered on and correctly connected.
- The default IP address of the camera is 192.168.1.64, and DHCP is enabled by default. When connected to your router, the camera should automatically be assigned a valid IP address.
- For this value series, unlike Hikvision branded or HITOSINO white label products, ONVIF is enabled by default. When using with a third-party PoE NVR, ensure you know the NVR's built-in IP address and adjust the camera's IP address to the same network segment accordingly. However, for full functionality, it is recommended to use a HITOSINO or Hikvision NVR.

Figure 4.1: Important tips for ensuring proper camera functionality and compatibility.
We have videos explaining how to configure each connection, please check them out. We understand that each experience is unique, so if you encounter any issues, we are always here to help.
Warranty & Support
HITOSINO is committed to providing high-quality cameras and excellent customer service.
- 2-Year Limited Warranty: Your product is covered by a 2-year limited warranty from the date of purchase.
- 30-Day Money-Back Guarantee: If you are not satisfied with your purchase, you may return it within 30 days for a full refund.
- Lifetime Technical Support: We offer professional technical support for the lifetime of your product.
For any inquiries or technical assistance, please feel free to contact us through Amazon messages or the contact information provided on the product packaging. Your safety is our priority.