1. Introduction
The WAINLUX K8 is a compact, fully enclosed 10W laser engraver and cutter, designed for both hobbyists and small businesses. It offers high precision and speed, capable of engraving on a wide range of materials including wood, metal, leather, and acrylic. Its intelligent features, such as the built-in 2MP smart camera, simplify the engraving process, allowing for precise positioning and batch production. The K8 prioritizes user safety with its Class 1 laser rating and integrated protective mechanisms.

Figure 1: The WAINLUX K8 10W Mini Laser Engraver, a compact and fully enclosed unit.
2. Safety Information
The WAINLUX K8 is designed with multiple safety features to ensure user protection. It is a Class 1 laser product, meaning it is safe under all conditions of normal use. Always adhere to the following safety guidelines:
- Fully Enclosed Design: The K8 features a fully enclosed structure with a Hall induction door safety protection. The laser operation will automatically stop if the door is opened, preventing accidental laser exposure.
- Viewable Window: Both the front and back doors are equipped with anti-laser see-through windows that filter 99.7% of blue light, allowing safe observation of the engraving process.
- Fireproof Material: The machine incorporates fireproof engineering plastic to enhance safety during operation.
- Ventilation System: A built-in efficient ventilation system helps to blow away smoke, dust, and sparks. For optimal air quality, consider connecting an external air purifier.

Figure 2: The K8's enclosed design with a blue light filtering window for safe operation.
3. Product Overview
The WAINLUX K8 is engineered for precision and ease of use. Key components and features include:
- 2MP Smart Camera: Allows for visual processing, autofocus, and precise editing of engraving positions directly within the software. This feature is particularly useful for batch production.
- High Precision Laser: Utilizes advanced laser compression technology for ultra-fine 0.01mm engraving precision.
- Fast Engraving Speed: Achieves speeds up to 15000mm/min, significantly reducing project completion times.
- Adjustable Platform: The stage height can be manually adjusted up to 100mm, accommodating objects of various thicknesses.
- Slag Collecting Tray: A convenient sliding tray automatically collects debris, simplifying cleanup.
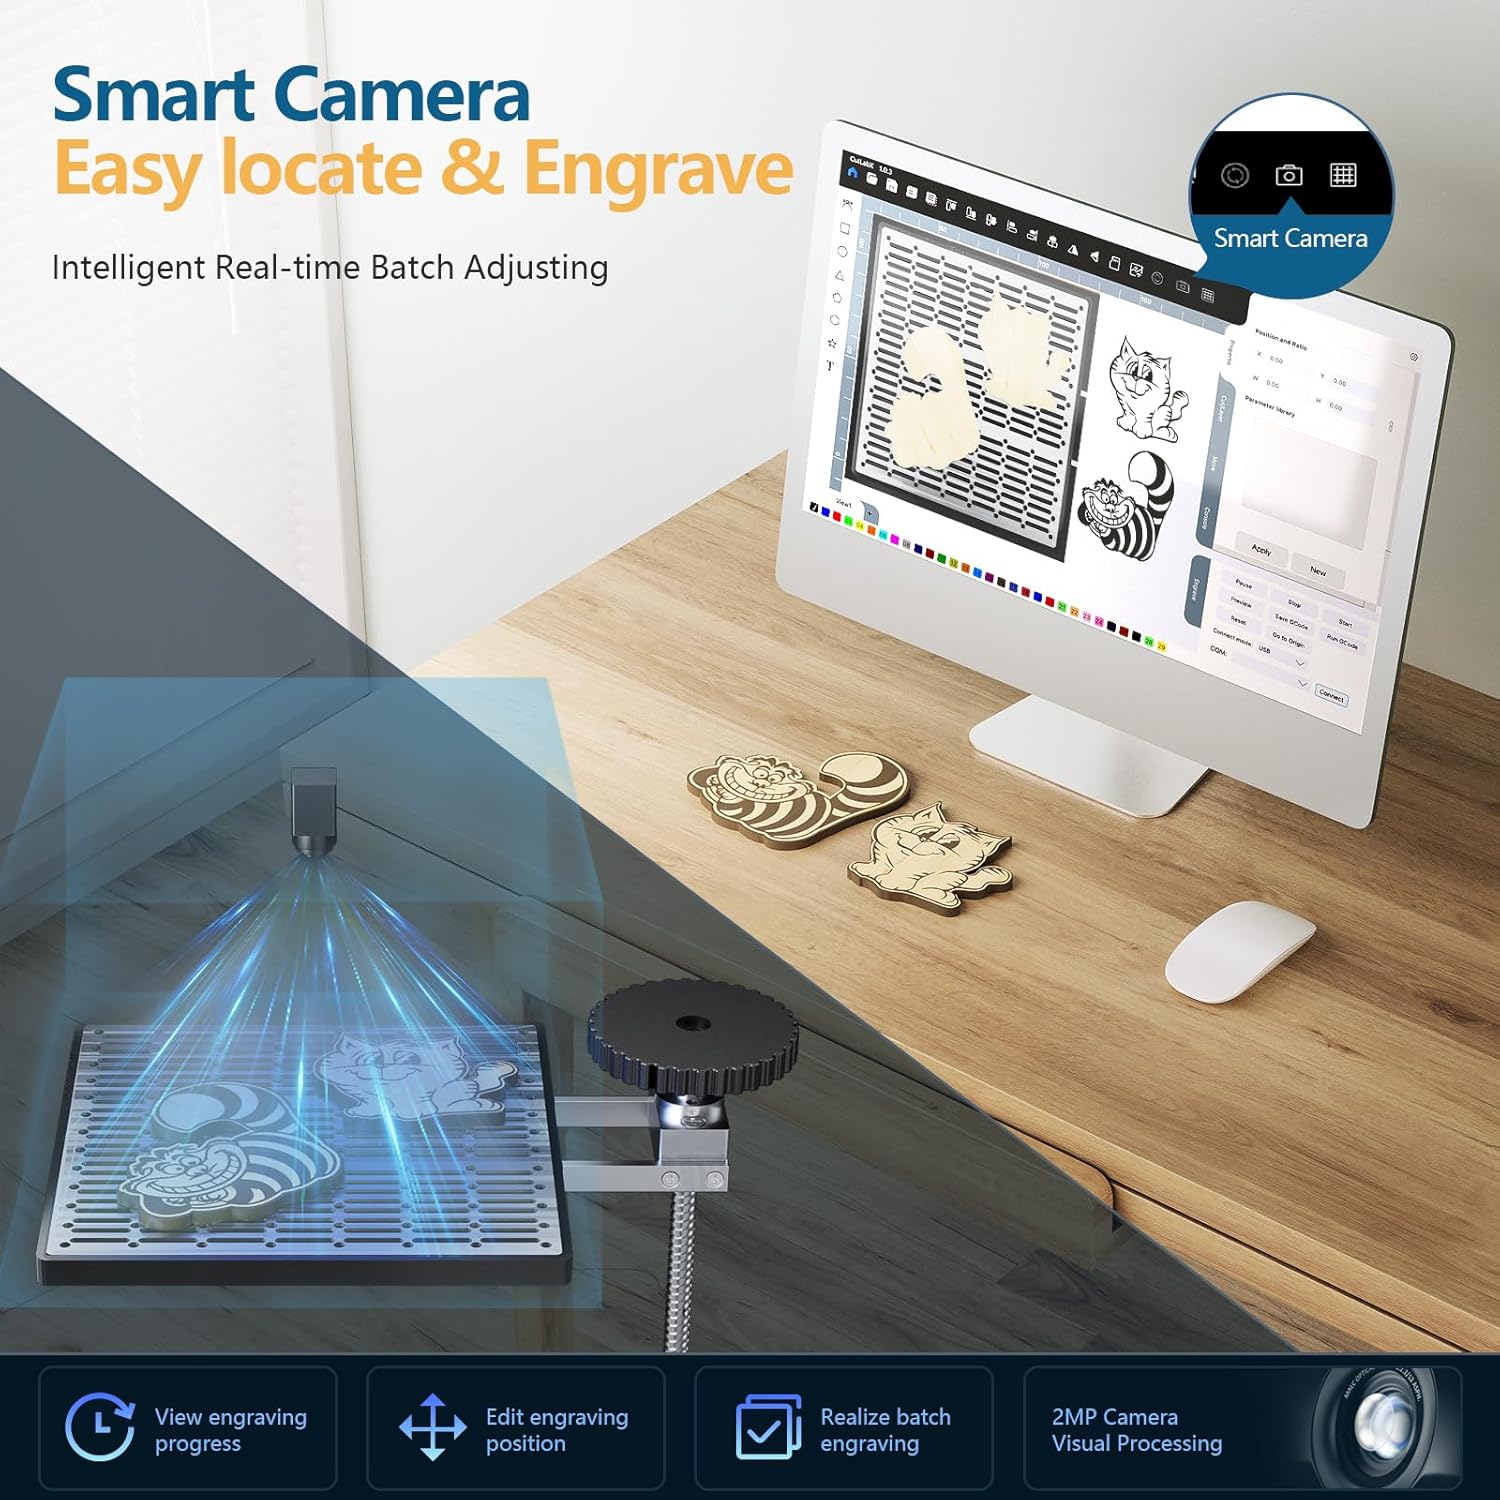
Figure 3: The K8's smart camera feature for precise object placement and engraving.

Figure 4: Illustration of the K8's ultra-fine precision and fast engraving capabilities.
4. Setup
Setting up your WAINLUX K8 is a straightforward process. Follow these steps for initial setup and connection:
- Unboxing: Carefully remove the engraver and all accessories from the packaging. Inspect for any damage.
- Power Connection: Connect the power supply to the K8 and plug it into a suitable power outlet.
- Software Installation: Install the recommended software (CutLabX, LightBurn, or LaserGRBL) on your computer. Ensure your computer meets the software's system requirements.
- Initial Connection: Connect the K8 to your computer via USB or Wi-Fi as per the software's instructions. The indicator light will change from flashing to solid once the machine has loaded its program and is ready for connection.
Video 1: This video demonstrates the unboxing process of the WAINLUX K8 laser engraver, showing how to safely remove the unit and its components from the packaging.
Video 2: This video provides a guide on connecting the WAINLUX K8 to LightBurn software for the first time, covering the necessary steps for successful communication between the engraver and your computer.
5. Operating Instructions
Operating the WAINLUX K8 involves preparing your material, setting up your design in the software, and initiating the engraving process. The smart camera feature in CutLabX software greatly assists with precise positioning.
5.1 Material Placement and Focus
- Place your material flat on the engraving platform.
- Use the manual adjustment knob to set the laser head to the correct focus height for your material.
5.2 Software Usage (CutLabX Example)
The camera calibration function is only supported by CutLabX PC software. Before using this function, the engraving machine must be configured with WiFi and connected using WiFi mode.
- Open CutLabX software and ensure the K8 is connected (Wi-Fi recommended for camera features).
- Find the camera calibration icon at the top of the software and click it.
- The software will display alignment lines. Adjust the X and Y axis alignment lines and rotation angle within the software to match the physical alignment lines engraved on a test piece of kraft paper. Take photos with the camera icon to verify alignment.
- Once calibrated, find a carved object for testing. Click the camera icon to take photos, and the carved object image will be displayed on the canvas.
- Draw a simple shape in the software and move it to the surface of the carved object image on the canvas.
- Set engraving parameters (speed, power, engraving times) for your material.
- Click 'Start' to begin the engraving process.
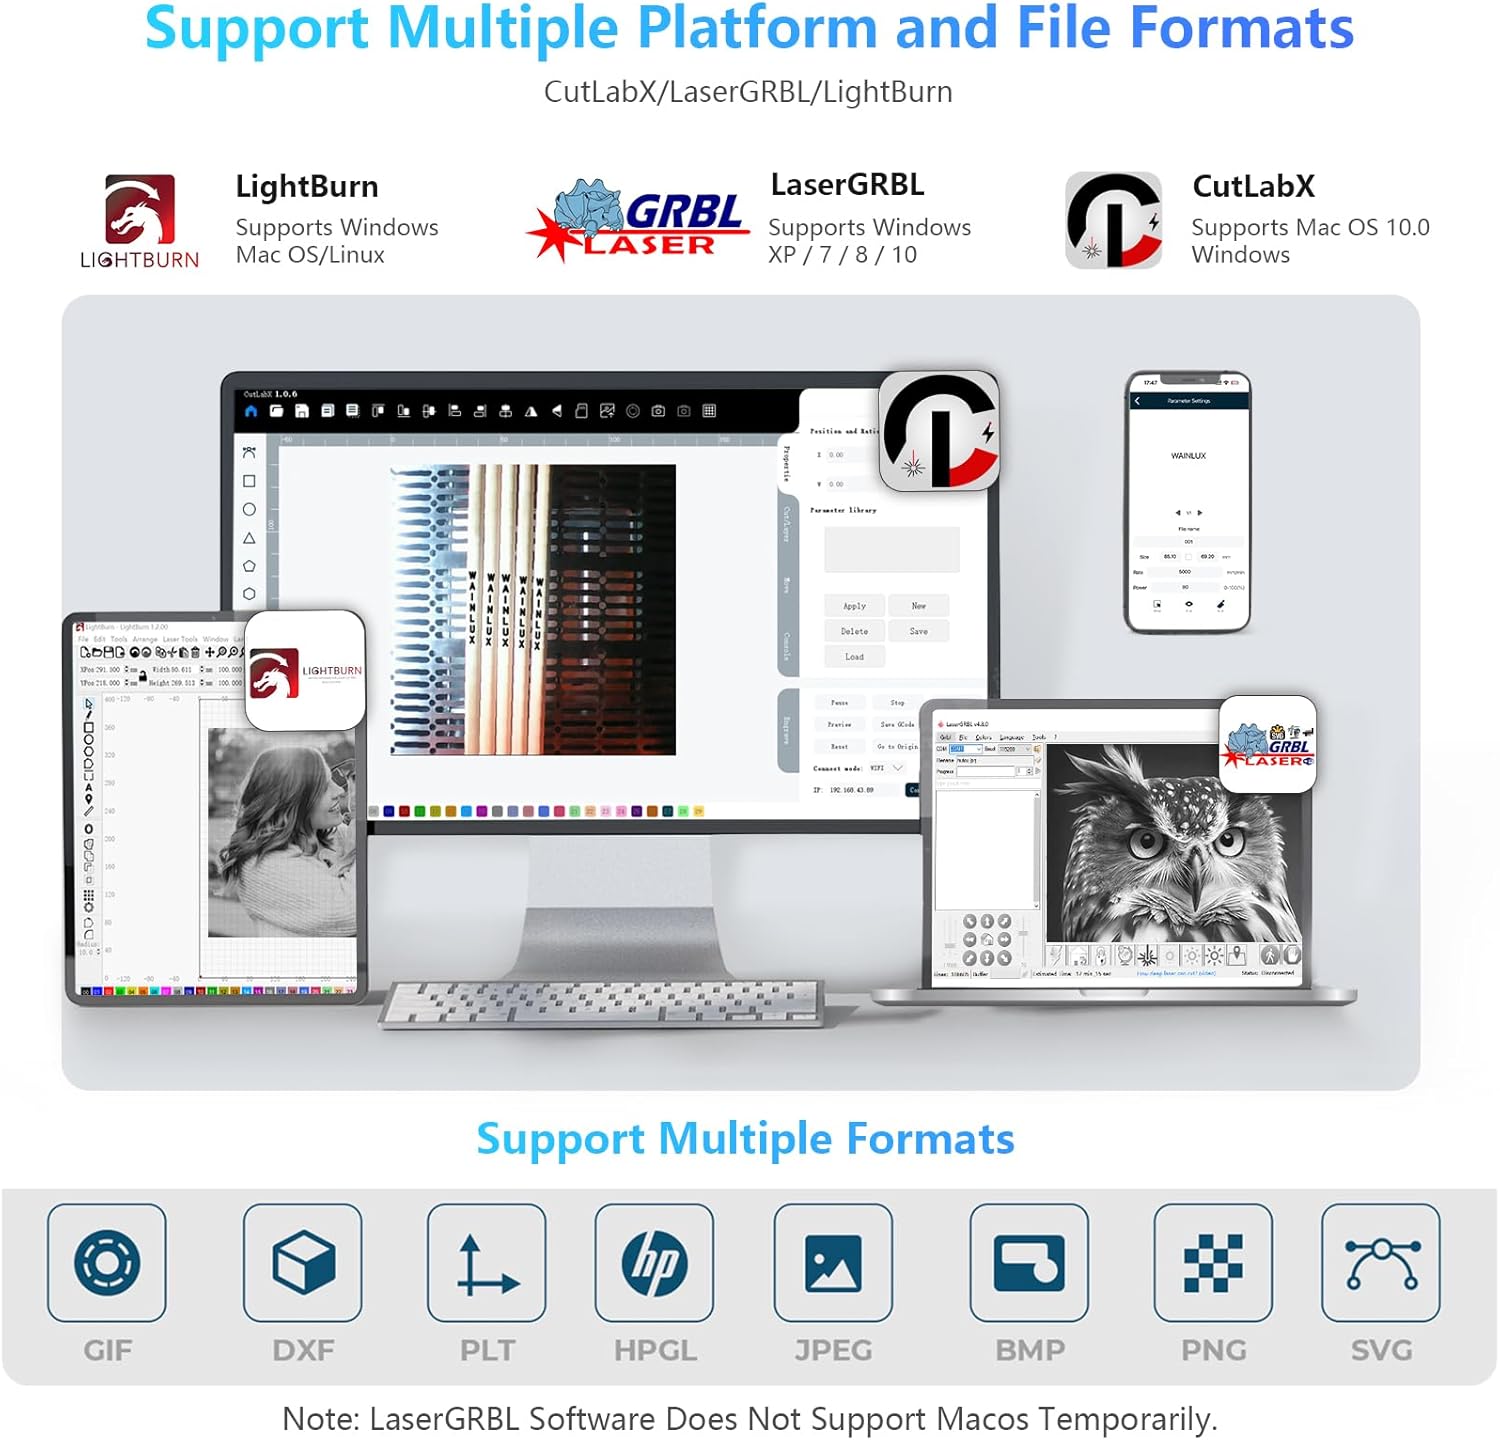
Figure 5: The K8 supports multiple engraving software platforms and file formats.

Figure 6: Examples of materials suitable for engraving with the WAINLUX K8.
Video 3: This video illustrates how to use the WAINLUX K8 for batch engraving, optimizing the process for multiple items.
6. Maintenance
Regular maintenance ensures the longevity and optimal performance of your WAINLUX K8.
- Cleaning: The K8 features a detachable cleaning structure exhaust fan and a slag collecting tray for easy removal of debris. Regularly clean these components to prevent buildup.
- Air Purifier: For enhanced air quality and to minimize smoke/odor, connect an external air purifier to the K8.
- Laser Module Care: The laser module has an impressive lifespan of up to 10,000 hours. Avoid touching the laser lens directly.
Video 4: This video demonstrates the setup and function of the WAINLUX K8 with an external air purifier, highlighting its benefits for a cleaner workspace.
6.1 Advanced Maintenance
For advanced maintenance or component replacement, refer to the official guides:
Video 5: This video provides a detailed guide on how to replace the motherboard of the K8 laser engraver, intended for experienced users or under professional guidance.
7. Troubleshooting
Here are some common questions and solutions for the WAINLUX K8:
- Q: Can it be engraved on curved surface materials?
A: Yes, but the radian of the material and the engraved graphic area should not be too large, otherwise there will be slight deformation. - Q: How to deal with a lot of smoke and dust on the cut material?
A: Please reduce the laser power and increase the speed appropriately. Ensure the ventilation system is clean and functioning, and consider using an external air purifier. - Q: The camera image is split or misaligned.
A: This may require recalibrating the camera within the CutLabX software. Follow the camera calibration steps in the operating instructions, ensuring the alignment lines on the kraft paper match the software's display. Adjust X and Y axis values and rotation as needed. - Q: The machine randomly shuts off during operation.
A: Check all power connections and ensure the power supply is stable. Verify that the internal wiring harness is not damaged. If the issue persists, contact customer support.
8. Specifications
| Feature | Detail |
|---|---|
| Product Dimensions | 10.7 x 10.7 x 11.57 inches |
| Item Model Number | K8-10 |
| Item Weight | 14.97 pounds |
| Manufacturer | WAINLUXPRO |
| Country of Origin | China |
| Laser Power Output | 10000mW |
| Laser Class | Class 1 |
| Wavelength | 455nm ± 5nm |
| Engraving Precision | 0.01mm |
| Engraving Speed | Up to 15000mm/min |
| Max Material Height | 100mm (adjustable stage) |
| Compatibility | CutLabX, LaserGRBL, LightBurn (Windows, Mac) |
| Supported Image Formats | JPEG/BMP/PNG/JPG/GIF |
| Supported Vector Formats | DXF/PLT/HPGL |
| Connectivity | SD Card/USB/Wi-Fi APP/Access Point Offline Work |
9. Warranty and Support
WAINLUXPRO is committed to providing high-quality products and comprehensive pre-sales and after-sales services. For any inquiries, technical assistance, or warranty claims, please contact WAINLUXPRO Official customer support. Refer to your purchase documentation for specific warranty terms and contact information.


