
Colosus S110
COLOSUS S110 Smart Door Lock User Manual
Model: S110
1. Product Overview
The COLOSUS S110 Smart Door Lock offers advanced security and convenience with multiple unlocking methods. This manual provides detailed instructions for installation, operation, and maintenance of your smart lock.
Key Features:
- Versatile Unlocking Methods: Fingerprint, smartphone app, password, card, and physical key.
- Convenient and Fast Locking: One-tap lock functionality for quick and hassle-free locking.
- Long Battery Life: Up to one year of standby battery life with four AA batteries (not included).
- Low Battery Alert: Notifies you when battery replacement is needed.
- Emergency Power: Can be powered by a 9V battery (not included) if main batteries run out.
- Universal Compatibility: Fits doors with thickness 38-48mm (1-1/2 to 1-7/8 inches), adjustable for left and right directions.

Figure 1.1: Overview of the COLOSUS S110 Smart Door Lock components and features.
2. Package Contents
Before installation, please verify that all components are present in the package:
- Front Panel Assembly (with keypad and fingerprint sensor)
- Rear Panel Assembly (with battery compartment)
- Mortise/Latch
- Strike Plate
- Strike Box
- Mounting Screws
- Physical Keys (2-3)
- RFID Cards (2-4, depending on model)
- Installation Template
3. Installation Guide
Follow these steps carefully to install your COLOSUS S110 Smart Door Lock. Ensure your door thickness is between 38-48mm (1-1/2 to 1-7/8 inches).
3.1 Prepare the Door
- Check door dimensions and ensure existing holes match the installation template. If not, drill new holes as per the template.
- Determine the door's opening direction (left or right-handed) and adjust the lock's handle direction if necessary.
3.2 Install the Mortise/Latch
- Insert the mortise/latch into the door edge.
- Secure it with the provided screws. Ensure the latch bolt operates smoothly.
3.3 Install the Front Panel
- Feed the data cable and spindle through the mortise/latch hole from the outside of the door.
- Align the front panel with the door and ensure the spindle engages with the mortise.
3.4 Install the Rear Panel
- Connect the data cable from the front panel to the rear panel.
- Align the rear panel with the spindle and mounting posts.
- Secure the rear panel to the front panel using the long mounting screws. Do not overtighten.
- Insert four AA batteries into the battery compartment.
3.5 Test the Lock
- Test the physical key to ensure it operates the lock smoothly.
- Follow the instructions in Section 4.1 to set up the administrator password and test basic functions.

Figure 3.1: Exploded view of the COLOSUS S110 Smart Door Lock components for installation reference.
4. Operating Instructions
4.1 Initial Setup and Administrator Password
Upon first power-up, the lock will prompt you to set an administrator password. This password is crucial for managing users and settings.
- Press the * key.
- Enter your desired 6-8 digit administrator password, then press #.
- Re-enter the administrator password, then press # to confirm.
4.2 Unlocking Methods

Figure 4.1: Visual representation of the five unlocking methods available with the COLOSUS S110 Smart Door Lock.
4.2.1 Fingerprint Unlock
Place your registered finger on the fingerprint sensor. The lock will unlock if the fingerprint is recognized.
4.2.2 Smartphone App Control (TTLock App)
Download the "TTLock" app from your smartphone's app store. Follow the in-app instructions to pair your lock via Bluetooth. The app allows you to unlock, manage users, view access logs, and configure settings remotely.
4.2.3 Password Unlock
Enter a registered password on the keypad, then press #. The lock supports anti-peep code functionality, allowing you to enter random digits before or after your actual password to prevent others from guessing it.
4.2.4 Card Unlock (RFID)
Present a registered RFID card to the card reader area on the lock. The lock will unlock if the card is recognized.
4.2.5 Physical Key Unlock
Insert the physical key into the keyhole and turn to unlock the door. This method serves as a reliable backup.
4.3 Locking Methods
4.3.1 Automatic Locking
The lock can be configured to automatically lock after a set period (e.g., 10-999 seconds) once the door is closed. This feature enhances security and convenience.

Figure 4.2: Illustration of the automatic locking feature, which engages the deadbolt after a set time.
4.3.2 Manual Locking (One-Tap)
To manually lock the door from the outside, simply press the # key on the keypad. From the inside, turn the thumb-turn knob.
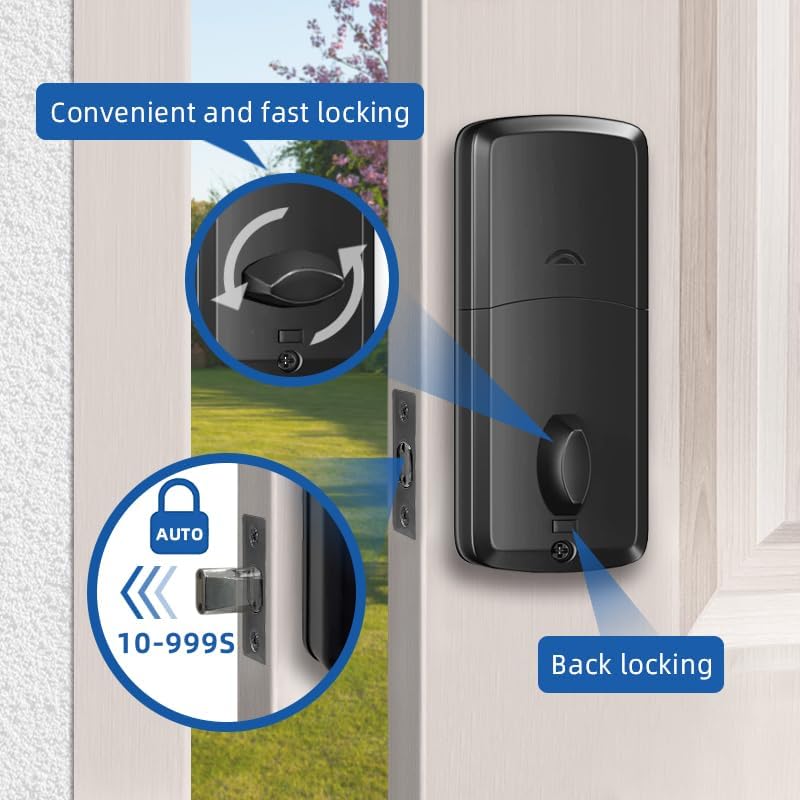
Figure 4.3: Demonstrating the one-key lock function by pressing the '#' button on the keypad.
5. Maintenance
5.1 Battery Replacement
The COLOSUS S110 Smart Door Lock is powered by four AA batteries (not included). It features a low battery alert system.
- When the battery is low, the lock will emit a warning sound or light indicator.
- To replace, open the battery cover on the rear panel, remove old batteries, and insert new AA batteries, ensuring correct polarity.

Figure 5.1: Battery compartment location and visual indicators for low battery and backlit keypad.
5.2 Emergency Power
In case the batteries completely drain, you can temporarily power the lock using a 9V battery (not included) by touching it to the emergency power terminals located at the bottom of the front panel.
Figure 5.2: Using a 9V battery for emergency power when the main batteries are depleted.
5.3 Cleaning
Clean the lock's surface with a soft, dry cloth. Avoid using abrasive cleaners or solvents that may damage the finish or electronic components.
6. Troubleshooting
| Problem | Possible Cause | Solution |
|---|---|---|
| Lock does not respond. | Dead batteries. | Replace AA batteries or use a 9V emergency battery. |
| Fingerprint not recognized. | Finger is dirty/wet, or not properly registered. | Clean finger and sensor. Re-register fingerprint if issue persists. |
| Keypad unresponsive. | Low battery or system error. | Replace batteries. If still unresponsive, try a factory reset (refer to app instructions). |
| Lock does not auto-lock. | Auto-lock feature disabled or setting incorrect. | Check auto-lock settings in the TTLock app. Ensure the door sensor is aligned. |
| Cannot connect to app via Bluetooth. | Bluetooth off, lock too far, or pairing issue. | Ensure Bluetooth is on. Move closer to the lock. Restart app/phone. Re-pair the lock in the app. |
7. Specifications
- Model: S110
- Brand: Colosus
- Material: Zinc Alloy
- Dimensions (L x W x H): 5.5 x 2.5 x 1.5 inches (approximate)
- Lock Type: Keypad Deadbolt
- Special Features: Auto-Lock, Fingerprint, Keyless Entry, APP Control
- Power Supply: 4 x AA Batteries (not included)
- Emergency Power: 9V Battery (not included)
- Door Thickness Compatibility: 38-48mm (1-1/2 to 1-7/8 inches)
- Operating Temperature: -20°C to 70°C (-4°F to 158°F)
8. Warranty and Support
For warranty information and technical support, please refer to the warranty card included with your product or visit the official Colosus website. You can also contact Colosus customer service through the details provided on their Amazon store page.
Colosus Store Link: Visit the Colosus Store on Amazon
Ask a question about this manual
Ask about setup, troubleshooting, compatibility, parts, safety, or missing instructions. Manuals+ will review the question and use this page’s manual context to help answer it.