Introduction
Thank you for choosing the CAT Electric Pressure Washer. This manual provides essential information for the safe and efficient operation, maintenance, and troubleshooting of your pressure washer. Please read this manual thoroughly before initial use and retain it for future reference.
The CAT Electric Pressure Washer, Model RE01, delivers 1850 PSI of maximum pressure and a flow rate of 1.4 GPM, powered by an 1800W motor. It is designed for effective cleaning of various outdoor surfaces including vehicles, patios, driveways, and siding.
Important Safety Information
WARNING: Read all safety warnings and instructions. Failure to follow the warnings and instructions may result in electric shock, fire, and/or serious injury.
- Always wear appropriate personal protective equipment, including safety glasses, during operation.
- Ensure the power cord is connected to a grounded outlet with GFCI protection.
- Never point the spray gun at people, pets, or electrical devices.
- Do not operate the pressure washer in the rain or wet conditions.
- Keep children and bystanders away from the operating area.
- Before performing any maintenance or cleaning, always disconnect the power supply and water supply.
Product Components
The CAT Electric Pressure Washer comes with the following components:

Figure 1: Included Components
- CAT Electric Pressure Washer Main Unit (1850 PSI / 1.4 GPM)
- 3-in-1 Nozzle Lance (0°, 15°, 40° settings)
- Quick Release Spray Gun
- 20-foot Non-Kink High-Pressure Hose (M22-15mm)
- 600ml Detergent Foam Blaster
- 35-foot Electric Cord with GFCI

Figure 2: Pressure Washer Overview with Labeled Parts
Setup Instructions
- Unpack and Inspect: Carefully remove all components from the packaging. Inspect for any damage.
- Assemble Handle: Extend the integrated foldable handle until it locks into place.
- Connect High-Pressure Hose: Attach the 20-foot high-pressure hose to the M22-15mm water outlet on the side of the pressure washer unit. Ensure a secure connection.
- Attach Spray Gun and Lance: Connect the high-pressure hose to the spray gun. Then, attach the 3-in-1 nozzle lance to the spray gun using the quick-connect mechanism.
- Connect Water Supply: Connect a standard garden hose (not included) to the water inlet located at the back of the pressure washer. Ensure the garden hose is free of kinks and has a minimum diameter of 5/8 inch. Turn on the water supply completely.
- Connect Power: Plug the 35-foot electric cord with GFCI into a grounded 120V AC electrical outlet.
- Prime the Pump: Before turning on the unit, squeeze the trigger on the spray gun to release any air trapped in the system. Allow water to flow through the gun until a steady stream is achieved. This primes the pump and prevents damage.

Figure 3: Quick-Connect Mechanism
Operating Instructions
- Start the Unit: Once the pump is primed, turn the ON/OFF switch to the 'ON' position. The motor will start when the trigger is squeezed and stop when released (Total Stop System - TSS).
- Select Nozzle Setting: The 3-in-1 nozzle lance allows you to switch between 0°, 15°, and 40° spray patterns by rotating the nozzle head.
- 0° Nozzle (Pinpoint): For concentrated, tough dirt and grime removal. Use with caution on delicate surfaces.
- 15° Nozzle (Fan Spray): For general surface cleaning and moderate dirt. Ideal for driveways, fences, and patios.
- 40° Nozzle (Wide Fan Spray): For rinsing and washing applications, suitable for cars, patio furniture, and windows.
- Apply Detergent (Optional): Fill the 600ml detergent foam blaster with appropriate pressure washer detergent. Attach it to the spray gun using the quick-connect. The pressure washer will automatically draw detergent when the foam blaster is attached and the trigger is squeezed.
- Cleaning Technique: Hold the spray gun firmly with both hands. Start spraying a few feet away from the surface and gradually move closer until the desired cleaning effect is achieved. Maintain a consistent distance and angle for even cleaning.
- Shut Down: When finished, turn the ON/OFF switch to 'OFF'. Turn off the water supply. Squeeze the spray gun trigger to release any remaining pressure in the system. Disconnect the power cord.

Figure 4: Using the Detergent Foam Blaster

Figure 5: 0° Nozzle Application

Figure 6: 15° Nozzle Application

Figure 7: 40° Nozzle Application
Video 1: Official demonstration of the CAT 1850 Electric Pressure Washer in use, showcasing its features and cleaning capabilities on various surfaces.
Maintenance
- Cleaning Nozzles: Regularly check and clean the nozzle openings to prevent blockages. Use the included nozzle cleaning tool if necessary.
- Draining Water: After each use, ensure all water is drained from the pump and hoses to prevent freezing and damage, especially in cold climates.
- Storage: Store the pressure washer in a dry, protected area. Utilize the on-board storage for the hose, power cord, spray gun, and foam cannon to keep accessories organized and prevent loss. The integrated foldable handle allows for compact storage.
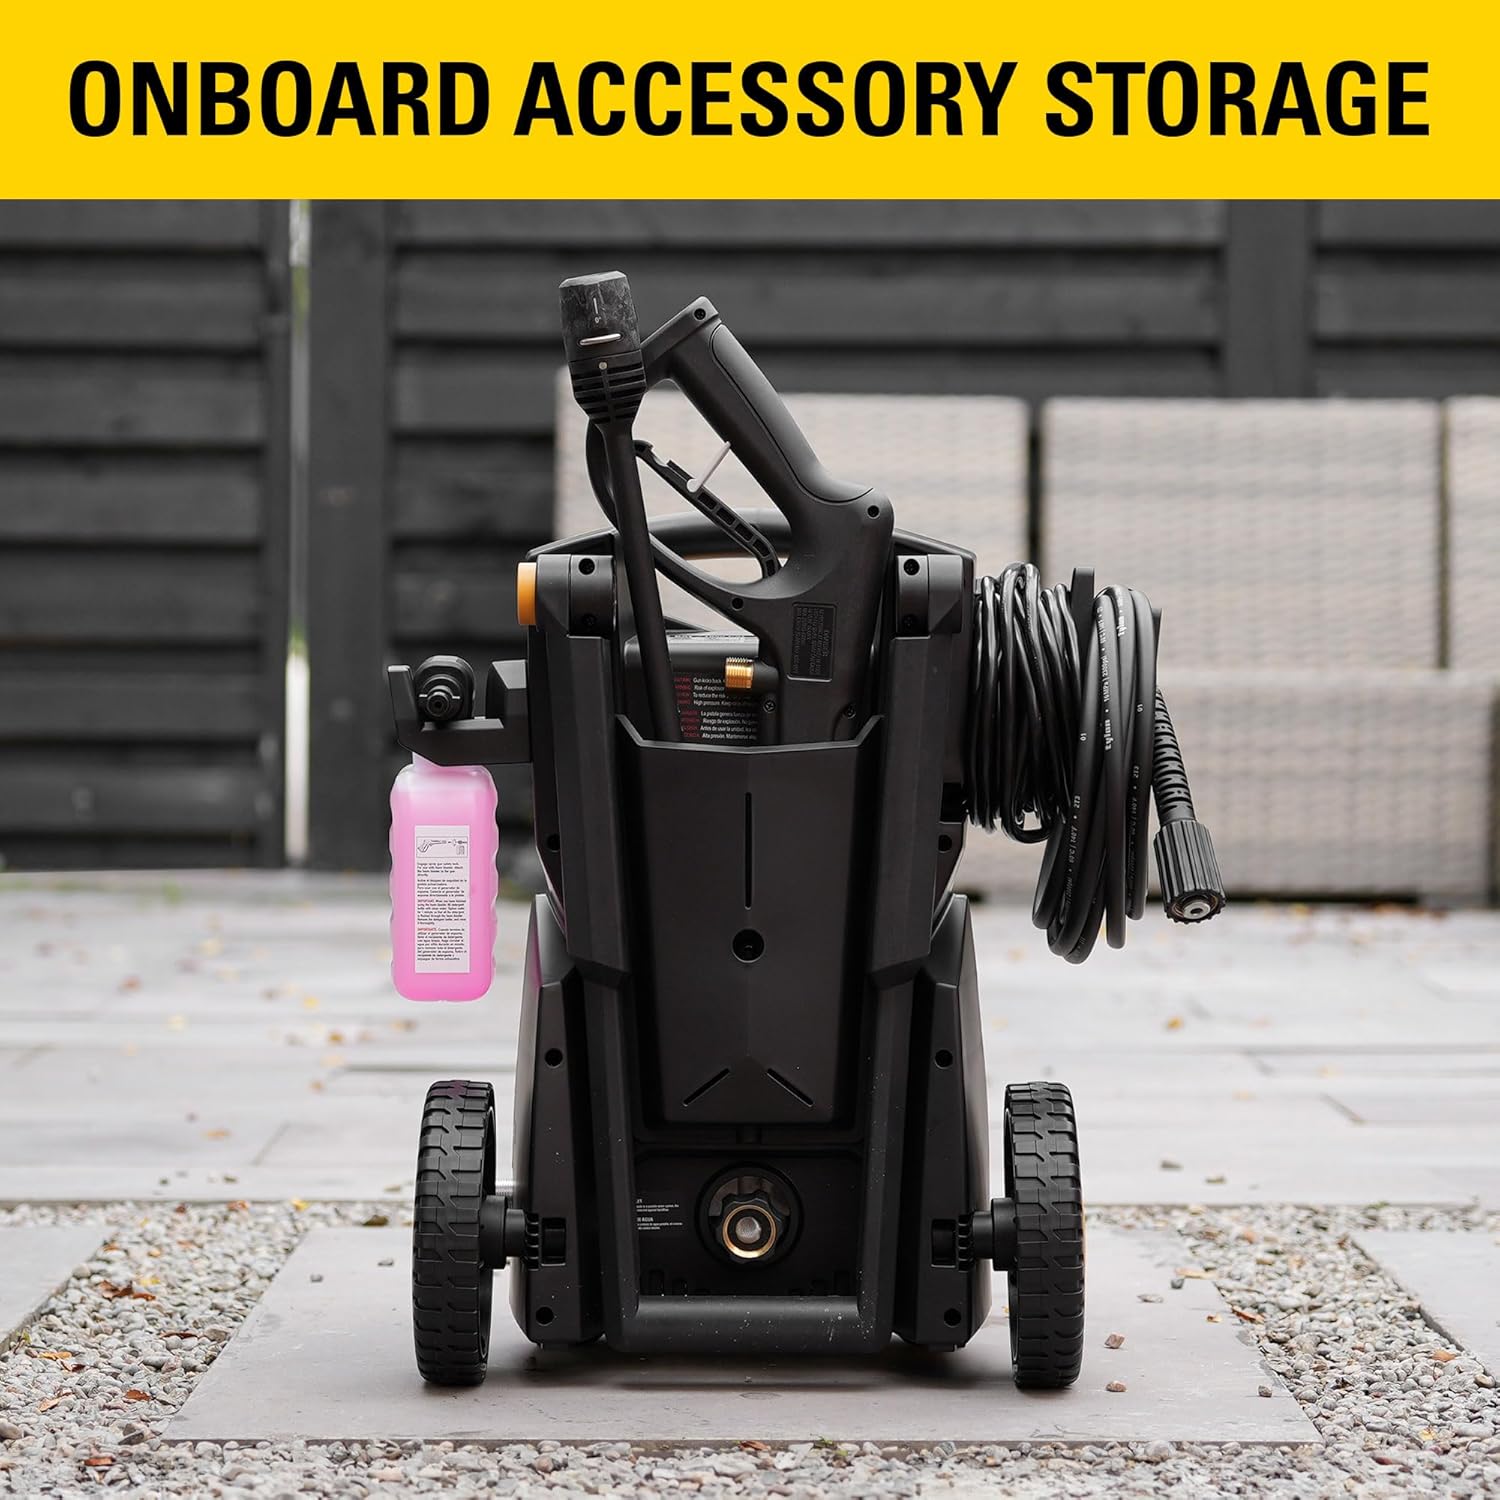
Figure 8: Onboard Accessory Storage
Troubleshooting
| Problem | Possible Cause | Solution |
|---|---|---|
| Motor does not start | Power cord not plugged in; GFCI tripped; ON/OFF switch in 'OFF' position. | Check power connection; Reset GFCI; Turn switch to 'ON'. |
| No water pressure or low pressure | Water supply off; Kinked garden hose; Air in pump; Clogged nozzle. | Turn on water supply; Straighten hose; Prime pump (see Setup); Clean nozzle. |
| Water leaks from connections | Loose connections; Worn O-rings. | Tighten all connections; Replace O-rings if damaged. |
| Detergent not dispensing | Detergent tank empty; Foam blaster not properly attached; Nozzle not set for detergent application. | Fill detergent tank; Ensure foam blaster is securely attached; Some models require a specific nozzle setting for detergent. |
Specifications
- Brand: CAT
- Model Number: RE01
- Maximum Pressure: 1850 PSI
- Maximum Flow Rate: 1.4 GPM
- Power Source: AC Electric (1800W Motor)
- Hose Length: 20 Feet
- Electric Cord Length: 35 Feet with GFCI
- Item Weight: 21 Pounds
- Product Dimensions (L x W x H): 14.25" x 12.5" x 18.85"
- Color: Yellow
- UPC: 841308103365
Warranty Information
For detailed warranty information, please refer to the official CAT product packaging or visit the manufacturer's website. Keep your purchase receipt as proof of purchase for any warranty claims.
Customer Support
Should you require technical assistance, replacement parts, or have any questions regarding your CAT Electric Pressure Washer, please contact CAT customer service. Contact information can typically be found on the product packaging or the official CAT website.