Introduction
Thank you for choosing the Crenova Laminator Machine. This compact and efficient laminator is designed for home, office, and school use, providing reliable hot and cold lamination for your important documents and photos. With its fast warm-up time and user-friendly features, you can easily protect and preserve your materials.

Image: Crenova A4 Laminator highlighting its key features and available colors.
Safety Information
- Read all instructions before use.
- Keep the laminator away from water or other liquids.
- Do not touch the hot parts of the laminator during or immediately after use.
- Ensure the laminator is placed on a stable, flat surface.
- Unplug the laminator when not in use or before cleaning.
- Keep out of reach of children.
- Use only recommended laminating pouches (80-125mic).
Package Contents
Upon opening your Crenova Laminator Machine package, please ensure all the following items are present:
- Crenova Laminator Machine (Green)
- 10 Laminating Sheets (A4 size)
- Paper Trimmer
- Corner Rounder
- User Manual
Product Overview
Familiarize yourself with the components of your Crenova Laminator Machine:
- Power/Mode Switch: Selects between OFF, COLD, and HOT lamination modes.
- Mode Indicator Lights: Indicates power status and readiness (e.g., green for ready).
- A4 Wide Inlet: The entry point for laminating pouches, accommodating documents up to 230mm (9 inches) wide.
- ABS Lever: Used to release jammed pouches.
- 2-Roller System: Ensures quick and even heating for bubble- and wrinkle-free results.

Image: Labeled diagram of the Crenova Laminator Machine components.

Cold/Hot Switch

ABS Lever

Supported Sheet Sizes

Pouch Thickness
Setup
- Place the laminator on a flat, stable, and heat-resistant surface. Ensure there is enough space behind the laminator for the laminated item to exit freely.
- Plug the power cord into a suitable electrical outlet.
- Switch the Power/Mode Switch to the "HOT" position for thermal lamination. The mode indicator light will illuminate.
- Allow the laminator to warm up for approximately 1-2 minutes. The mode indicator light will turn green when it is ready for use.

Image: The laminator requires 1-2 minutes to preheat for hot lamination. Cold mode does not require preheating.
Operating Instructions
Hot Lamination
- Ensure the laminator is set to "HOT" mode and the indicator light is green, signifying it's ready.
- Place your document inside a thermal laminating pouch, ensuring it is centered and there is an even border around the document. Use pouches between 80-125mic thickness.
- Insert the sealed edge of the pouch into the A4 Wide Inlet, feeding it straight into the machine.
- The laminator will automatically feed the pouch through. Do not pull or push the pouch during the lamination process.
- Once the pouch exits the machine, place it on a flat surface to cool and flatten.
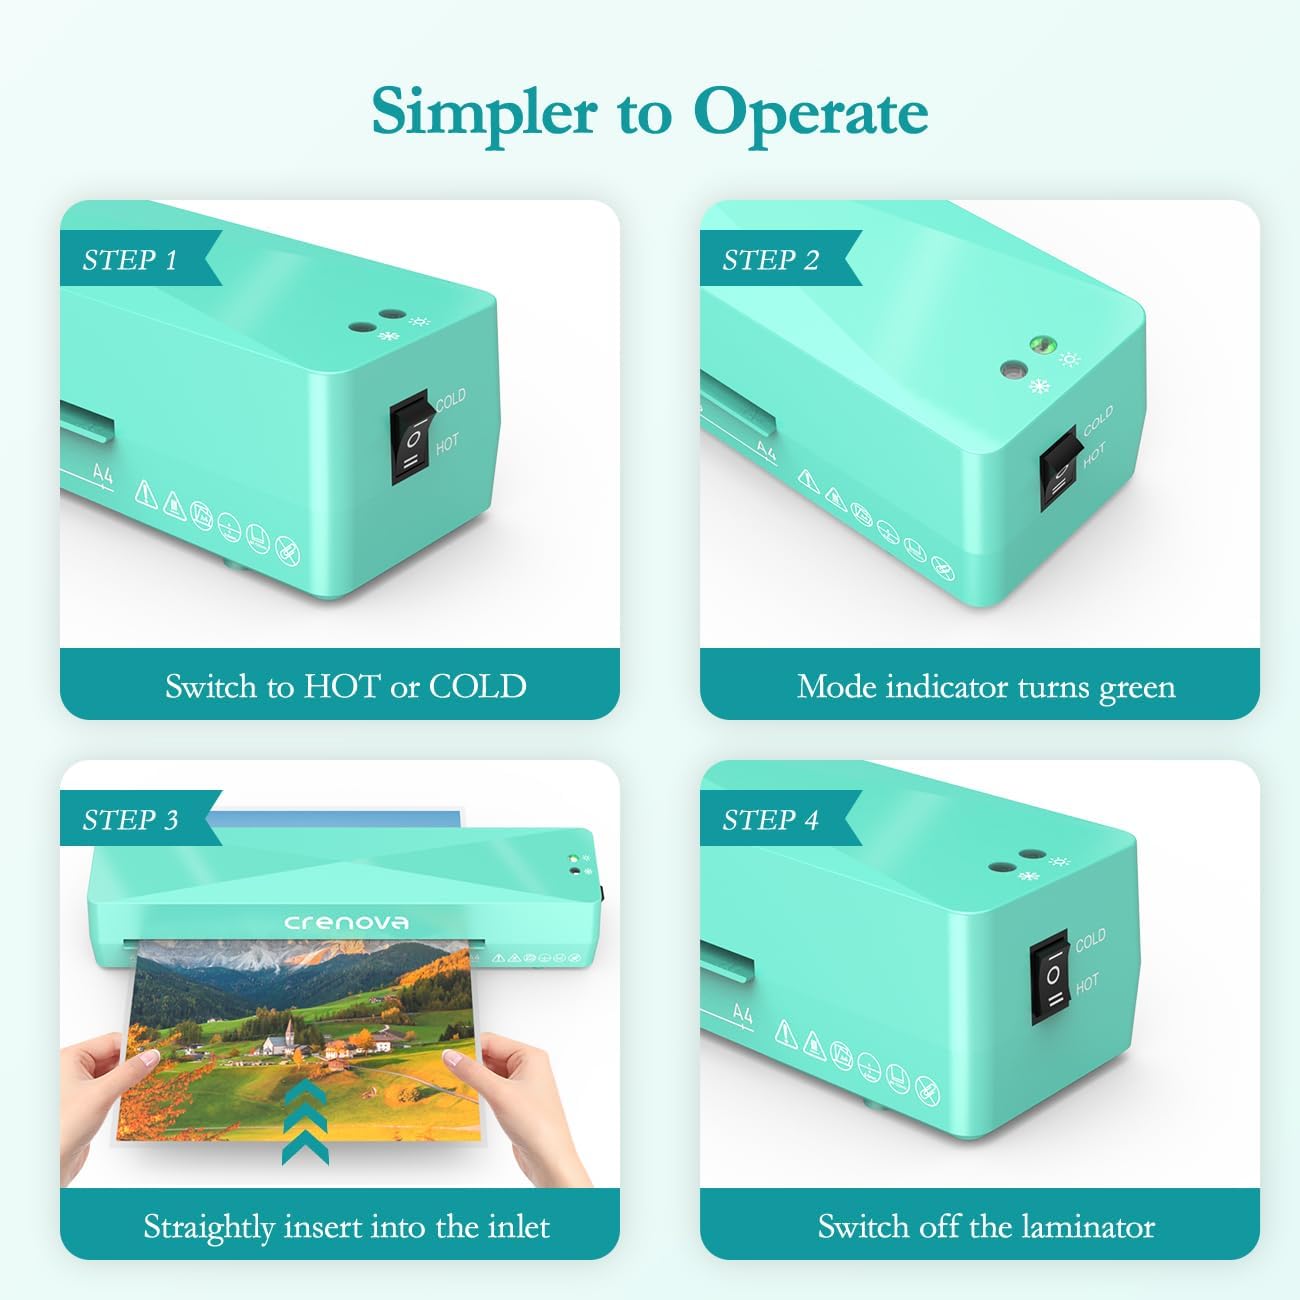
Image: Simple steps to operate the Crenova Laminator.
Cold Lamination
Cold lamination is ideal for heat-sensitive materials and uses self-adhesive pouches.
- Switch the Power/Mode Switch to the "COLD" position. Cold lamination does not require preheating.
- Place your document inside a self-adhesive cold laminating pouch.
- Insert the sealed edge of the pouch into the A4 Wide Inlet, feeding it straight into the machine.
- The laminator will feed the pouch through, applying pressure to seal it.
- Remove the laminated item once it exits the machine.
Tips for Best Results
- Always ensure the laminating pouch is inserted straight and centered to prevent wrinkling or uneven sealing.
- For optimal results, use high-quality laminating pouches.
- Avoid using pouches that are too thick or too large for the machine's capacity (max 230mm/9 inches wide, 80-125mic thickness).
- Do not laminate curled or wrinkled sheets, as this can lead to poor results or jams.
- Allow laminated items to cool completely on a flat surface before handling to ensure a strong, flat seal.

Image: Important notes for plastic sealing, illustrating common lamination errors to avoid.
Creative Uses
Your Crenova laminator can be used for various creative projects:
- Foiling: Print designs with a laser printer, place a foil sheet over the design, cover with white paper, and run through the hot laminator. Peel off the foil for a metallic effect.
- Preserving Dried Flowers: Carefully arrange dried flowers inside a laminating pouch and run through the laminator. For best results, run through twice to smooth out any bumps.
- Making Flash Cards: Laminate flash cards for durability and reusability, perfect for educational purposes.

Foiling with a Laminator

Preserving Dried Flowers

Making Flash Cards
Maintenance
- Always unplug the laminator and allow it to cool completely before cleaning.
- Wipe the exterior of the laminator with a soft, dry cloth. Do not use abrasive cleaners or solvents.
- Periodically run a cleaning sheet (a folded piece of paper or a dedicated cleaning sheet) through the laminator to remove any adhesive residue from the rollers.
Troubleshooting
| Problem | Possible Cause | Solution |
|---|---|---|
| Laminator not turning on. | Not plugged in; power switch off; power outage. | Ensure the power cord is securely plugged in. Check the power switch is in the ON position. Verify power supply. |
| Pouch jammed in the machine. | Pouch inserted incorrectly (e.g., open end first, tilted); pouch too thick; wrinkled document. | Immediately switch off the laminator. Push and hold the ABS lever to release the rollers and gently pull the pouch out. Ensure pouches are inserted sealed-end first and straight. |
| Bubbles or wrinkles after lamination. | Laminator not fully warmed up (Hot mode); incorrect pouch thickness; air trapped; roller defect. | Allow sufficient warm-up time until the green indicator light appears. Ensure pouch thickness is within 80-125mic. Smooth out any air bubbles before inserting. If persistent, try running the item through again or contact customer support if a roller defect is suspected. |
| Laminated item is cloudy or dull. | Laminator not hot enough; low-quality pouches. | Ensure the laminator is fully warmed up. Use recommended thermal pouches. |

Image: Steps to clear a paper jam using the ABS lever.
Specifications
| Feature | Detail |
|---|---|
| Brand | Crenova |
| Model Number | Green (FN001) |
| Product Dimensions | 13.19 x 3.46 x 2.56 inches |
| Item Weight | 1.94 pounds |
| Sheet Size Compatibility | Up to A4 (230mm / 9 inches wide) |
| Pouch Thickness | 80-125mic |
| Warm-up Time | 1-2 minutes |
| Lamination Speed | 320mm/min |
| Roller System | 2-Roller System |
| Noise Level | ≤55dB |

Image: Compact size and dimensions of the laminator.

Image: A4 wide inlet and examples of items suitable for lamination.
Warranty and Support
Crenova products are manufactured to high-quality standards. For information regarding warranty coverage, technical support, or service inquiries, please refer to the contact information provided on the product packaging or visit the official Crenova website.