1. Product Overview
The JBL RallyBar is a 21-inch Bluetooth universal outdoor vehicle soundbar designed for robust audio performance in challenging environments. It features a built-in 150W RMS amplifier, dynamic LED lights, and is IP66 rated for water and dust resistance, making it suitable for various outdoor and vehicle applications.
Key Features:
- Dynamic LED Lights: Integrated LED lighting with customizable patterns that can sync with music.
- 150Wrms Class-D Amplifier: Delivers powerful and clear audio output.
- IP66 Rated: Provides protection against dust ingress and powerful water jets.
- Broadcast Mode: Allows connection and synchronization with multiple RallyBar units for expanded audio coverage.
- Innovative Mounting Kits: Designed for versatile installation options on various vehicle types.
- JBL Click Remote Control Support: Compatible with the JBL Click Bluetooth controller (sold separately) for convenient music control.
- Automatic Audio Source Detection: Prioritizes audio sources (USB disk > Bluetooth > AUX-IN).
What's in the Box:
- 1x JBL RallyBar Soundbar
- 2x Security Cables
- 1x Small Wrench
- 1x G-Clamp
- Mounting Hardware (various clamps and brackets)
- Power Wiring Harness
- Allen Key
- Owner's Manual Keychain

Image 1.1: Front view of the JBL RallyBar soundbar, showcasing its integrated LED lighting and robust design.
2. Safety Information
Please read all safety instructions carefully before installing and operating the JBL RallyBar. Failure to follow these instructions may result in property damage, injury, or product malfunction.
- Power Connection: Ensure the power source matches the specified voltage (9.6 Volts DC). Incorrect voltage can damage the unit.
- Wiring: Always disconnect the vehicle's battery before making any electrical connections. Use appropriate gauge wiring and fuses as recommended.
- Mounting: Securely mount the soundbar using the provided hardware. Improper mounting can lead to the unit detaching during vehicle operation, causing damage or injury.
- Environmental Conditions: While IP66 rated, avoid submerging the unit in water or exposing it to extreme temperatures beyond its operating range.
- Hearing Protection: Prolonged exposure to high volume levels can cause permanent hearing damage. Adjust volume to a safe level.
- Vehicle Operation: Do not operate the soundbar in a manner that distracts from safe vehicle operation.
3. Setup and Installation
This section outlines the steps for installing your JBL RallyBar. Professional installation is recommended for optimal performance and safety.
3.1 Unpacking and Inspection
Carefully remove all components from the packaging. Inspect the soundbar and accessories for any signs of damage. Contact your dealer immediately if any items are missing or damaged.
3.2 Mounting the Soundbar
The RallyBar includes innovative mounting kits designed for various roll bar sizes. Choose a mounting location that does not obstruct your view or interfere with vehicle controls.
- Select the appropriate clamps and brackets for your vehicle's roll bar diameter.
- Attach the brackets to the soundbar using the provided screws.
- Position the soundbar on the roll bar and secure the clamps tightly. Ensure the soundbar is stable and does not move.
- Utilize the security cables by attaching one end to the soundbar and the other to a secure point on the vehicle, providing an additional safety measure.
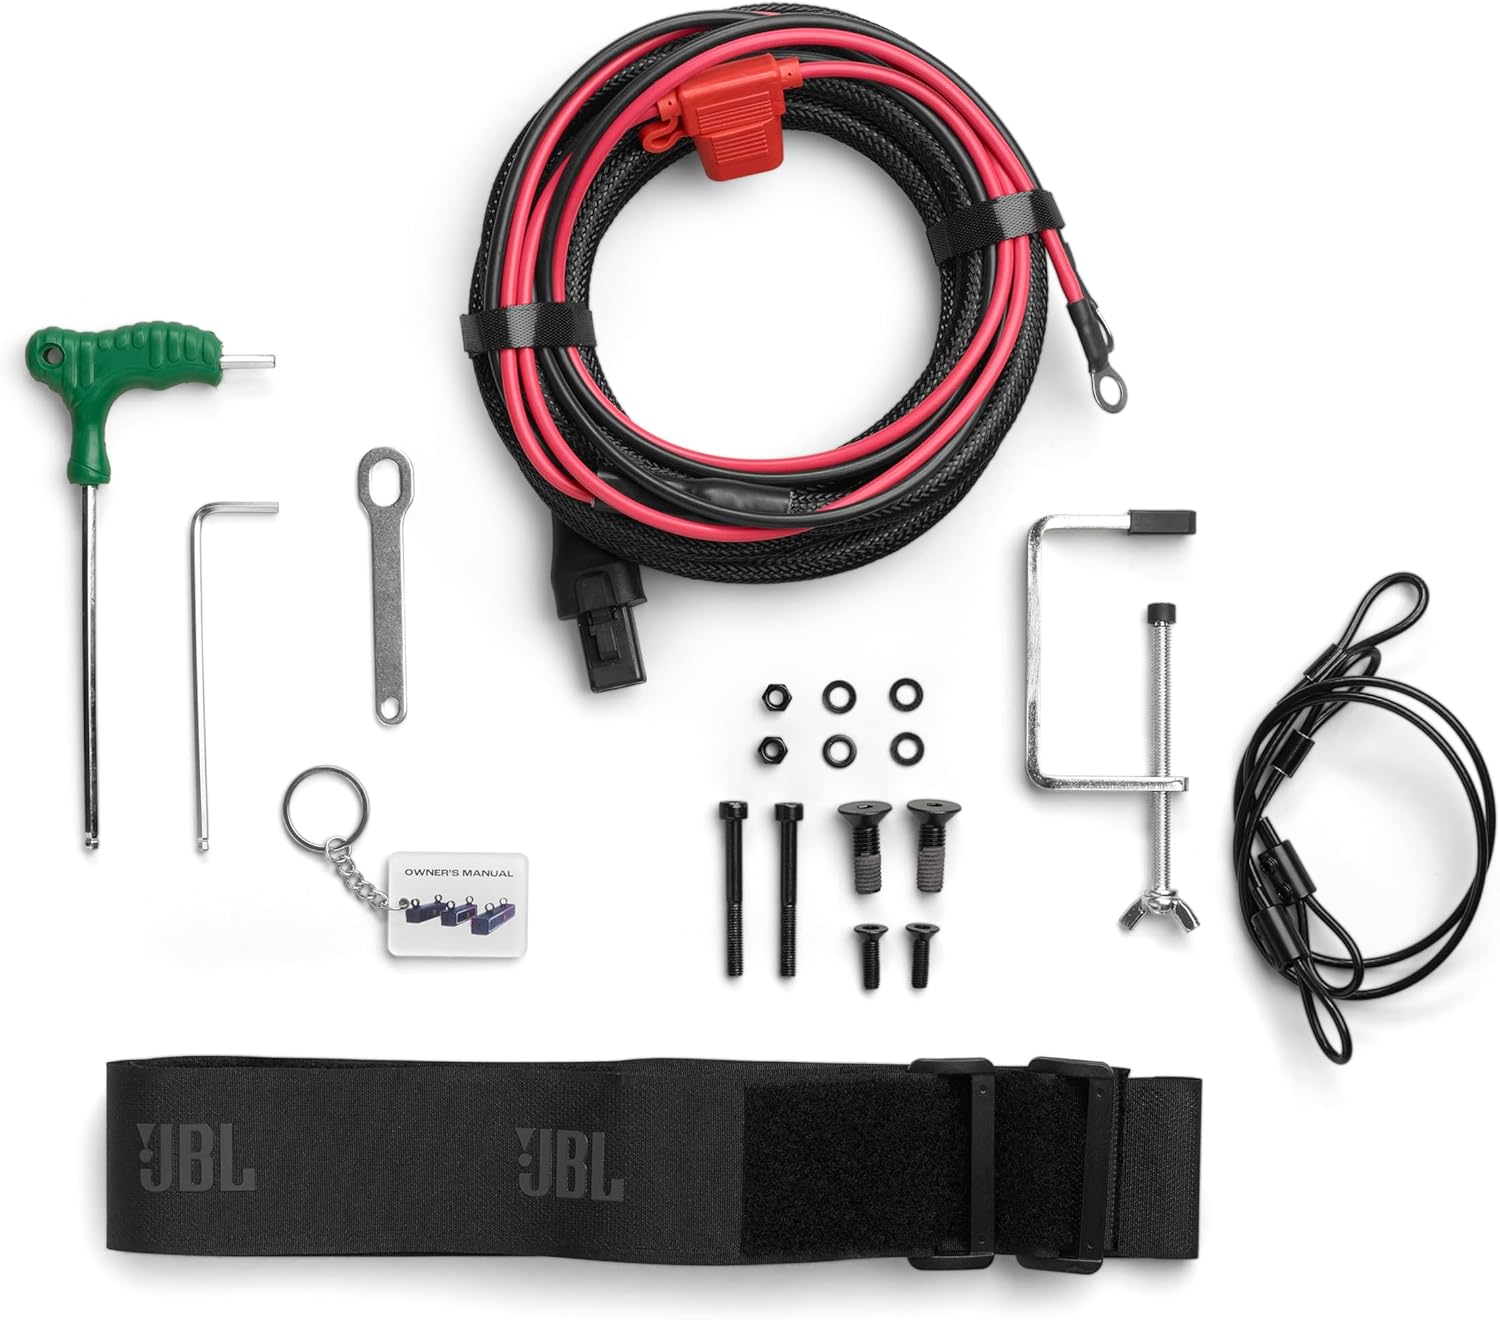
Image 3.1: Assortment of mounting hardware, including clamps and brackets, for secure installation.
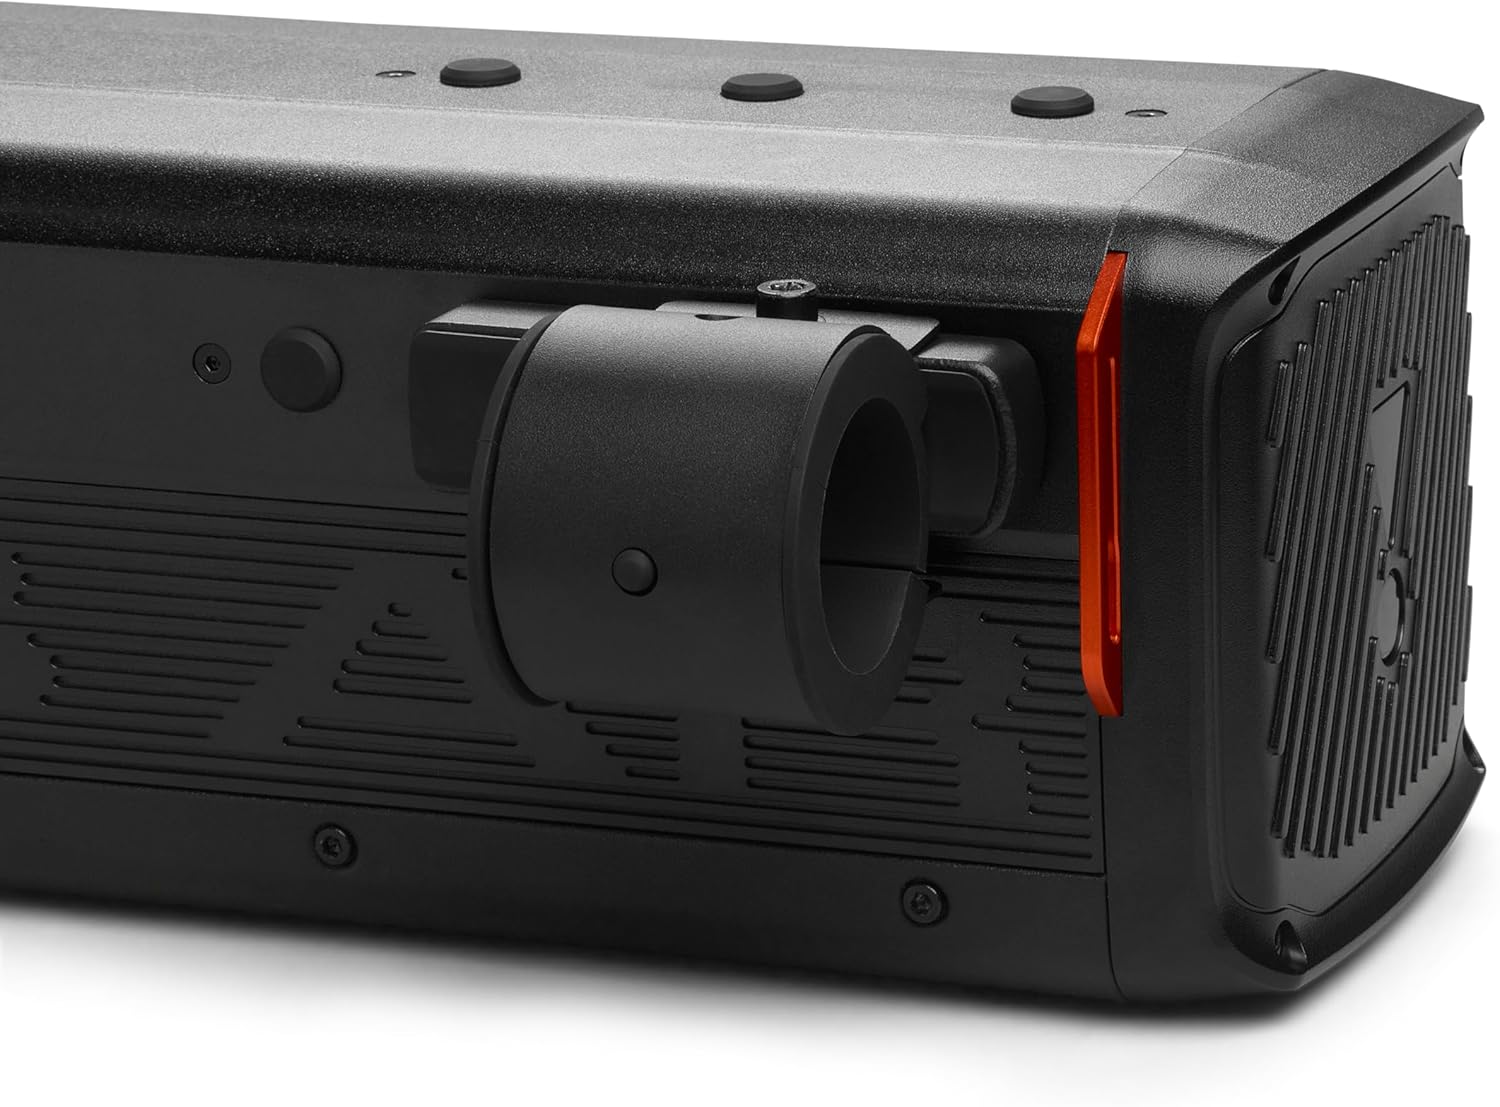
Image 3.2: Detailed view of a top-mounted bracket securely fastened to the soundbar.
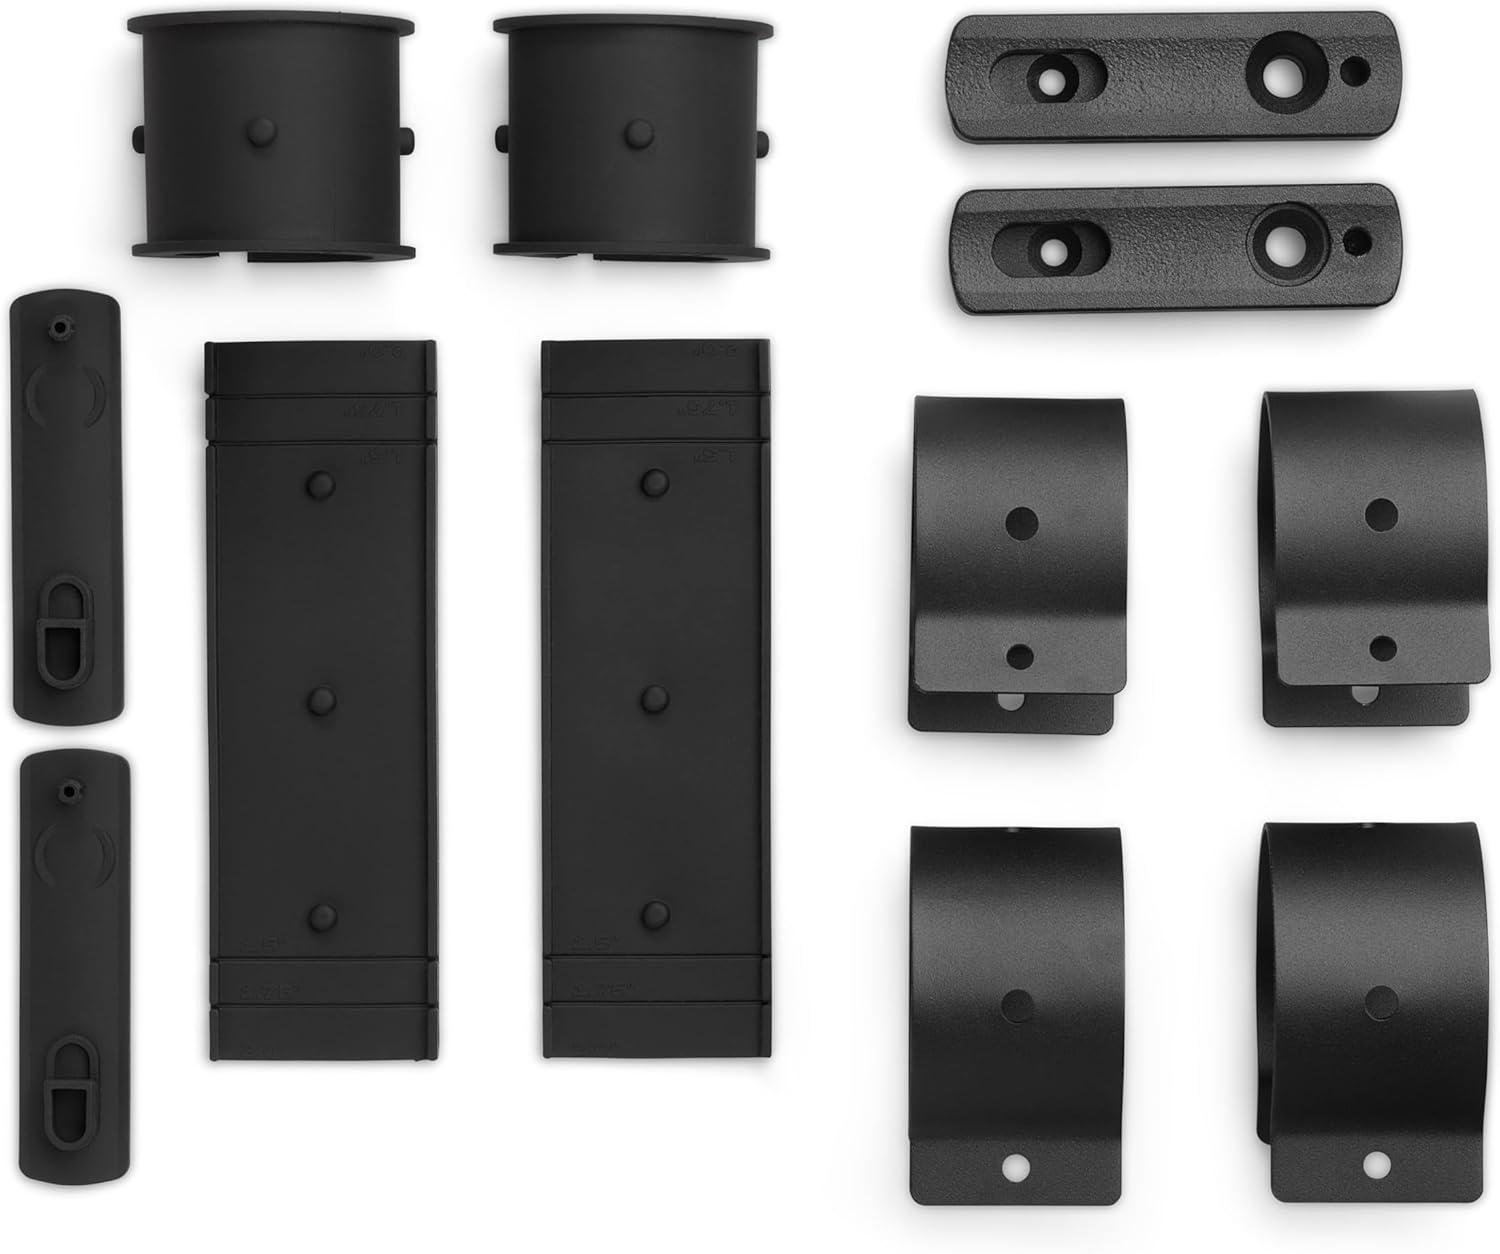
Image 3.3: Side profile of the RallyBar illustrating how the mounting bracket integrates with the unit.
3.3 Electrical Connections
The RallyBar requires a direct connection to your vehicle's 12V DC power system.
- Disconnect the negative terminal of your vehicle's battery before proceeding.
- Connect the red wire of the power harness to the positive (+) terminal of the vehicle's battery.
- Connect the black wire of the power harness to the negative (-) terminal of the vehicle's battery or a suitable ground point on the chassis.
- Ensure all connections are secure and properly insulated to prevent short circuits.
- Reconnect the vehicle's battery negative terminal.

Image 3.4: The power wiring harness and various tools provided for installation.

Image 3.5: Rear panel of the soundbar, detailing the USB, AUX-IN, AUX-OUT, and Power input connections.
4. Operating Instructions
Familiarize yourself with the controls and functions of your JBL RallyBar.
4.1 Power On/Off
Locate the power switch on the rear panel of the soundbar. Flip the switch to the 'ON' position to power on the unit. Flip to 'OFF' to power down.
4.2 Control Panel Functions
The top panel of the RallyBar features several control buttons:

Image 4.1: Top-mounted control panel with buttons for playback, volume, LED lights, and Bluetooth pairing.
- Play/Pause Button: Press to play or pause audio playback.
- Volume Up/Down Buttons: Press to adjust the audio volume.
- LED Light Control Button: Press to cycle through different LED light patterns or turn them off.
- Bluetooth Pairing Button: Press and hold to enter Bluetooth pairing mode.
4.3 Bluetooth Pairing
- Ensure the RallyBar is powered on.
- Press and hold the Bluetooth pairing button on the control panel until the LED indicator flashes, indicating pairing mode.
- On your mobile device, enable Bluetooth and search for available devices.
- Select 'JBL RallyBar' from the list of devices.
- Once connected, the LED indicator will stop flashing and remain solid.
4.4 Audio Source Selection
The RallyBar automatically detects and prioritizes audio sources:
- USB Disk: Insert a USB drive with audio files into the USB port. The RallyBar will automatically switch to USB playback.
- Bluetooth: Connect a device via Bluetooth as described above.
- AUX-IN: Connect an external audio device using a 3.5mm audio cable to the AUX-IN port.
Higher priority sources (USB > Bluetooth > AUX-IN) will override lower priority sources.
4.5 Broadcast Mode
Broadcast Mode allows multiple RallyBar units to play the same audio source simultaneously.
- Designate one RallyBar as the primary unit and connect your audio source to it.
- On the primary unit, activate Broadcast Mode (refer to the full owner's manual for specific button sequence).
- On other RallyBar units, activate Broadcast Receive Mode.
- The units will connect and synchronize audio playback.

Image 4.2: Multiple RallyBar units demonstrating the potential for synchronized audio and lighting in Broadcast Mode.
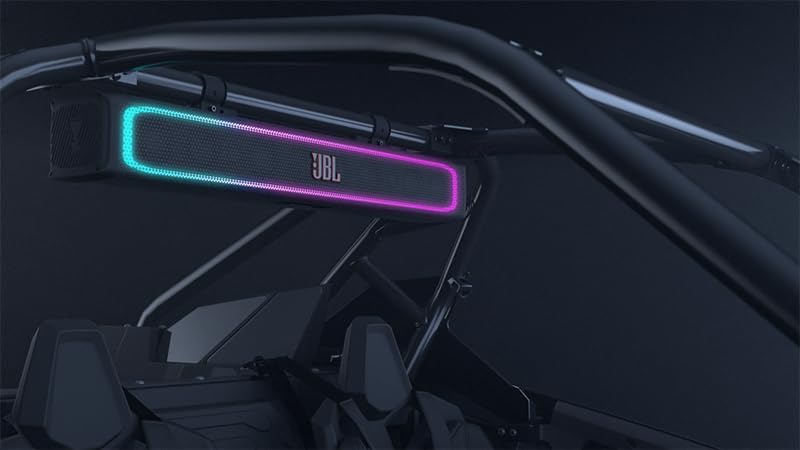
Image 4.3: The RallyBar mounted inside a vehicle, showcasing its dynamic LED lights during operation.

Image 4.4: An exterior front view of a vehicle equipped with the RallyBar, highlighting its prominent placement and illuminated LEDs.
5. Maintenance
Proper maintenance ensures the longevity and performance of your JBL RallyBar.
- Cleaning: Use a soft, damp cloth to clean the exterior of the soundbar. Avoid abrasive cleaners or solvents that could damage the finish or IP66 rating.
- Water and Dust Resistance: While IP66 rated, regularly inspect the rubber seals on ports and covers to ensure they are free of debris and properly seated. This maintains the water and dust resistance.
- Connections: Periodically check all electrical connections for corrosion or looseness. Tighten as necessary.
- Storage: If storing the vehicle or soundbar for extended periods, ensure it is in a dry, temperate environment.
6. Troubleshooting
This section addresses common issues you might encounter with your JBL RallyBar.
No Power:
- Check the power switch on the rear panel to ensure it is in the 'ON' position.
- Verify all power connections to the vehicle's battery are secure and free of corrosion.
- Inspect the inline fuse on the power harness. Replace if blown.
- Ensure the vehicle's battery has sufficient charge.
No Sound:
- Increase the volume on both the RallyBar and your connected audio device.
- Confirm the correct audio source is selected (Bluetooth, USB, AUX-IN).
- If using Bluetooth, ensure the device is properly paired and connected. Try re-pairing.
- If using AUX-IN, check the audio cable for damage and ensure it is fully inserted.
- If using USB, ensure the audio files are in a supported format.
Bluetooth Connection Issues:
- Ensure your device is within the Bluetooth range (up to 100 meters).
- Clear previous Bluetooth pairings on your device and the RallyBar, then attempt to re-pair.
- Turn off and on the Bluetooth function on your device.
- Restart both the RallyBar and your audio device.
LED Lights Not Functioning:
- Press the LED light control button on the top panel to cycle through patterns or activate them.
- Ensure the soundbar is receiving adequate power.
7. Specifications
| Feature | Specification |
|---|---|
| Model Name | RallyBar |
| Item Model Number | JBLPWSRALLYBARAM |
| Product Dimensions | 7.6"D x 24"W x 9"H |
| Item Weight | 12 Pounds |
| Speaker Size | 21 Inches |
| Speaker Type | Outdoor |
| Speaker Maximum Output Power | 150 Watts RMS |
| Frequency Response | 45 Hz |
| Signal-to-Noise Ratio | 81 dB |
| Input Voltage | 9.6 Volts (DC) |
| Power Source | Corded Electric |
| Wireless Communication Technology | Bluetooth |
| Bluetooth Range | 100 Meters |
| Connectivity Technology | USB, Bluetooth, AUX-IN |
| Water Resistance Level | IP66 Rated (Water and Dust Resistant) |
| Material | Plastic or Rubberized |
| Color | Black |
| Included Components | Soundbar, Security Cables, Small Wrench, G-Clamp |

Image 7.1: Dimensional overview of the JBL RallyBar, indicating its depth, width, and height.
8. Warranty and Support
8.1 Limited Warranty
The JBL RallyBar comes with a Limited Warranty. Please refer to the warranty card included with your product or visit the official JBL website for detailed terms and conditions regarding coverage, duration, and claims process.
8.2 Customer Support
For technical assistance, troubleshooting beyond this manual, or warranty inquiries, please contact JBL customer support. Contact information can typically be found on the official JBL website or in the product packaging.
When contacting support, please have your product model number (JBLPWSRALLYBARAM) and proof of purchase readily available.