1. Introduction
Thank you for choosing the DUDUPET DU4L-KA Automatic Pet Feeder. This device is designed to provide a convenient and reliable feeding solution for your pet, ensuring they receive meals on a consistent schedule and with precise portions. Please read this manual thoroughly before use to ensure proper operation and maintenance.
2. Safety Information
- Always place the feeder on a stable, level surface to prevent tipping.
- This appliance is intended for indoor use only.
- Do not immerse the main unit in water or any other liquid. The main unit is not waterproof.
- Keep out of reach of children and pets to prevent accidental operation or damage.
- Use only the provided AC adapter.
- Ensure the power cord is not chewed by pets.
- Only use dry pet food with a diameter between 3-10mm.
- Regularly clean the food tank and bowl to maintain hygiene.
3. Package Contents
Please check the package to ensure all items are present:
- DUDUPET DU4L-KA Automatic Pet Feeder Main Unit
- Stainless Steel Food Bowl
- AC Power Adapter
- Desiccant Bag
- Instruction Manual

Image: DUDUPET DU4L-KA Automatic Pet Feeder and included accessories, including the main unit, stainless steel bowl, power adapter, and manual.
4. Product Diagram

Image: Front view of the DUDUPET DU4L-KA Automatic Pet Feeder, showing the food tank, control panel, and stainless steel bowl.
- Food Tank Lid: Secures the food and houses the desiccant bag. Features a locking mechanism.
- Food Tank: 4-liter capacity for dry pet food.
- Food Level Window: Allows visual inspection of food quantity.
- Control Panel: Buttons and display for setting schedules and functions.
- Food Outlet: Where food is dispensed into the bowl.
- Stainless Steel Bowl: Removable and easy to clean, designed for comfortable pet eating.
- Power Port: For connecting the AC adapter.
- Battery Compartment: For backup power (requires 3 x D-size alkaline batteries, not included).
5. Setup
5.1 Assembly
- Unpack all components from the box.
- Place the main unit on a flat, stable surface.
- Insert the stainless steel food bowl into the designated slot at the base of the feeder.
- Open the food tank lid. Locate the desiccant bag holder on the underside of the lid. Insert the provided desiccant bag into the holder to help keep food fresh.
- Fill the food tank with dry pet food. Ensure the food size is between 3-10mm.
- Close the food tank lid securely. The lid features a locking mechanism to prevent pets from opening it.

Image: Visual guide showing the assembly steps, including opening the lid, inserting the desiccant, attaching the food tray, filling food, and closing the lid.
5.2 Power Supply
The feeder supports two power supply methods:
- AC Adapter: Connect the provided AC adapter to the power port on the feeder and plug it into a wall outlet. This is the primary power source.
- Battery Backup: For power outage protection, install 3 x D-size alkaline batteries (not included) into the battery compartment at the bottom of the unit. If AC power is interrupted, the feeder will automatically switch to battery power to maintain the feeding schedule. It is highly recommended to use both AC power and battery backup.

Image: The DUDUPET pet feeder highlighting its dual power options: AC adapter connection and the battery compartment for D-size batteries.
6. Operating Instructions
6.1 Control Panel Overview
The control panel on the side of the feeder allows you to set the time, schedule meals, and record voice messages. The panel will auto-lock after approximately 30 seconds of inactivity.
6.2 Setting Current Time
Refer to the specific buttons on your control panel (usually marked with a clock icon or 'SET' button) to adjust the current time. Follow the on-screen prompts to set the hour and minute.
6.3 Programming Feeding Schedule
The feeder can be programmed for 1 to 6 meals per day. Each meal can be set with a specific time and portion size (10g-200g per portion). One portion is approximately 10g.
- Press the 'SET' or 'PROGRAM' button to enter the feeding schedule setting mode.
- Select the meal number (e.g., Meal 1, Meal 2).
- Set the desired feeding time for that meal.
- Set the portion size for that meal.
- Repeat for up to 6 meals.
- Save the settings (usually by pressing 'SET' again or waiting for auto-save).

Image: The automatic pet feeder dispensing food into the bowl, with a cat nearby, demonstrating the scheduled feeding function.

Image: An example feeding schedule showing multiple meal times and portion sizes throughout the day, emphasizing a balanced diet for pets.
6.4 Voice Recording Function
The feeder includes a 10-second voice recording function to call your pet at meal times, providing a sense of comfort and familiarity.
- Press and hold the 'RECORD' button (often indicated by a microphone icon).
- Speak your message clearly into the microphone for up to 10 seconds.
- Release the 'RECORD' button to save the message.
- The recorded message will play automatically at each scheduled feeding time.

Image: The DUDUPET feeder illustrating the voice recording function, with a speech bubble indicating a pet owner's recorded message.
6.5 Manual Feeding
To dispense food manually outside of the scheduled times, press the 'MANUAL' or 'FEED' button (often indicated by a food icon). Each press will dispense one portion of food.
7. Maintenance
7.1 Cleaning
Regular cleaning is essential for your pet's health and the feeder's longevity.
- Removable Parts (Food Tank Lid, Food Tank, Stainless Steel Bowl): These parts can be detached from the main unit and washed with water and mild detergent. Rinse thoroughly and dry completely before reassembling.
- Main Unit: The main unit is not waterproof. To clean, wipe with a damp cloth or wet towel. Do not use abrasive cleaners. Ensure no water enters the electronic components.

Image: The DUDUPET feeder with its components separated, demonstrating how easily parts can be removed for thorough cleaning.
7.2 Desiccant Replacement
The desiccant bag helps maintain food freshness. Replace it periodically (e.g., every 1-2 months) to ensure optimal performance.
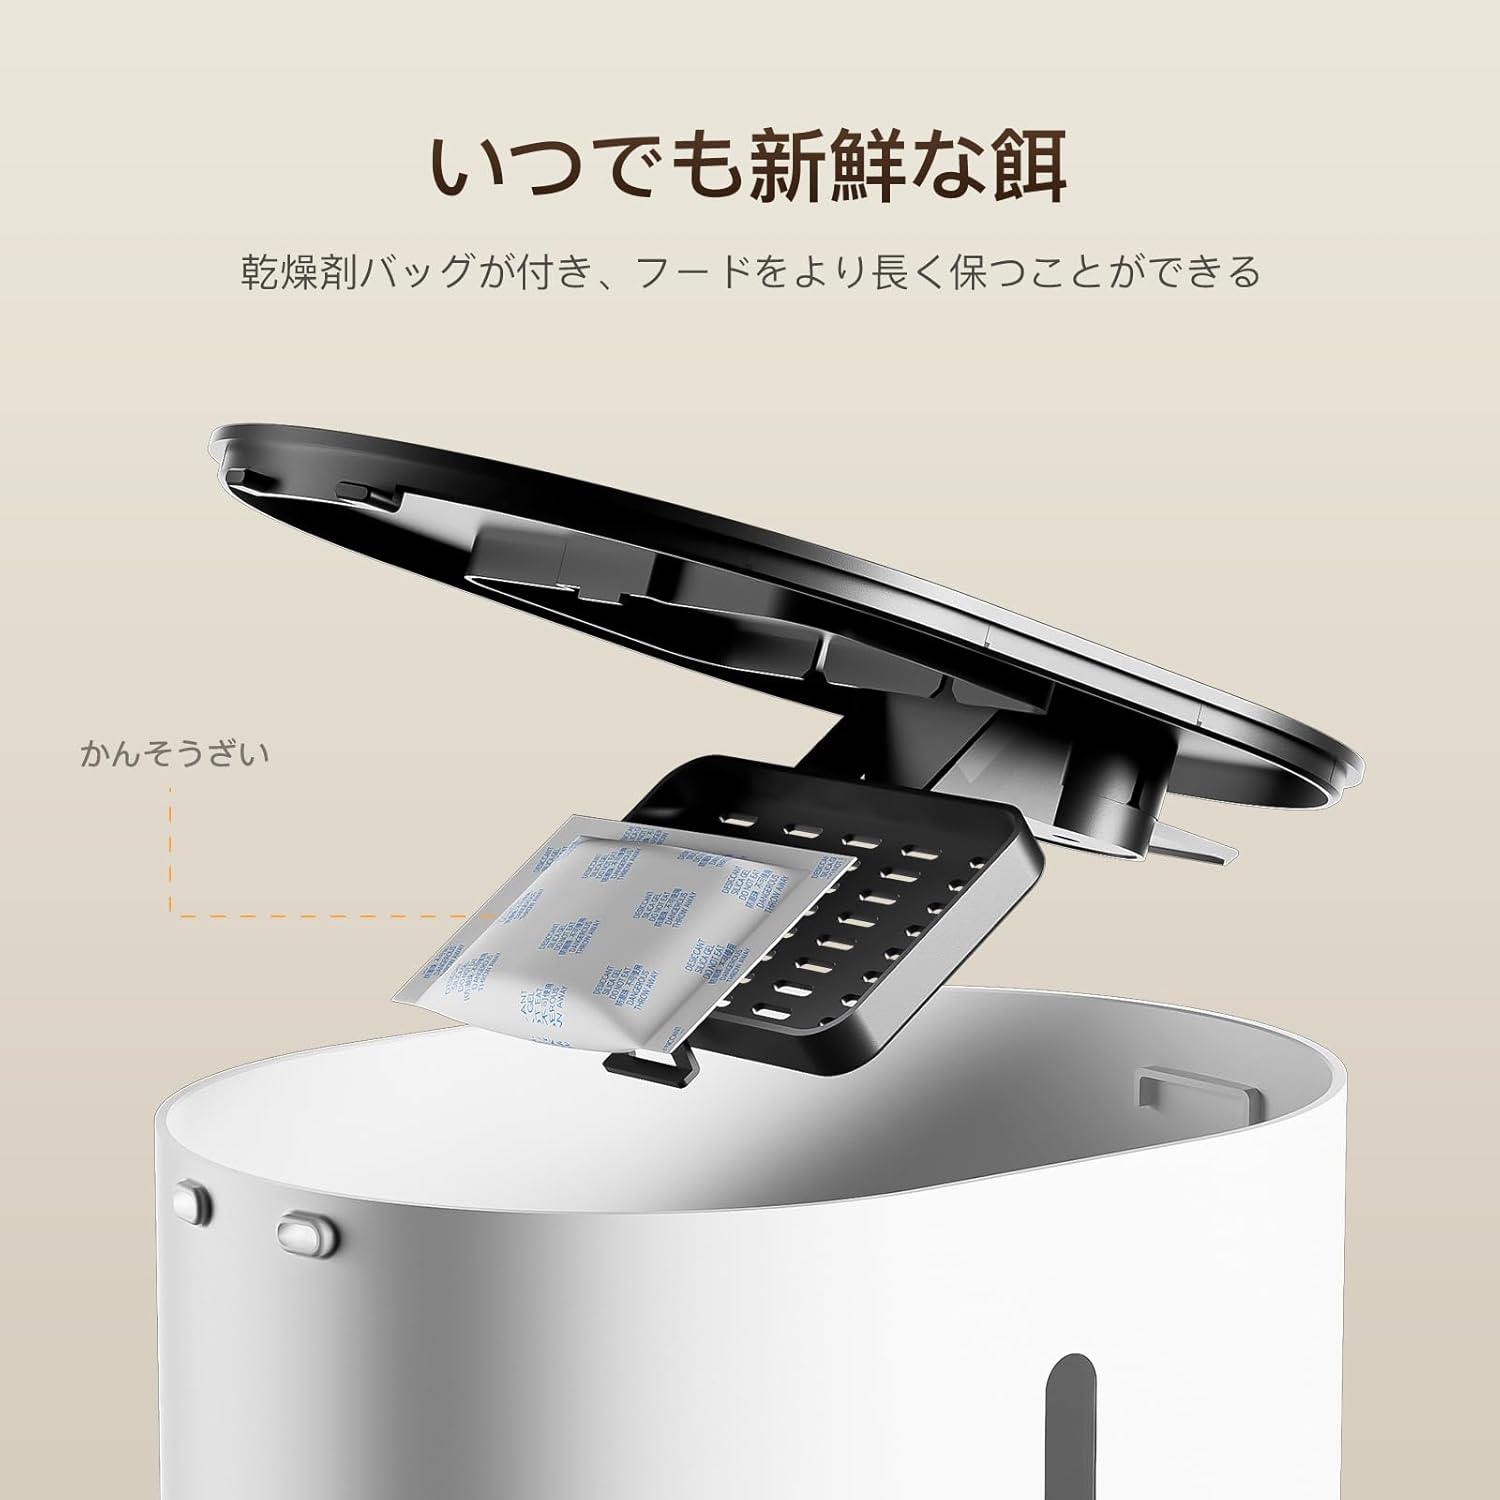
Image: A desiccant bag being placed into its designated compartment on the underside of the feeder's lid, ensuring food freshness.
8. Troubleshooting
| Problem | Possible Cause | Solution |
|---|---|---|
| Feeder does not dispense food. | No food in tank; food clogged; power issue; incorrect settings. | Refill food tank. Check for clogs in the food outlet. Ensure power is connected and batteries are installed. Verify feeding schedule settings. |
| Food is not fresh. | Lid not sealed; desiccant bag needs replacement. | Ensure the food tank lid is securely closed. Replace the desiccant bag. |
| Feeder loses settings after power loss. | No battery backup installed. | Install 3 x D-size alkaline batteries for backup power. |
| Food gets stuck in the outlet. | Food size too large; excessive food in bowl; mechanism obstruction. | Use appropriate dry food size (3-10mm). Clear any excess food from the bowl. Check for foreign objects. The feeder has an infrared sensor to detect and prevent clogging. |

Image: Diagram illustrating the infrared sensor at the food outlet, designed to detect and prevent food clogging.
9. Specifications
| Feature | Detail |
|---|---|
| Model Number | DU4L-KA |
| Capacity | 4 Liters (approx. 2.5 kg dry food) |
| Feeding Schedule | 1-6 meals per day |
| Portion Size | 1-20 portions per meal (approx. 10g per portion) |
| Food Type | Dry food, 3-10mm diameter |
| Voice Recording | Up to 10 seconds |
| Power Supply | AC Adapter (included) or 3 x D-size alkaline batteries (not included) |
| Material | Food-grade ABS plastic, 304 Stainless Steel bowl |
| Color | White |
10. Warranty and Support
All DUDUPET feeders come with a 12-month quality support. If you encounter any issues with the product, please contact DUDUPET customer service. We will gladly assist with troubleshooting or facilitate an exchange procedure under the warranty plan.
For support, please refer to the contact information provided with your purchase or visit the official DUDUPET store on Amazon: DUDUPET Amazon Store


