Introduction
This manual provides detailed instructions for the installation, operation, and maintenance of your EBTOOLS 4.3-inch 1080P Mirror Dash Cam. This device is designed to record video footage from both the front and rear of your vehicle, offering features such as parking monitoring and loop recording for enhanced driving safety and evidence collection. Please read this manual thoroughly before using the product to ensure proper functionality and to avoid any damage.
Product Features
- Durable Construction: Manufactured from high-quality ABS material for robustness and extended durability.
- Wide-Angle Lenses: Equipped with wide-angle lenses to minimize blind spots and capture comprehensive road details.
- Loop Recording: Ensures continuous recording by automatically overwriting the oldest video files when the memory card reaches its capacity.
- All-Weather Performance: Capable of recording clear video footage even in adverse weather conditions such as rain or fog.
- User-Friendly Design: Features a straightforward installation process and intuitive controls for ease of use.
Package Contents
Please verify that all the following items are included in your package:
- EBTOOLS 4.3-inch Mirror Dash Cam Unit
- Rearview Camera
- Car Charger
- Rear Camera Connection Cable
- Mounting Straps/Adhesive
- User Manual (This document)

Setup
1. Mounting the Dash Cam
Secure the mirror dash cam over your vehicle's existing rearview mirror using the provided mounting straps. Ensure it is firmly attached and does not obstruct your view.
2. Connecting the Rear Camera
Route the rear camera cable from the dash cam to the desired mounting location at the rear of your vehicle. Connect the rear camera to the AV IN port on the main dash cam unit. For optimal performance, ensure the cable is neatly tucked away and secured.


3. Power Connection
Connect the provided car charger to the dash cam's power input port and then plug the other end into your vehicle's 12V power outlet (cigarette lighter socket). The device will typically power on automatically with the vehicle's ignition.
4. Insert Memory Card
Insert a compatible Micro SD card (not included) into the TF CARD slot on the dash cam. Ensure the card is inserted correctly until it clicks into place. A high-speed Class 10 or higher card is recommended for reliable recording.

Operating Instructions
Power On/Off
- Automatic: The dash cam will power on and begin recording automatically when your vehicle's ignition is turned on.
- Manual: Press and hold the Power button (usually marked with a power symbol) to manually turn the device on or off.
Menu Navigation
Use the physical buttons located on the bottom of the mirror unit to navigate through the menu options:
- Menu Button: Press to enter the settings menu.
- Up/Down Buttons: Use to scroll through menu options.
- OK Button: Press to confirm a selection or setting.
Recording Modes
- Loop Recording: This feature records video in continuous segments (e.g., 1, 2, 3, or 5 minutes). When the memory card is full, the oldest files are automatically overwritten to make space for new recordings.
- Motion Detection: When enabled, the dash cam will automatically start recording if it detects movement in front of the vehicle while parked. This feature is useful for parking surveillance.
Video Resolution Settings
You can adjust the video resolution for both front and rear cameras in the settings menu:
- Front Camera: Select between 1080P (FHD 1400x1080) or 720P (HD 1280x720).
- Rear Camera: Records at 720P resolution.
Language Settings
The device supports multiple languages. Navigate to the language settings in the menu to select your preferred language, including English, German, French, Italian, Japanese, Korean, and Simplified Chinese.

Maintenance
- Cleaning: Use a soft, dry cloth to clean the dash cam screen and lenses. Avoid using abrasive cleaners or solvents.
- Memory Card: Regularly format your Micro SD card (at least once a month) to ensure optimal performance and prevent data corruption. Back up any important footage before formatting.
- Temperature: Avoid exposing the device to extreme temperatures, both hot and cold, as this can affect battery life and component integrity.
Troubleshooting
- Device not powering on:
- Ensure the car charger is properly connected to both the dash cam and the vehicle's 12V power outlet. Check if the vehicle's ignition is on. Test the charger in another port or with another device if possible.
- Recording issues (e.g., stops recording, corrupted files):
- Verify that a compatible, high-speed Micro SD card (Class 10 or higher) is inserted correctly. Format the memory card through the dash cam's settings menu. If issues persist, try a different memory card.
- Screen display problems (e.g., black screen, distorted image):
- Check all cable connections, especially for the rear camera. Try resetting the device to factory settings via the menu. If the problem continues, contact customer support.
- Rear camera not displaying:
- Ensure the rear camera cable is securely connected to both the rear camera and the AV IN port on the main unit. Check for any damage to the cable or connectors.
Specifications
| Item Type | 4.3-inch Mirror Dash Cam |
| Material | ABS |
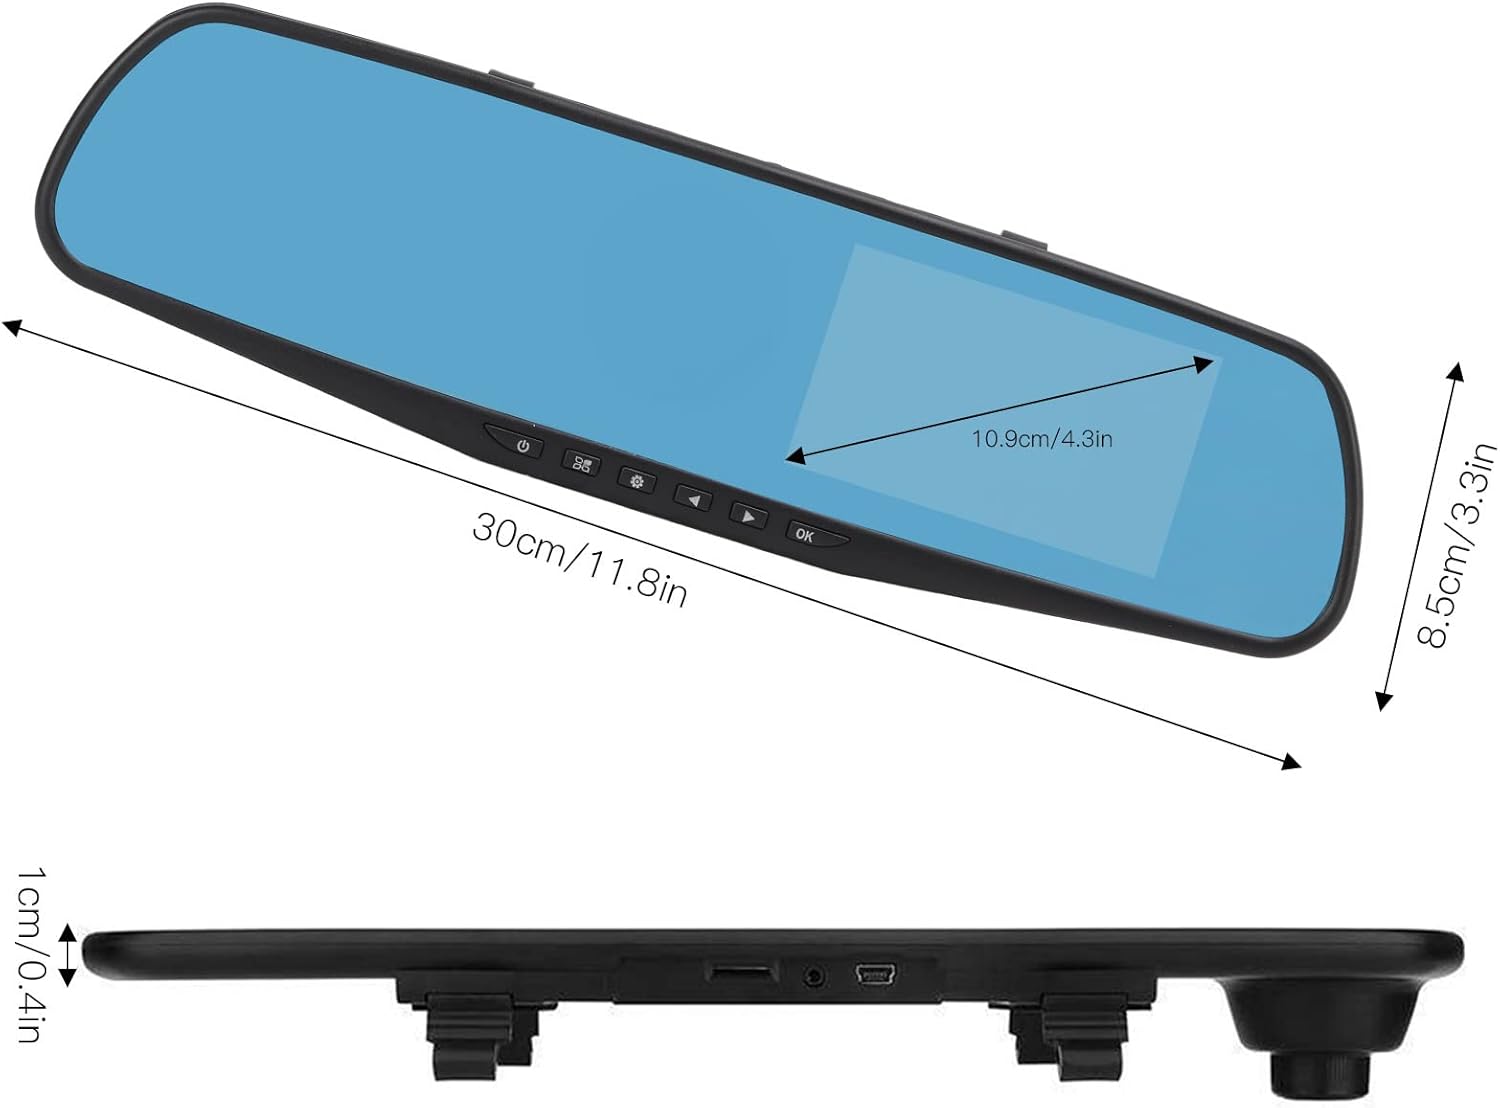
| Screen Size | 4.3 inches |
| Display Type | TFT LCD |
| Front Camera Angle | 110 degrees |
| Rear Camera Angle | 90-110 degrees (Adjustable) |
| Front Video Resolution | 1080P (FHD 1400x1080), 720P (HD 1280x720) |
| Rear Video Resolution | 720P |
| Loop Recording Intervals | 1 minute, 2 minutes, 3 minutes, 5 minutes |
| Motion Detection | Supported |
| Image Resolution | 12MP, 10MP, 5MP, 3MP, 2MP, 1.3MP |
| Video Format | AVI |
| Image Format | JPEG |
| Lens Type | F2.78 glass resolution multi-layer filter wide-angle lens |
| Supported Languages | English, German, French, Italian, Japanese, Korean, Simplified Chinese |
| Video Output | USB Card Reader |
| Mounting Method | Adhesive type |
| Product Dimensions | Approx. 30cm (11.8in) L x 8.5cm (3.3in) W x 1cm (0.4in) T |
| Package Dimensions | 34 x 12 x 6 cm; 512 g |
Warranty and Support
For warranty information or technical assistance, please refer to the warranty card included with your product or contact EBTOOLS customer support through the retailer's platform where the product was purchased. Our support team is available to help with any questions or issues you may encounter.