1. Introduction
This instruction manual provides essential information for the safe installation, operation, and maintenance of your NOPAARD 52-inch Smart Wood Ceiling Fan with Light. Please read this manual thoroughly before installation and retain it for future reference.
The NOPAARD 52-inch Smart Wood Ceiling Fan (Model 52-YJ682) is designed to provide efficient air circulation and lighting for indoor and covered outdoor spaces. It features a quiet DC motor, dimmable LED light with adjustable color temperature, and multiple control options including remote, smartphone app, and voice commands via Alexa or Google Assistant.
2. Safety Information
- Always disconnect power at the circuit breaker before beginning installation or performing any maintenance.
- Consult a qualified electrician if you are unsure about wiring procedures.
- Ensure the mounting structure can safely support the weight of the fan (approximately 8.36 lbs).
- Do not expose the damp-rated fan to direct water spray or submersion. It is suitable for covered outdoor patios, porches, and gazebos, but not for direct rain exposure.
- Keep hands and objects clear of the fan blades during operation.
- Use only the replacement parts specified by the manufacturer.
3. Package Contents
Verify that all components are present before beginning installation:
- Fan Motor Assembly
- 3 Wood Fan Blades
- LED Light Kit
- Remote Control
- Receiver for Smart Control
- Mounting Bracket
- Down-rods (6-inch and 10-inch options)
- Hardware Pack (screws, washers, wire nuts)
- Instruction Manual

Image: NOPAARD 52-inch Smart Wood Ceiling Fan with Light, showing the fan unit, two down-rods, a smartphone with the control app, a smart speaker, and the remote control.
4. Specifications
| Feature | Specification |
|---|---|
| Brand | NOPAARD |
| Model Name | 52-YJ682 |
| Size | 52 inches |
| Color | Red Walnut |
| Material | Metal, Wood |
| Power Source | DC |
| Voltage | 110 Volts |
| Wattage | 50 watts |
| Air Flow Capacity | 6872 Cubic Feet Per Minute (CFM) |
| Sound Level | Less than 35 dB (at speed 1-2) |
| Light Type | 3CCT Dimmable LED (3000K, 4000K, 5000K) |
| Light Brightness | 0-100% Dimmable, up to 2000 Lumens |
| Control Methods | Remote, Tuya App, Voice (Alexa, Google Assistant) |
| Motor Type | Reversible Quiet DC Motor |
| Mounting Options | Flat Ceiling, Sloped Ceiling (up to 20°) |
| Down-rod Lengths | 6 inches, 10 inches |
| Usage Environment | Indoor, Covered Outdoor (Damp-rated) |
| Certifications | ETL, FCC |

Image: Diagram illustrating the fan's dimensions (52-inch blade length, 13.4-17.4 inch height), available down-rod sizes (6 and 10 inches), and compatible mounting types (flat ceiling and sloped ceiling up to 20 degrees).
5. Setup and Installation
Professional installation is recommended for safety and optimal performance. Ensure all power is disconnected at the circuit breaker before proceeding.
5.1 Mounting the Fan
- Prepare the Mounting Location: Ensure the electrical box is securely mounted and capable of supporting the fan's weight.
- Install the Mounting Bracket: Attach the mounting bracket to the electrical box using the provided screws. Ensure it is firmly secured.
- Assemble Down-rod: Choose either the 6-inch or 10-inch down-rod based on your ceiling height and preference. Feed the fan wires through the chosen down-rod.
- Hang the Fan: Carefully lift the fan motor assembly and hang it onto the mounting bracket hook.
5.2 Wiring Connections
- Connect the fan's electrical wires to the household wiring according to local electrical codes. Typically, this involves connecting live, neutral, and ground wires.
- Ensure all connections are secure using wire nuts.
- Tuck all wires neatly into the electrical box.
5.3 Attaching Blades and Light Kit
- Attach the three wood fan blades to the motor housing using the provided screws. Ensure they are tightened securely.
- Connect the LED light kit wiring to the fan motor assembly.
- Secure the light kit to the fan motor assembly.
5.4 Final Steps
- Raise the canopy to cover the mounting bracket and secure it.
- Restore power at the circuit breaker.
- Test the fan and light functions using the remote control.
6. Operating Instructions
Your NOPAARD smart ceiling fan offers multiple convenient control methods.

Image: Illustration of the four control methods: Remote Control, Tuya APP Control, Voice Control (Alexa/Google Assistant), and Wall Control.
6.1 Remote Control
The included remote control allows for direct operation of the fan and light functions.
- Fan On/Off: Press the fan power button.
- Fan Speed: Adjust between 6 variable speeds using the speed buttons.
- Light On/Off: Press the light power button.
- Light Dimming: Use the dimming buttons to adjust brightness from 0% to 100%.
- Color Temperature: Cycle through 3000K (warm yellow), 4000K (bright daylight), and 5000K (cool white) light settings.
- Reversible Motor: Press the reverse button to change blade direction for summer (downward airflow) or winter (upward airflow) modes.
- Timer: Activate the 2-hour timer function.
6.2 App Control (Tuya APP)
For advanced control and smart home integration, download the Tuya Smart app on your smartphone.
- Download and install the Tuya Smart app from your device's app store.
- Register or log in to your Tuya account.
- Ensure your smartphone is connected to a 2.4GHz Wi-Fi network.
- Follow the in-app instructions to add your NOPAARD ceiling fan. This typically involves putting the fan into pairing mode (refer to the app for specific steps).
- Once paired, you can control all fan and light functions from anywhere via the app.
6.3 Voice Control (Alexa & Google Assistant)
Integrate your NOPAARD smart ceiling fan with Amazon Alexa or Google Assistant for convenient voice commands.
- Ensure your fan is successfully paired with the Tuya Smart app.
- Open the Alexa or Google Home app.
- Link your Tuya Smart account within the Alexa/Google Home app (usually found under 'Skills' for Alexa or 'Works with Google' for Google Home).
- Discover new devices. Your NOPAARD fan should appear.
- You can now use voice commands such as:
- "Alexa, turn on the fan."
- "Hey Google, set fan speed to 3."
- "Alexa, turn off the bedroom light."
- "Hey Google, change fan light to warm white."
- Summer Mode: Blades rotate counter-clockwise, pushing air downwards to create a cooling effect.
- Winter Mode: Blades rotate clockwise, drawing air upwards to circulate warm air trapped near the ceiling.
6.4 Fan Speed Adjustment
The fan offers 6 variable speeds to meet different airflow needs. Levels 1-2 provide a low, comfortable breeze, levels 3-4 offer a natural wind, and levels 5-6 deliver a high, cooling wind.
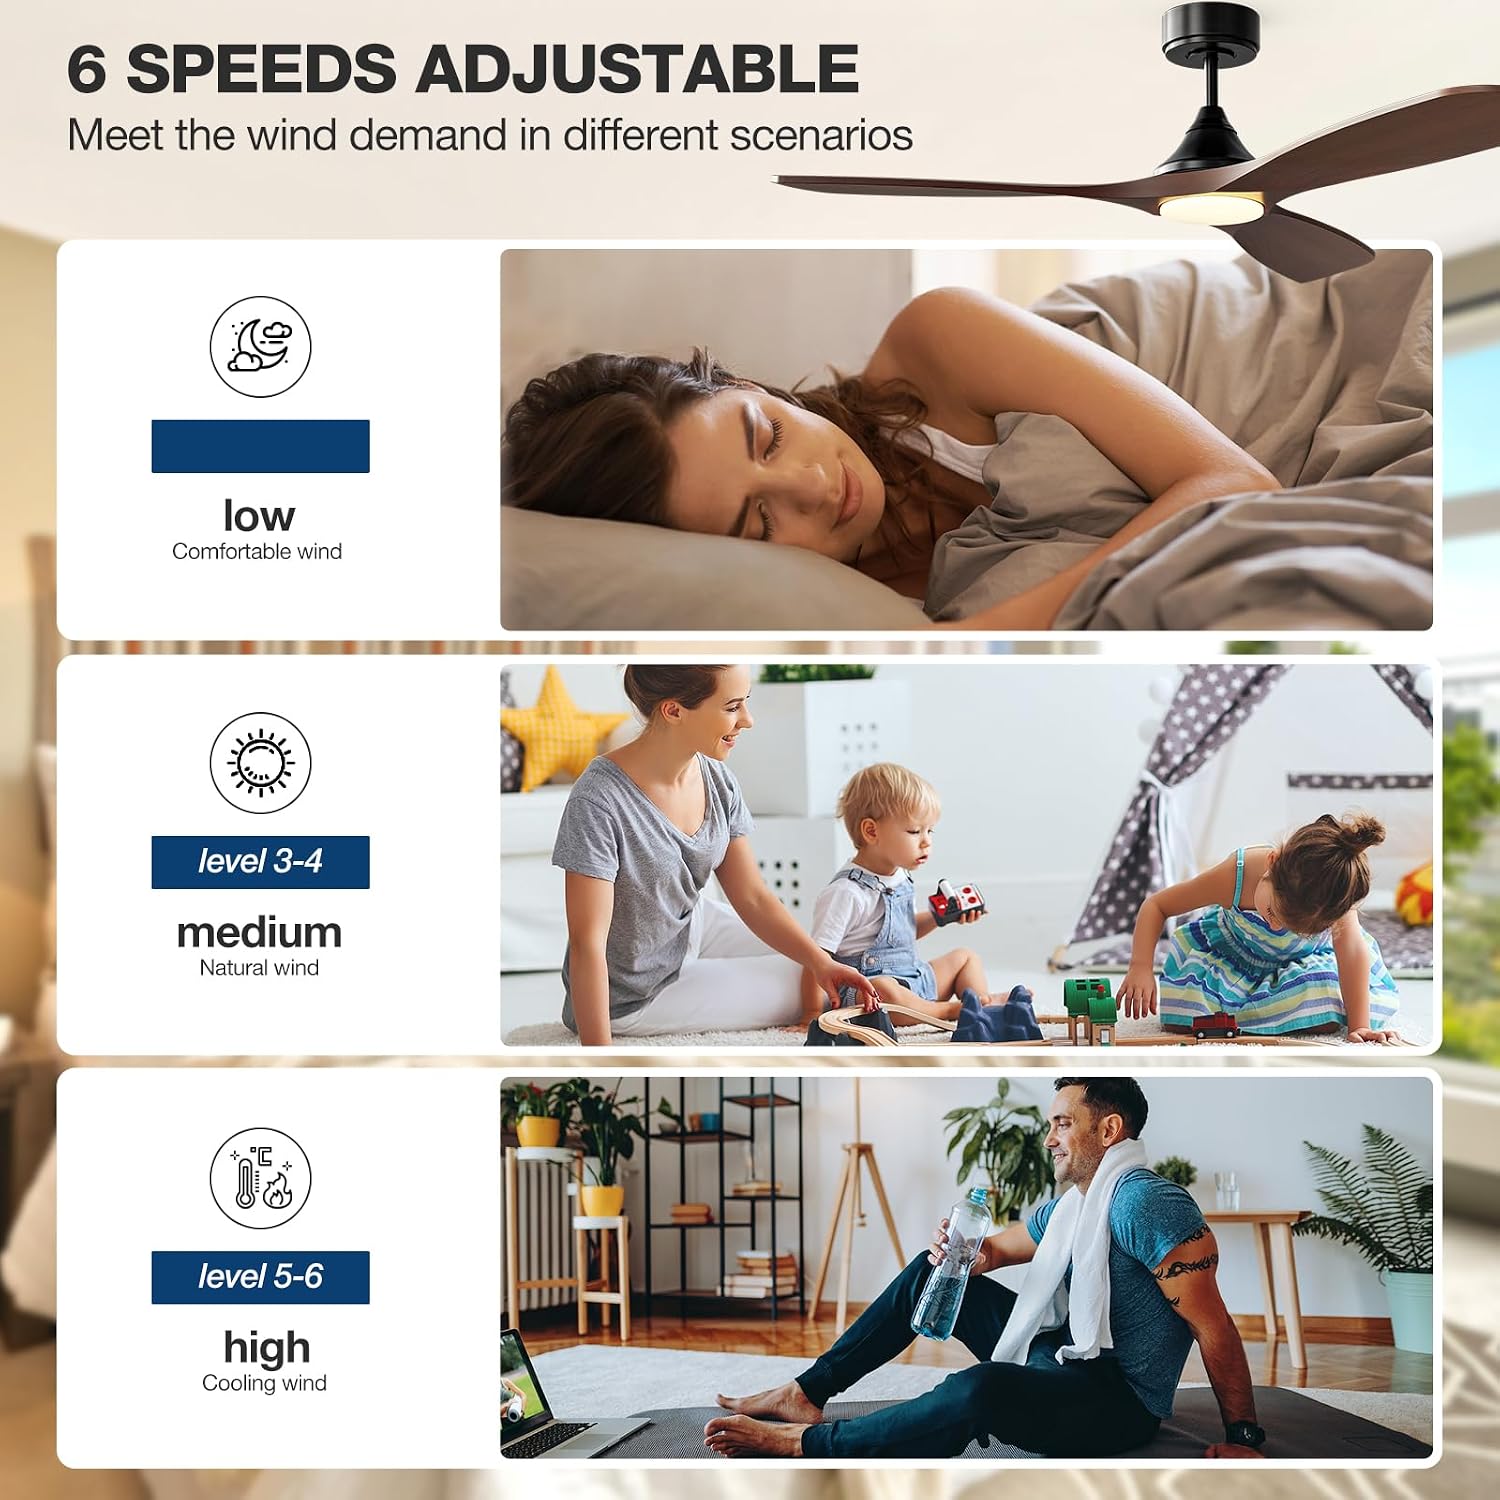
Image: Visual representation of the 6 adjustable fan speeds, categorized into low (levels 1-2), medium (levels 3-4), and high (levels 5-6) for various comfort levels.
6.5 Light Control
The integrated LED light is dimmable from 0% to 100% and offers three color temperature options: 3000K (warm yellow), 4000K (bright daylight), and 5000K (cool white). This allows you to create the desired ambiance for any activity.

Image: Three panels showing the fan light at different color temperatures: 3000K warm yellow, 4000K bright daylight, and 5000K cool white, with a dimming scale from 0% to 100% (0-2000 lumens).
6.6 Reversible Motor Function
The DC motor allows for reversible blade rotation, optimizing comfort throughout the year.

Image: Two panels illustrating the reversible function of the fan blades. One panel shows upward arrows for winter mode (reducing heat loss and circulating warm air), and the other shows downward arrows for summer mode (keeping cool and enhancing cold airflow).
7. Maintenance
Regular maintenance ensures the longevity and optimal performance of your ceiling fan.
- Cleaning: Dust the fan blades and motor housing periodically with a soft, damp cloth. Avoid using abrasive cleaners or solvents that could damage the finish.
- Tighten Fasteners: Periodically check all screws and fasteners on the fan and mounting hardware to ensure they are secure. Loose connections can cause noise or wobbling.
- Blade Balance: If the fan wobbles, ensure all blades are securely attached and consider using a blade balancing kit (not included) if necessary.
8. Troubleshooting
Refer to the following table for common issues and their solutions.
| Problem | Possible Cause | Solution |
|---|---|---|
| Fan does not start | No power to the fan; Remote battery low/dead; Incorrect wiring. | Check circuit breaker; Replace remote battery; Verify wiring connections. |
| Light does not work | No power to the light; Loose light kit connection. | Check power supply; Ensure light kit wires are securely connected. |
| Fan wobbles | Loose blade screws; Unbalanced blades; Loose mounting bracket. | Tighten all blade screws; Use a blade balancing kit; Ensure mounting bracket is secure. |
| Excessive noise | Loose screws; Motor housing rubbing; Blades hitting an obstruction. | Check and tighten all screws; Ensure no parts are rubbing; Verify blades are clear. |
| Smart control not connecting | Incorrect Wi-Fi network (not 2.4GHz); Incorrect pairing procedure; App issues. | Ensure 2.4GHz Wi-Fi; Follow app pairing instructions carefully; Restart app/router. |
9. Warranty and Support
NOPAARD provides the following warranty for your ceiling fan:
- Quality Assurance: 24 months from the date of purchase.
- DC Motor: 10-year warranty.
This warranty covers defects in materials and workmanship under normal use. It does not cover damage resulting from improper installation, misuse, accidents, or unauthorized repairs.
For technical support, warranty claims, or any questions regarding your NOPAARD ceiling fan, please contact NOPAARD customer support through the retailer's platform or the official NOPAARD website. Please have your model number (52-YJ682) and proof of purchase ready when contacting support.


