1. Introduction
Thank you for choosing the DAMGOO T160HS Amplifier Board. This 160W+160W 2.0 channel stereo amplifier board is designed for DIY wireless speaker projects, offering versatile audio input options including Bluetooth, AUX, USB flash drive, and USB sound card. It features independent treble and bass control, ensuring a customizable audio experience. This manual provides essential information for the proper setup, operation, and maintenance of your amplifier board.
2. Product Overview
The T160HS amplifier board integrates a TDA7498E HIFI chip, providing robust and clear audio output. It is equipped with various controls and ports for ease of use and connectivity.

Figure 2.1: Overall view of the DAMGOO T160HS Amplifier Board, showcasing its compact design and included screwdriver for assembly.
Key Components and Features:
- TDA7498E HIFI Chip: A BTLD class audio power amplifier chip with built-in protection functions (under-voltage, over-current, temperature).
- Power Switch: For turning the unit on and off.
- DC 12-36V Input: Power supply connection.
- Speaker Outputs (L/R): For connecting passive speakers.
- USB Flash Drive Port: For playing audio files directly.
- 3.5mm AUX Input: For wired audio connections.
- R&L Treble Control: Adjusts high frequencies.
- R&L Bass Control: Adjusts low frequencies.
- Volume Control: Master volume adjustment.
- Ultra-quiet Cooling Fan: Large-area aluminum alloy heat sink and fan for efficient temperature reduction.

Figure 2.2: Detailed diagram illustrating the TDA7498E chip, power switch, DC input, speaker terminals, USB port, AUX input, and control knobs for treble, bass, and volume.
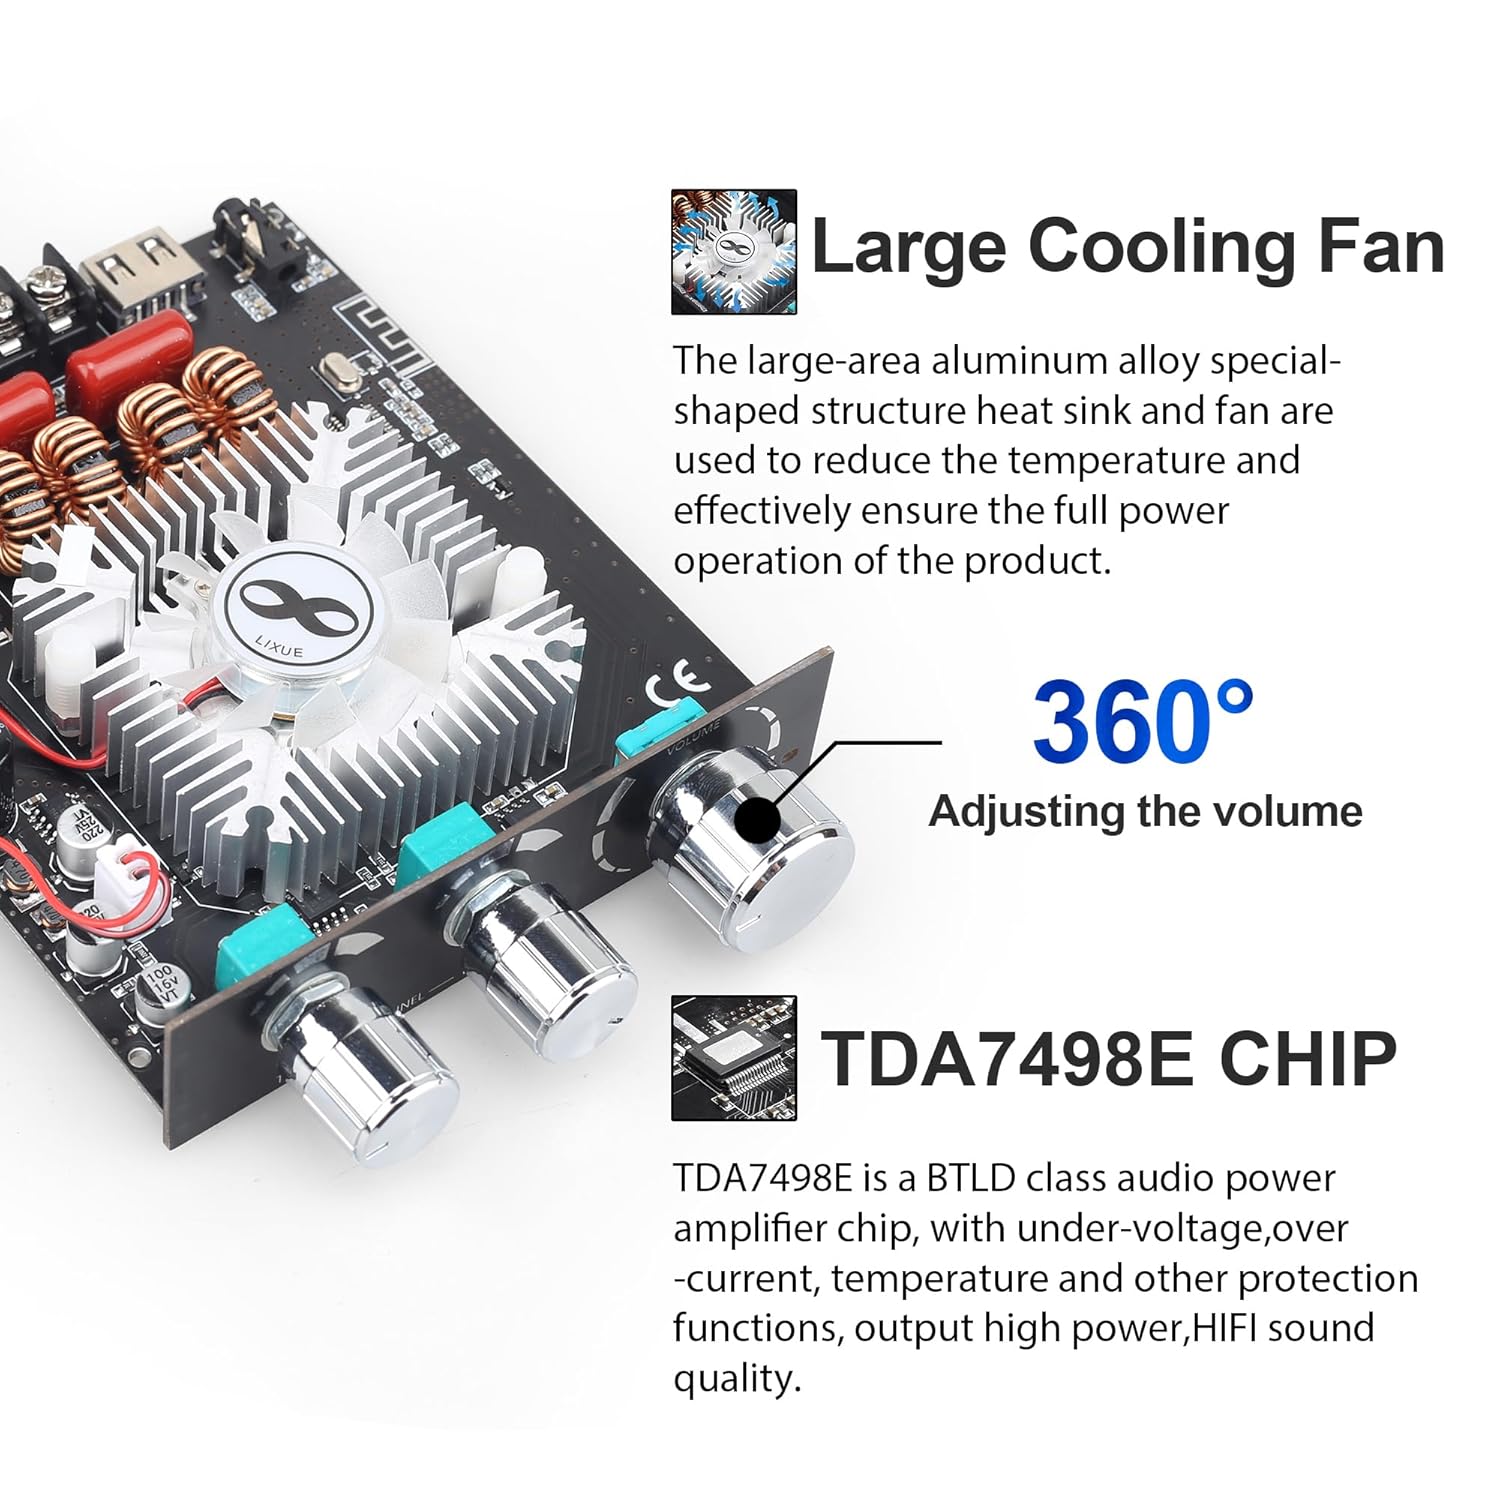
Figure 2.3: Close-up view highlighting the large cooling fan and the TDA7498E chip, emphasizing the thermal management system.
3. Setup Instructions
Follow these steps to correctly set up your amplifier board.
3.1 Power Supply Connection
- Ensure the power switch on the amplifier board is in the 'OFF' position.
- Connect a DC power supply (12-36V) to the DC input port on the board. A 36V power supply is recommended for optimal performance.
- Ensure the power supply provides sufficient current (8A or above) for the desired output.
3.2 Speaker Connection
- Identify the Left (L) and Right (R) speaker output terminals on the board.
- Connect your passive speakers to the corresponding terminals. Ensure correct polarity (+ to + and - to -) for each speaker.
- The amplifier supports 2.0 channel stereo output.
3.3 Audio Input Connection
The amplifier board supports multiple audio input methods:
- Bluetooth: For wireless connection from smartphones, tablets, etc.
- AUX (3.5mm): For wired connection from audio sources.
- USB Flash Drive: For direct playback of audio files.
- USB Sound Card: Connect to a computer via USB for audio input.

Figure 3.1: Visual representation of the four available audio input methods, including Bluetooth, AUX, USB Flash Drive, and USB Sound Card.
4. Operating Instructions
Learn how to operate your DAMGOO T160HS Amplifier Board.
4.1 Powering On/Off
- To power on, slide the power switch to the 'ON' position.
- To power off, slide the power switch to the 'OFF' position.
4.2 Volume, Treble, and Bass Adjustment
- Volume Knob: Rotate clockwise to increase volume, counter-clockwise to decrease.
- R&L Treble Knob: Rotate to adjust the high-frequency response.
- R&L Bass Knob: Rotate to adjust the low-frequency response.
4.3 Bluetooth Operation
- Ensure the amplifier board is powered on and in Bluetooth mode (if applicable, switch modes using the control button).
- On your audio device (smartphone, tablet), enable Bluetooth and search for available devices.
- Select the amplifier board (usually named 'BT-AUDIO' or similar) from the list. No password is required for pairing.
- Once connected, audio from your device will play through the amplifier.

Figure 4.1: Illustration of a smartphone wirelessly connected to the amplifier board via Bluetooth 5.1, demonstrating ease of connection.
4.4 USB Flash Drive / USB Sound Card Operation
- USB Flash Drive: Insert a USB flash drive containing WAV, FLAC, APE, or MP3 audio files into the USB port. The amplifier will automatically detect and begin playback.
- USB Sound Card: Connect the amplifier board to your computer via a USB cable. The computer should recognize it as an audio output device. Select it as your playback device.
4.5 Control Button Functions (if applicable, refer to Figure 2.2)
- Click: Play / Pause
- Two Clicks: Next Song
- Three Clicks: Previous Song
- Four Clicks: Switch Mode (e.g., Bluetooth, USB, AUX)
- Five Clicks: Factory Reset
- Long Press: Standby / Power ON
5. Maintenance
Proper maintenance ensures the longevity and optimal performance of your amplifier board.
- Cleaning: Regularly clean the board with a soft, dry cloth to remove dust. Avoid using liquid cleaners or solvents.
- Environment: Operate the amplifier in a dry, well-ventilated area. Avoid exposure to moisture, direct sunlight, and extreme temperatures.
- Connections: Periodically check all connections (power, speakers, audio inputs) to ensure they are secure and free from corrosion.
- Safety: Always power off and disconnect the power supply before performing any maintenance or making changes to connections.
6. Troubleshooting
If you encounter issues, refer to the following troubleshooting guide:
| Problem | Possible Cause | Solution |
|---|---|---|
| No power | Power supply not connected or faulty; Power switch off. | Check power supply connection and voltage. Ensure power switch is ON. |
| No sound output | Incorrect audio input selected; Speaker wires loose or incorrect polarity; Source device volume low. | Verify input mode. Check speaker connections and polarity. Increase source device volume. |
| Distorted sound | Input signal too high; Speaker impedance mismatch; Insufficient power supply. | Reduce input volume. Ensure speakers match amplifier impedance. Use a higher current/voltage power supply within specified limits. |
| Bluetooth connection fails | Device not in pairing mode; Out of range; Interference. | Ensure amplifier is in Bluetooth mode. Keep devices within range. Restart both devices. |
| Overheating | Poor ventilation; Excessive load. | Ensure adequate airflow around the board. Reduce volume or load. The board has overheat protection. |
7. Specifications
Detailed technical specifications for the DAMGOO T160HS Amplifier Board.

Figure 7.1: Comprehensive list of technical specifications, including power output, input methods, and protection mechanisms.
- Output Power: 160W + 160W (2.0 Channel Stereo)
- Power Supply: DC 12-36V (Recommended: 36V)
- Power Supply Current: 8A or above
- Audio Input Methods: Bluetooth 5.1, AUX (3.5mm), USB Flash Drive, USB Sound Card
- Bluetooth Version: 5.1
- Frequency Response: 20Hz - 20KHz
- Audio Adjustment: Independent Treble and Bass control
- Decoding Format (USB Flash Drive): WAV, FLAC, APE, MP3
- Output Power Configurations:
- 160W x 2 @ 4Ω/36VDC
- 80W x 2 @ 8Ω/36VDC
- 70W x 2 @ 4Ω/24VDC
- 35W x 2 @ 8Ω/24VDC
- Protection Mechanisms: Overheat Protection, Circuit Protection, Over-voltage Protection, Under-voltage Protection
- Product Dimensions (L x W x H): 5.03 x 3.74 x 1.02 inches (128 x 95 x 26mm)
- Model Number: T160HS
8. Warranty and Support
DAMGOO is committed to customer satisfaction.
For any questions about the product, or if the product has quality problems, please contact our 7*24 Hours After-sales Service. We aim to provide a 100% satisfactory answer to all inquiries.