1. Safety Information
Read all safety warnings, instructions, illustrations, and specifications provided with this power tool. Failure to follow all instructions listed below may result in electric shock, fire, and/or serious injury.
General Power Tool Safety Warnings
- Work Area Safety: Keep work area clean and well lit. Cluttered or dark areas invite accidents. Do not operate power tools in explosive atmospheres, such as in the presence of flammable liquids, gases, or dust. Power tools create sparks which may ignite the dust or fumes.
- Electrical Safety: Power tool plugs must match the outlet. Never modify the plug in any way. Do not use any adapter plugs with earthed (grounded) power tools. Unmodified plugs and matching outlets will reduce risk of electric shock.
- Personal Safety: Stay alert, watch what you are doing, and use common sense when operating a power tool. Do not use a power tool while you are tired or under the influence of drugs, alcohol, or medication. A moment of inattention while operating power tools may result in serious personal injury.
- Tool Use and Care: Do not force the power tool. Use the correct power tool for your application. The correct power tool will do the job better and safer at the rate for which it was designed. Disconnect the plug from the power source and/or remove the battery pack, if detachable, from the power tool before making any adjustments, changing accessories, or storing power tools.
- Battery Tool Use and Care: Recharge only with the charger specified by the manufacturer. A charger that is suitable for one type of battery pack may create a risk of fire when used with another battery pack. Use power tools only with specifically designated battery packs. Use of any other battery packs may create a risk of injury and fire.
2. Product Overview
The Durofix RI12184-4-P2G is a G12 Series 12V Brushless 1/2" Drive Cordless Impact Wrench designed for efficient fastening and loosening tasks. It features a powerful brushless motor, multiple torque settings, and intelligent control functions for enhanced performance and user safety.
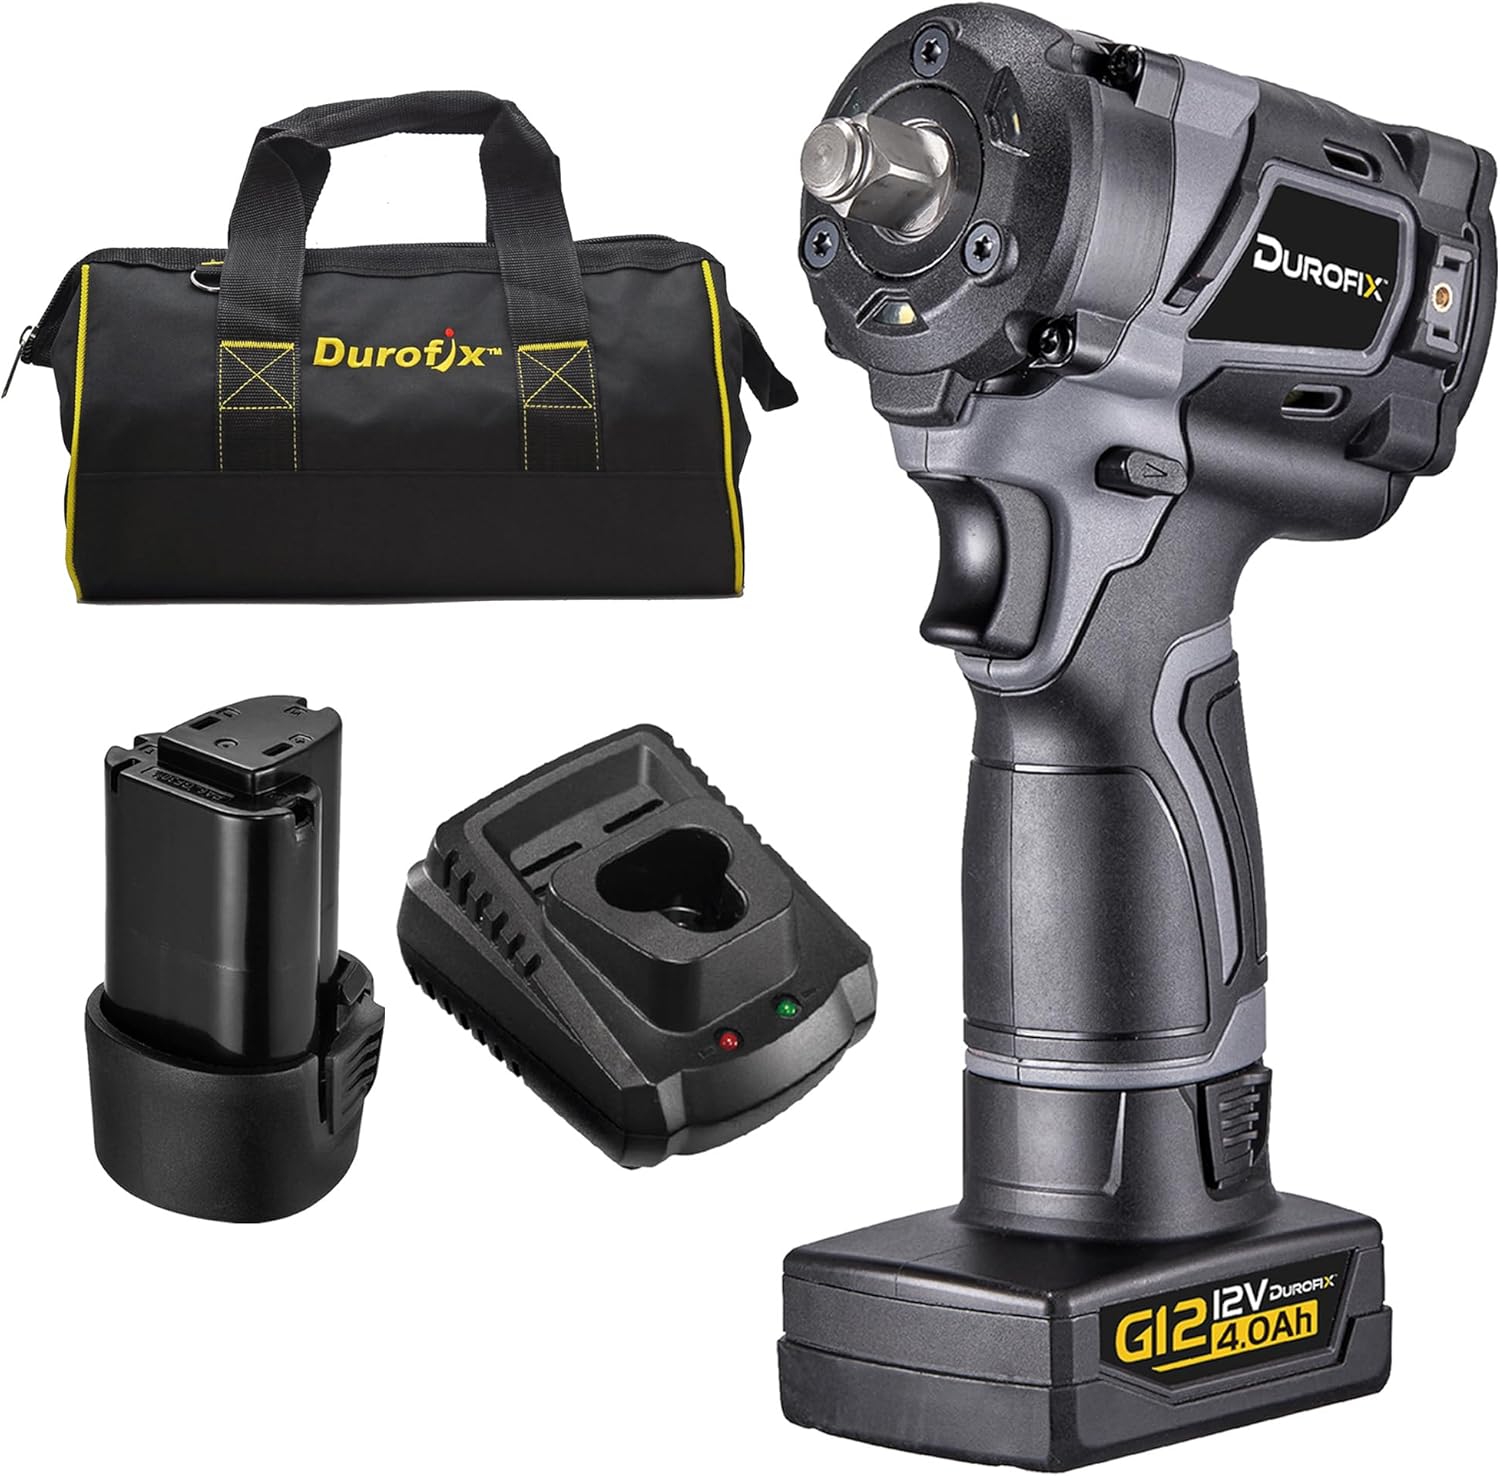
Figure 2.1: Durofix RI12184-4-P2G Impact Wrench kit including the tool, two batteries (4.0Ah and 2.0Ah), a charger, and a canvas bag.
Key Features:
- Brushless Motor (BLDC): Provides high efficiency, precise torque, extended lifespan, and reduced maintenance compared to brushed motors.
- Compact Design: Measuring only 132mm in length, allowing access to tighter workspaces.
- Multiple Torque Settings: 3-stage tightening torque presets in forward mode, plus a max torque setting.
- Auto Shut-Off Mode: Prevents over-fastening of bolts, stripped threads, and material deformations in specific forward torque stages.
- Smart Reverse Mode: Provides controlled loosening of fasteners.
- LED Work Lights: Integrated LEDs illuminate the work area for improved visibility.
- G12 Battery Platform: Utilizes the slim 12V (10.8V) Lithium-Ion battery platform, interchangeable with other G12 series tools.

Figure 2.2: The impact wrench highlighting the Auto Shutoff and Smart Break Loose features.
3. Setup
3.1 Battery Installation and Removal
- To Install: Align the battery pack with the slot in the tool handle. Slide the battery pack into the handle until it clicks securely into place. Ensure it is fully seated.
- To Remove: Press the battery release button (usually located on the side of the battery pack). While holding the button, slide the battery pack out of the tool handle.

Figure 3.1: Close-up view of the G12 battery connection point on the tool.
3.2 Battery Charging
Use only the Durofix G12 charger provided with your tool. Refer to the charger's instruction manual for detailed charging procedures.
- Connect the charger to a standard power outlet.
- Slide the battery pack onto the charger. The indicator light on the charger will show the charging status.
- Once fully charged, remove the battery pack from the charger.
3.3 Attaching and Removing Sockets
- To Attach: Push the desired 1/2" square drive impact socket firmly onto the anvil of the impact wrench until it locks into place. Ensure the socket is fully engaged and secure.
- To Remove: Pull the socket firmly off the anvil. Some anvils may have a detent pin or friction ring requiring a slight pull and twist.
Note: Always use impact-rated sockets with an impact wrench. Standard chrome sockets are not designed for impact use and may shatter, causing injury.
4. Operating Instructions
4.1 Powering On/Off and Direction Selection
- On/Off: Squeeze the trigger switch to turn the tool on. Release the trigger to turn it off. The LED work lights will activate when the trigger is pressed.
- Direction: Use the forward/reverse selector switch, typically located above the trigger, to choose the desired rotation direction (forward for tightening, reverse for loosening). Ensure the switch is fully engaged in either direction. A center position usually locks the trigger for safety.

Figure 4.1: Front view of the impact wrench showing the integrated LED work lights.
4.2 Torque Stage Settings (Forward Mode)
The tool offers multiple torque settings to prevent over-tightening and ensure proper fastening. Press the setting button (usually near the battery indicator) to cycle through the torque stages.

Figure 4.2: Diagram illustrating the torque stage settings for both forward and reverse modes.
- Stage 1: Approximately 85 Nm (62.7 ft-lb) with Auto Shut-Off. Ideal for delicate applications.
- Stage 2: Approximately 165 Nm (121.7 ft-lb) with Auto Shut-Off. Suitable for general fastening.
- Stage 3: Approximately 235 Nm (173.3 ft-lb) with Auto Shut-Off. For more demanding fastening tasks.
- Stage 4 (Max Torque): Approximately 320 Nm (236 ft-lb) without Auto Shut-Off, full output. Use for applications requiring maximum tightening force.
Note: Auto Shut-Off mode automatically stops the tool once the set torque is reached, preventing over-tightening. Always verify final torque with a calibrated torque wrench when precision is critical.
4.3 Reverse Mode Operation (Smart Reverse)
In reverse mode, the tool provides powerful breakaway torque for loosening stubborn fasteners. Press the setting button to select the reverse mode.
- Reverse Auto Shut-Up: Provides controlled loosening, stopping the tool once the fastener is loose to prevent it from falling off.
- Reverse (Non-Auto Shut-Off, Full Output): Delivers maximum breakaway torque (up to 540 Nm / 400 ft-lb) for removing extremely tight fasteners.
Caution: Always maintain a firm grip on the tool during operation, especially when using maximum torque settings.
5. Maintenance
5.1 Cleaning
- Keep the tool's ventilation openings clean and free of debris to prevent overheating.
- Wipe the tool housing with a soft, damp cloth. Do not use harsh chemicals or abrasive cleaners.
- Periodically clean the battery terminals with a dry cloth to ensure good electrical contact.
5.2 Storage
- Store the tool and batteries in a cool, dry place, away from direct sunlight and extreme temperatures.
- When storing for extended periods, ensure batteries are partially charged (around 50%) to prolong their lifespan.
- Store the tool in its provided canvas bag or a suitable case to protect it from dust and damage.
5.3 Battery Care
- Do not expose batteries to water or moisture.
- Avoid dropping or subjecting batteries to heavy impact.
- Do not attempt to disassemble or modify battery packs.
- Dispose of old or damaged batteries according to local regulations.
6. Troubleshooting
| Problem | Possible Cause | Solution |
|---|---|---|
| Tool does not start. | Battery not installed correctly or discharged. Trigger lock engaged. | Ensure battery is fully seated. Charge battery. Disengage trigger lock. |
| Reduced power or performance. | Low battery charge. Incorrect torque setting. Overload protection activated. | Charge battery. Select a higher torque setting. Allow tool to cool down if overheated. |
| Battery not charging. | Charger not plugged in. Faulty battery or charger. | Check power connection. Try another battery (if available). Contact customer service if problem persists. |
| Socket not attaching securely. | Incorrect socket size. Debris on anvil. | Ensure 1/2" square drive socket is used. Clean anvil. |
7. Specifications
| Feature | Detail |
|---|---|
| Brand | Durofix |
| Model Number | RI12184-4-P2G |
| Voltage | 12 Volts (DC) |
| Drive Size | 1/2 Inch Square Drive |
| Max Tightening Torque | 338 Nm (236 ft-lb) |
| Max Breakaway Torque (Reverse) | 540 Nm (400 ft-lb) |
| Torque Settings (Forward) | 4 Stages (3 with Auto Shut-Off, 1 Full Output) |
| Motor Type | Brushless (BLDC) |
| Tool Length | 132 mm (5.2 Inches) |
| Item Weight | 1.2 Kilograms (2.64 pounds) |
| Batteries Included | 2 Lithium Ion (4.0Ah & 2.0Ah) |
| Power Source | Battery Powered |
| Material | Plastic |
| Included Components | Impact Wrench, 4.0 Battery, 2.0 Battery, Charger, Canvas Bag |
8. Warranty and Support
Durofix provides a warranty for its products against defects in material and workmanship. Specific warranty terms and duration may vary by region and product. Please retain your proof of purchase for warranty claims.
Customer Service:
For technical assistance, warranty inquiries, or to order replacement parts, please contact Durofix customer service. Contact information can typically be found on the official Durofix website or on the product packaging.
As a US company, Durofix prides itself on providing customer service based in the US to assist with any needs.
You can visit the official Durofix store for more information: Durofix Store on Amazon