1. Introduction
Thank you for choosing the JoyKip Remote Control Robotic Dog Model A118. This intelligent robotic pet offers a variety of interactive features including dancing, singing, touch interaction, and a programmable mode. This manual provides essential information to ensure safe and optimal use of your new robotic companion. Please read it thoroughly before operating the product.

Image 1.1: The JoyKip Robotic Dog and its accompanying remote control.
2. Safety Information
To prevent injury or damage to the product, please observe the following safety guidelines:
- This product is suitable for children aged 3 years and older. Adult supervision is recommended.
- Do not disassemble, modify, or attempt to repair the product yourself. Contact customer support for assistance.
- Keep the product away from water, moisture, and extreme temperatures.
- Ensure the robotic dog is used on a flat, clear surface to prevent falls and damage.
- Do not throw or drop the product.
- Use only the specified batteries for the remote control and the provided charging cable for the robotic dog.
- Dispose of batteries responsibly according to local regulations.
3. Package Contents
Verify that all items are present in the package:
- 1 x JoyKip Remote Control Robotic Dog (Model A118)
- 1 x Remote Control
- 1 x USB Charging Cable
- 1 x User Manual (this document)
4. Setup
4.1. Remote Control Battery Installation
The remote control requires 2 x 'AA' batteries (not included).
- Locate the battery compartment on the back of the remote control.
- Use a small screwdriver to open the battery compartment cover.
- Insert 2 'AA' batteries, ensuring correct polarity (+/-).
- Replace the battery compartment cover and secure it with the screw.
4.2. Charging the Robotic Dog
The robotic dog has a built-in rechargeable battery. It may have a partial charge upon unboxing, but a full charge is recommended before first use.
- Locate the charging port on the robotic dog.
- Connect the small end of the USB charging cable to the dog's charging port.
- Connect the larger end of the USB charging cable to a standard USB power adapter (e.g., phone charger, computer USB port) or a power bank.
- The indicator light on the dog will illuminate during charging and turn off or change color when fully charged (refer to product for specific indicator behavior).
- Charging typically takes approximately 2-3 hours. Do not overcharge.
5. Operating Instructions
5.1. Remote Control Overview
The remote control allows you to command the robotic dog. Familiarize yourself with the buttons:

Image 5.1: The remote control for the JoyKip Robotic Dog, showing various function buttons.
- Forward: Moves the dog forward.
- Gymnastics: Initiates various acrobatic movements.
- Dance: Activates pre-programmed dance routines.
- Swimming: Simulates swimming motions.
- Attention: Makes the dog perform an attention-seeking action.
- Imitate: Allows the dog to imitate sounds.
- Voice Command: Activates voice recognition mode.
- Greeting: Makes the dog perform a greeting action.
- Push-up: Commands the dog to perform push-ups.
- Programming: Enters programming mode to create custom sequences.
- Handstand: Commands the dog to perform a handstand.
5.2. Basic Functions
Turn on the robotic dog using the power switch. Use the remote control to initiate various actions:

Image 5.2: The robotic dog demonstrating six different actions: walk, push-up, sit down, attention, get down, and handstand.
- Press the corresponding buttons on the remote for actions like Walk, Push-up, Sit Down, Attention, Get Down, and Handstand.
- The dog will execute the command and may emit sounds or display facial expressions on its LED eyes.
5.3. Special Features
The JoyKip Robotic Dog offers advanced interactive modes:
- Dancing and Singing: Press the Dance button to activate various dance routines accompanied by music.
- Voice Commands: Press the Voice Command button on the remote. The dog will indicate it's listening. Speak clear commands such as "Sit down!" or "Hello!" (specific commands may vary, refer to quick start guide if included).
- Programming Mode:
- Press the Programming button to enter programming mode.
- Input a sequence of desired actions by pressing the corresponding buttons on the remote control.
- Press the Programming button again to save and execute the sequence. The dog will perform the programmed actions in order.
- Sleep Mode: The robotic dog will enter sleep mode after a period of inactivity to conserve battery. To reactivate, press any button on the remote or the power button on the dog.
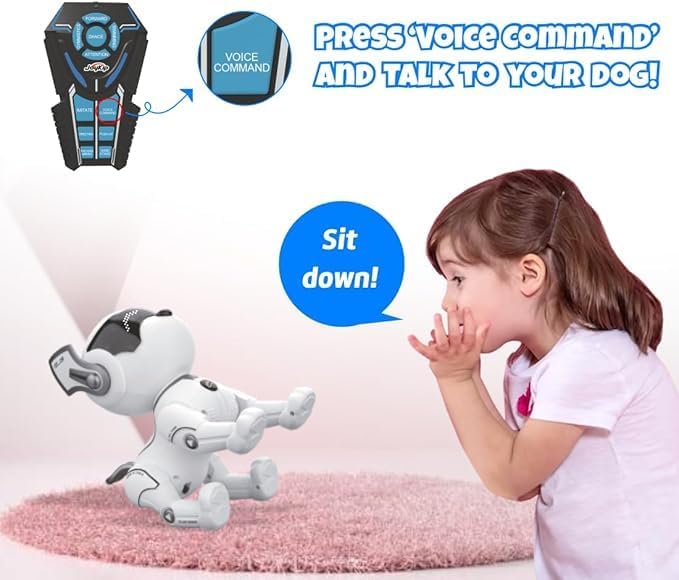
Image 5.3: A child interacting with the robotic dog using a voice command.
6. Maintenance
Proper maintenance ensures the longevity of your robotic dog:
- Cleaning: Wipe the robotic dog and remote control with a soft, dry cloth. Do not use harsh chemicals or abrasive cleaners.
- Storage: When not in use for extended periods, turn off the robotic dog and remove batteries from the remote control. Store in a cool, dry place away from direct sunlight.
- Battery Care: Recharge the robotic dog's battery regularly, even if not in frequent use, to maintain battery health.
7. Troubleshooting
If you encounter issues, refer to the following common problems and solutions:
| Problem | Possible Cause | Solution |
|---|---|---|
| Robotic dog does not turn on. | Battery is low or depleted. | Charge the robotic dog fully using the provided USB cable. |
| Remote control is unresponsive. | Remote control batteries are low or incorrectly installed. | Replace 'AA' batteries in the remote control, ensuring correct polarity. |
| Dog does not respond to commands. | Dog and remote are not paired or out of range. | Ensure the dog is turned on and within range (approx. 5-10 meters). Re-pair if necessary (refer to quick start guide for pairing instructions if applicable). |
| Dog falls over frequently. | Uneven surface or slippery floor. | Operate the dog on a flat, non-slippery surface like carpet or a rug. |
| Voice commands are not recognized. | Ambient noise or unclear speech. | Speak clearly and loudly into the remote control's microphone (if applicable) in a quiet environment. |
8. Specifications
Key technical details of the JoyKip Robotic Dog Model A118:
- Model Number: A118
- Product Dimensions: 2.9 x 4.8 x 4.5 inches (approximately 7.4 x 12.2 x 11.4 cm)
- Item Weight: 1.46 pounds (approximately 0.66 kg)
- Recommended Age: 36 months - 10 years
- Power Source (Dog): Rechargeable battery (built-in)
- Power Source (Remote): 2 x 'AA' batteries (not included)
- Control Method: Remote Control, Voice Command, Touch Interaction
- Features: Dancing, Singing, Programming Mode, Various Actions

Image 8.1: Dimensional overview of the JoyKip Robotic Dog.
9. Warranty and Support
JoyKip products are designed for quality and performance. For specific warranty details, please refer to the product packaging or contact JoyKip customer support directly. If you have any questions or require assistance with your Robotic Dog, please visit the official JoyKip website or contact our customer service team.
Contact Information:
- Website: Visit the JoyKip Store on Amazon
- Email: Refer to product packaging for customer service email.
- Phone: Refer to product packaging for customer service phone number.