1. Introduction
Thank you for choosing YHTAUTO Hub Centric Wheel Spacers. These spacers are designed to enhance your vehicle's appearance and improve stability by widening its stance. They are engineered for a custom fit, ensuring proper alignment and secure installation. This manual provides essential information for safe and effective installation, operation, and maintenance of your wheel spacers.

Figure 1: YHTAUTO 5x5.5 inch Hub Centric Wheel Spacers, including the product, packaging, and thread locker.
2. Product Specifications
YHTAUTO wheel spacers are manufactured with precision and high-quality materials to ensure durability and performance.
- Material: Forged AL6061-T6 Aluminum
- Studs: 12.9 Grade (highest grade of bolt strength)
- Nuts: 10 Grade
- Coating: Anodic Oxidation for better corrosion resistance
Key Dimensions and Features:
| Feature | Specification |
|---|---|
| Vehicle Bolt Pattern (PCD) | 5x5.5" (5x139.7mm) |
| Hub Bore (with lip) | 77.8mm |
| Thickness | 2 inch (50.8mm) |
| Studs & Lug Nuts Thread | M14x1.5 |
| Quantity per package | 4 pieces |
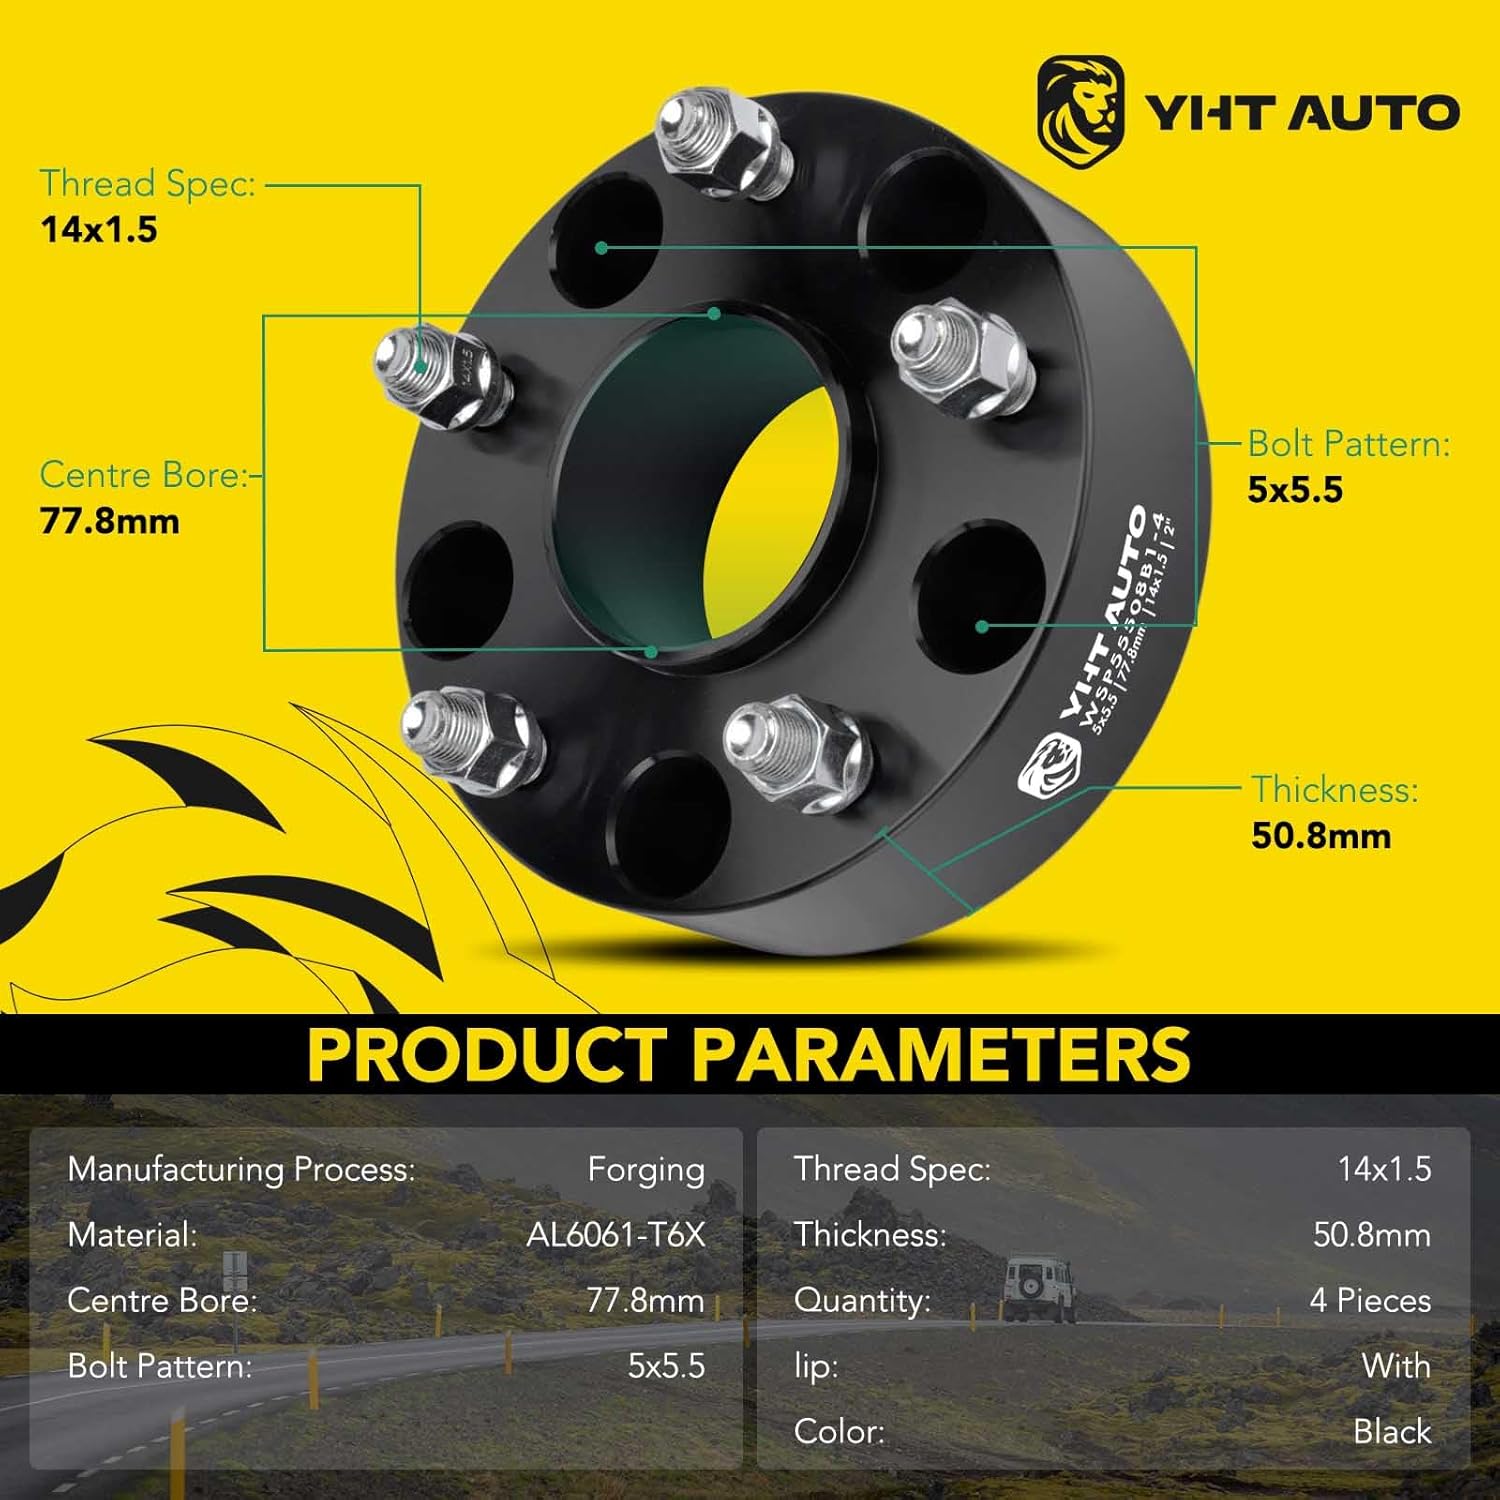
Figure 2: Detailed product parameters and dimensions.

Figure 3: Properties of the CNC Machined 6061-T6 Aluminum used in the spacers, highlighting good corrosion resistance, tensile strength (42,000-45,000 PSI), yield strength (35,000-40,000 PSI), elongation (10%), and hardness (HRB 35-45).

Figure 4: Comparison illustrating the superior strength and performance of ISO Grade 12.9 wheel studs compared to Grade 10.9 factory studs, including metrics like Tensile Strength, Ultimate Tensile Load, Limited Life Range, Proof Load, and Neutral Salt Spray resistance.
3. Compatibility Check
Before installation, it is crucial to verify that these wheel spacers are compatible with your vehicle. Ensure the following specifications match your vehicle's requirements:
- Vehicle Bolt Pattern (PCD): Must match 5x5.5" (5x139.7mm).
- Hub Bore: Your vehicle's hub bore should be 77.8mm or smaller to fit the spacer's hub bore lip.
- Studs & Lug Nuts Thread: M14x1.5.
These spacers are compatible with Ram 1500 (2012-2018) and Ram 1500 Classic (2019-2023) models. For a comprehensive list of compatible models, please refer to the product listing or consult a qualified technician.

Figure 5: Visual guide on how to measure and check your vehicle's bolt pattern, hub bore, and thread size to ensure proper fitment with the wheel spacers.
4. Installation Guide
Proper installation is critical for safety and performance. If you are uncertain about any step, please seek assistance from a qualified automotive technician.
Required Tools:
- Torque Wrench
- Jack and Jack Stands
- Lug Wrench
- Wheel Chocks
- Wire Brush (for cleaning hub surface)
- Provided High-Strength Thread Locker
Installation Steps:
- Prepare Vehicle: Park the vehicle on a flat, level surface. Engage the parking brake and place wheel chocks on the wheels that will remain on the ground.
- Loosen Lug Nuts: Slightly loosen the lug nuts on the wheel you intend to remove while the vehicle is still on the ground.
- Lift Vehicle: Safely lift the vehicle using a jack and secure it with jack stands. Ensure the vehicle is stable before proceeding.
- Remove Wheel: Fully remove the lug nuts and carefully take off the wheel.
- Clean Hub Surface: Thoroughly clean the vehicle's hub surface to remove any rust, dirt, or debris. A clean, flat surface is essential for proper seating of the spacer.
- Install Spacer: Place the YHTAUTO wheel spacer onto the vehicle's hub. Ensure it sits flush against the hub.
- Apply Thread Locker: Apply a small amount of the provided high-strength thread locker to the original vehicle studs. This helps prevent the spacer from coming loose.
- Secure Spacer: Install the provided lug nuts onto the spacer's studs, securing the spacer to the vehicle's hub. Tighten these lug nuts in a star pattern to the recommended torque specification of 85-90 FT/LBS for M14x1.5 studs.
- Reinstall Wheel: Place the wheel back onto the newly installed spacer's studs.
- Tighten Wheel Lug Nuts: Install your original lug nuts onto the wheel studs. Hand-tighten them first, then lower the vehicle until the tire just touches the ground.
- Final Torque: Using a torque wrench, tighten the wheel lug nuts in a star pattern to your vehicle manufacturer's recommended torque specification.
- Repeat: Repeat the process for all remaining wheels.

Figure 6: Visual representation of the wheel spacer installation, showing its placement between the vehicle's hub and the wheel.

Figure 7: Important torque specifications for various stud sizes. For M14x1.5 studs, the recommended torque range is 85-90 FT/LBS with a minimum thread engagement of 7.5 turns.
Installation Video:
Video 1: Official YHTAUTO Wheel Spacers installation and feature overview. This video demonstrates the product's features and provides a visual guide for installation.
5. Maintenance and Safety Tips
Regular maintenance is crucial to ensure the long-term safety and performance of your wheel spacers.
- Re-torque After Initial Use: Retorque all lug nuts on the vehicle after the first 50-100 miles of driving. This is a critical step as new components can settle.
- Periodic Checks: Afterwards, retorque the lug nuts every 3,000-5,000 miles or during routine tire rotations.
- Inspect for Looseness: Periodically check for any signs of looseness or unusual noises from the wheels. If any looseness is detected, immediately tighten to the recommended torque.
- Professional Assistance: If you are uncertain about how to install the parts or lack the necessary experience, please seek the help of a qualified technician.
- Proper Precautions: Always take proper precautions and pay particular attention to all cautions and warnings in your vehicle's user manual before beginning the installation.

Figure 8: A reminder to take proper precautions and seek professional assistance if needed for installation and maintenance.
6. Troubleshooting
Most issues related to wheel spacers stem from improper installation or maintenance. Adhering strictly to the installation and maintenance guidelines will prevent common problems.
- Vibration After Installation: This often indicates improper seating of the spacer or wheel, or incorrect torque. Re-check all lug nuts and ensure surfaces are clean and flush.
- Loosening Spacers/Wheels: This is a serious safety concern. Ensure thread locker was applied to the vehicle's original studs before securing the spacer. Always re-torque after the initial 50-100 miles and periodically thereafter.
- Stud Breakage: While YHTAUTO uses high-grade 12.9 studs, improper torque (over-tightening or under-tightening) or impact can lead to stud failure. Always use a torque wrench.
If you encounter persistent issues or are unsure about diagnosing a problem, it is highly recommended to consult a certified automotive mechanic.
7. Warranty and Support
YHTAUTO is committed to providing high-quality products and excellent customer service. If you have any questions, concerns, or require assistance with your wheel spacers, please do not hesitate to contact our professional customer service support team. We are here to help with any doubts or queries you may have.
For contact information, please refer to the packaging or the official YHTAUTO website.