1. Introduction
This user manual provides essential information for the installation, operation, maintenance, and troubleshooting of the Bogist C1 Pro Electric Scooter Controller Motherboard. This component is specifically designed for the Bogist C1 Pro escooter, ensuring optimal performance and compatibility. Please read this manual thoroughly before attempting any installation or maintenance.
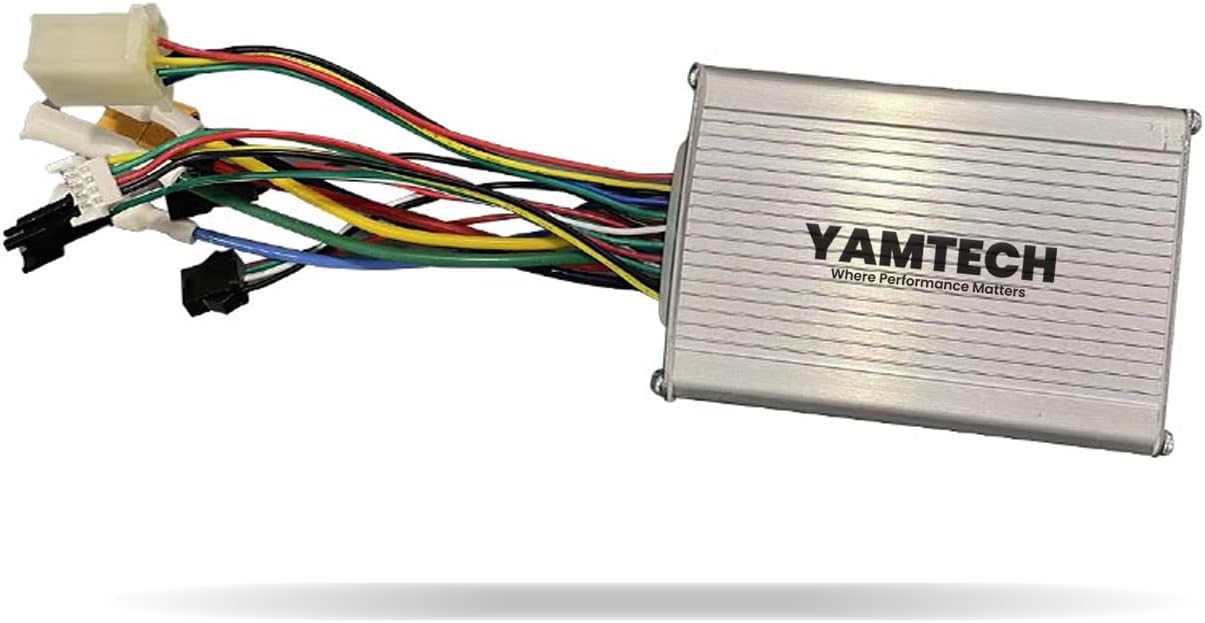
Figure 1: Front view of the Bogist C1 Pro Electric Scooter Controller, showing its silver aluminum casing and the YAMTECH logo.
2. Safety Information
Always prioritize safety when handling electronic components. Failure to follow these guidelines may result in injury, damage to the product, or voiding of the warranty.
- Disconnect Power: Always ensure the scooter's battery is disconnected before installing, removing, or servicing the controller.
- Professional Installation Recommended: If you are not familiar with electrical components or scooter repair, seek assistance from a qualified technician.
- Handle with Care: Electronic components are sensitive. Avoid dropping the controller or exposing it to excessive force.
- Moisture Protection: Keep the controller dry. Exposure to water or excessive humidity can cause damage.
- Correct Polarity: Ensure all connections are made with correct polarity to prevent short circuits and damage.
- Ventilation: Ensure the controller is installed in a location with adequate ventilation to prevent overheating.
3. Setup and Installation
This section outlines the general steps for replacing or installing the Bogist C1 Pro Electric Scooter Controller. Specific wiring diagrams for your scooter model may be required and are typically found in the scooter's main service manual.
3.1 Preparation
- Ensure the scooter is turned off and the battery is completely disconnected.
- Gather necessary tools: screwdrivers, wire cutters/strippers (if needed), electrical tape, and zip ties.
- Locate the existing controller within your Bogist C1 Pro escooter. It is typically housed in a protective compartment.
3.2 Controller Replacement/Installation Steps
- Carefully disconnect all wires from the old controller, noting the position and color of each connection. Taking photos before disconnecting can be very helpful.
- Remove the old controller from its mounting.
- Position the new Bogist C1 Pro Controller in the same location.
- Connect the wires from the scooter to the corresponding ports on the new controller. Refer to the labels on the controller and your scooter's wiring diagram. Common connections include:
- Battery Power: Thick red (positive) and black (negative) wires.
- Motor Wires: Typically three thick wires (e.g., yellow, green, blue) for the motor phases.
- Hall Sensor Wires: Thinner wires (e.g., red, black, yellow, green, blue) for motor position sensing.
- Throttle: Wires for speed control.
- Brake Levers: Wires for brake cut-off.
- Display/Dashboard: Wires for communication with the scooter's display.
- Lights: Wires for headlights/taillights.

Figure 2: Detailed view of the Bogist C1 Pro Electric Scooter Controller, highlighting the various colored wires and connectors, along with the technical specifications label on the casing.

Figure 3: Close-up of the various connectors and wiring harnesses extending from the Bogist C1 Pro Electric Scooter Controller, showing different plug types for various scooter components.
- Once all connections are secure, carefully arrange the wires to avoid pinching or damage when closing the compartment.
- Secure the controller in its mounting.
- Reconnect the scooter's battery.
- Perform a functional test (see Operating section).
4. Operating and Functional Test
After installation, it is crucial to perform a functional test to ensure the controller is working correctly and safely. This controller is an internal component; its "operation" is reflected in the scooter's functionality.
- With the battery reconnected, turn on the scooter's power switch.
- Check the scooter's display (if applicable) to ensure it powers on and shows correct information (e.g., battery level).
- Test the throttle: Gently apply the throttle while the scooter is on its kickstand or lifted, ensuring the wheel spins smoothly.
- Test the brakes: Engage the brake levers to ensure the motor cuts off and the brakes activate correctly.
- Test lights and other accessories connected through the controller.
- If any function does not work as expected, immediately disconnect power and refer to the Troubleshooting section.
5. Maintenance
The Bogist C1 Pro Electric Scooter Controller is designed for durability and requires minimal maintenance. However, periodic checks can extend its lifespan and ensure reliable performance.
- Keep Clean and Dry: Regularly inspect the controller compartment for dust, dirt, or moisture. Clean with a dry, soft cloth if necessary.
- Check Connections: Periodically (e.g., every 6 months) inspect all wire connections to ensure they are secure and free from corrosion. Loose connections can lead to intermittent issues or damage.
- Avoid Overheating: Ensure the controller's housing is not obstructed, allowing for proper heat dissipation. Avoid operating the scooter in extreme heat for prolonged periods.
- Physical Inspection: Look for any signs of physical damage, such as dents, cracks, or frayed wires. Address any damage promptly.
6. Troubleshooting
This section provides solutions to common issues you might encounter with the Bogist C1 Pro Electric Scooter Controller. Always disconnect power before attempting any internal inspection or repair.
| Problem | Possible Cause | Solution |
|---|---|---|
| Scooter does not power on. | Loose battery connection, faulty power switch, dead battery, or controller issue. | Check battery connection and charge. Verify power switch functionality. If other components work, controller may be faulty. |
| Motor does not spin or spins intermittently. | Loose motor phase wires, faulty Hall sensors, throttle issue, or controller malfunction. | Check all motor and Hall sensor connections. Test throttle functionality. If connections are good, controller may need replacement. |
| Brakes do not cut off motor power. | Loose brake lever sensor wires, faulty brake lever, or controller issue. | Inspect brake lever wiring. Ensure brake levers are not stuck. |
| Display/Dashboard not working. | Loose display connection, faulty display, or controller communication issue. | Check display cable connection to the controller. |
| Controller gets excessively hot. | Overload, poor ventilation, or internal short circuit. | Ensure proper ventilation. Avoid overloading the scooter. If heat persists, controller may be faulty. |
If the problem persists after attempting these solutions, it is recommended to consult a professional scooter repair service or contact customer support.
7. Specifications
Key technical specifications for the Bogist C1 Pro Electric Scooter Controller Motherboard (Model: YAM-1214-06).
| Feature | Detail |
|---|---|
| Model Name | YAM-1214-06 |
| Brand | Generic |
| Compatibility | Only For Bogist C1 Pro escooter |
| Material | Aluminum |
| Color | Silver |
| Item Package Dimensions (L x W x H) | 4.21 x 4.13 x 2.05 inches |
| Package Weight | 0.05 Kilograms |
| Manufacturer | YAMTECH |
8. Warranty and Support
8.1 Warranty Information
This Bogist C1 Pro Electric Scooter Controller Motherboard comes with a 90-Days Warranty from the date of purchase. This warranty covers manufacturing defects under normal use. It does not cover damage resulting from improper installation, misuse, accidents, unauthorized modifications, or exposure to extreme conditions.
8.2 Customer Support
For technical assistance, warranty claims, or any questions regarding your Bogist C1 Pro Electric Scooter Controller, please contact the manufacturer or seller through the platform where the product was purchased. Please have your purchase details and product model number (YAM-1214-06) ready when contacting support.
For general inquiries, you may also visit the product page on Amazon.


