VEVOR D-01B-600
VEVOR 24-inch Manual Tile Cutter Instruction Manual
Model: D-01B-600
1. Introduction
Thank you for choosing the VEVOR 24-inch Manual Tile Cutter. This tool is designed for precise and efficient cutting of various tile types, including ceramic and porcelain. This manual provides essential information for safe operation, setup, maintenance, and troubleshooting to ensure optimal performance and longevity of your tile cutter.
2. Safety Instructions
Always adhere to the following safety guidelines to prevent injury and damage to the tool:
- Read and understand all instructions before operating the tile cutter.
- Wear appropriate personal protective equipment (PPE), including safety glasses and gloves, during operation.
- Ensure the work area is clean, well-lit, and free from obstructions.
- Place the tile cutter on a stable, level surface to prevent movement during use.
- Keep hands and fingers clear of the cutting wheel and breaking mechanism during operation.
- Do not attempt to cut tiles thicker or harder than the specified limits.
- Store the tile cutter in a dry, secure location out of reach of children.
- Inspect the cutting wheel and other components for damage before each use. Replace worn or damaged parts immediately.
3. Product Overview
3.1 Components
The VEVOR Manual Tile Cutter consists of several key components designed for efficient tile cutting:
- Base: Sturdy aluminum frame with anti-skid feet for stability.
- Rails: Dual rugged steel rails guide the cutting head for straight cuts.
- Cutting Head: Houses the tungsten carbide cutting wheel and sliding mechanism.
- Handle: Ergonomic rubber handle for comfortable scoring and breaking.
- Ruler/Scale: Precise scale for accurate measurements and angle adjustments.
- Infrared Laser: For precise positioning and alignment of cuts.
- Support Feet: Adjustable feet for additional stability and balancing large tiles.

Figure 3.1: An overhead view of the VEVOR 24-inch Manual Tile Cutter, showcasing its teal handle, black base, and integrated ruler.
3.2 Key Features
- Premium Aluminum Frame: High-leverage, compact, strong, and durable construction.
- Precise Laser Positioning: Upgraded infrared laser for enhanced cutting accuracy.
- Alloy Cutter Wheel: Super hard tungsten carbide wheel ensures smooth, accurate, and clean cuts.
- Ergonomic Design: Anti-skid rubber handle for comfortable and secure grip.
- Accurate Scale: Moveable support tables and precise scale for continuous accurate cuts and versatility.

Figure 3.2: The VEVOR Manual Tile Cutter positioned over a large tile, with icons indicating its suitability for ceramics, porcelain, granite, and limestone.
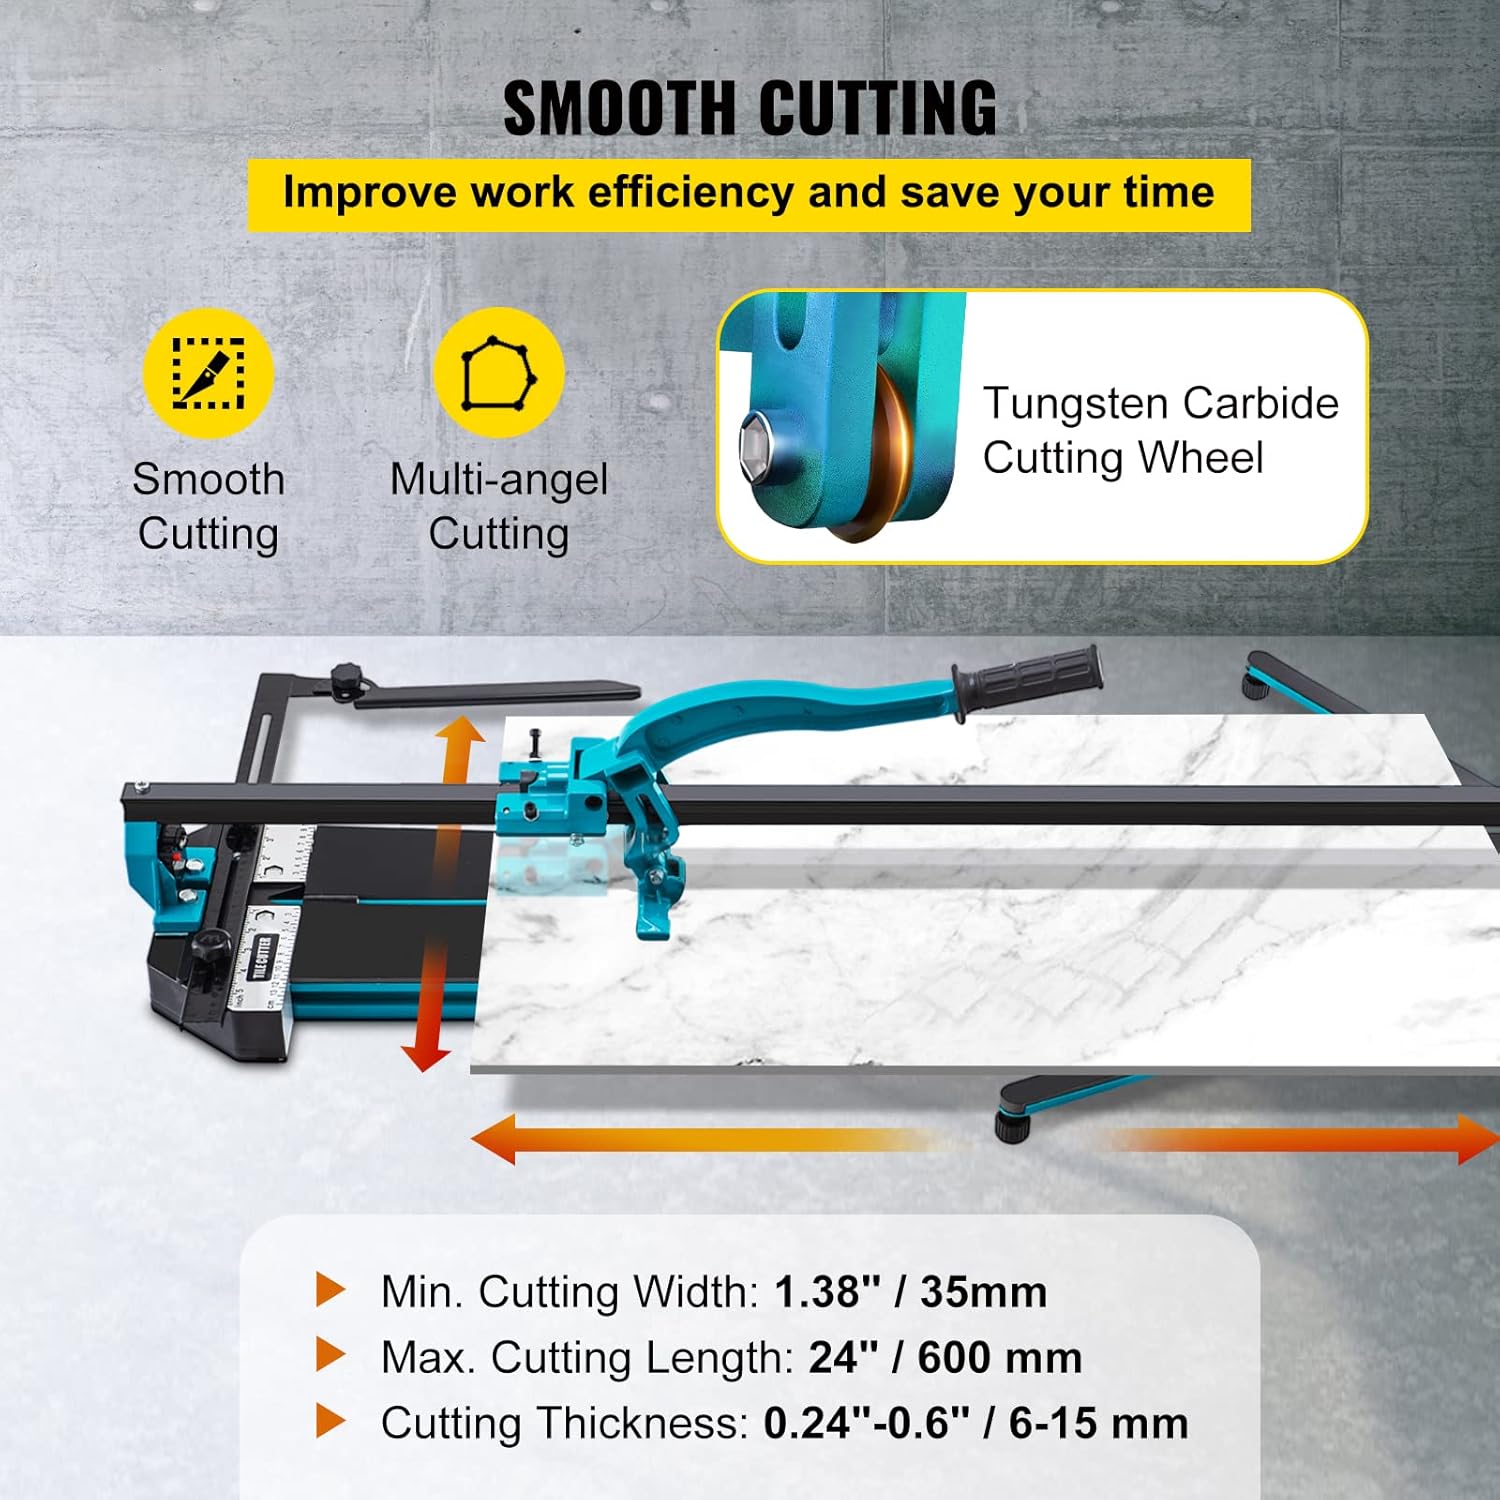
Figure 3.3: An image highlighting the smooth cutting action of the VEVOR tile cutter, detailing minimum cutting width (1.38"/35mm), maximum cutting length (24"/600mm), and cutting thickness (0.24"-0.6"/6-15mm). It also shows the Tungsten Carbide Cutting Wheel.
4. Setup
Before operating the tile cutter, ensure it is properly set up:
- Unpacking: Carefully remove all components from the packaging. Inspect for any shipping damage.
- Placement: Position the tile cutter on a flat, stable, and non-slip surface.
- Attach Support Feet (if detached): If the support feet are not already attached, secure them to the base. These feet can be swung 180 degrees for optimal tile support.
- Laser Alignment: The infrared laser guide assists in precise cutting. If necessary, adjust the infrared laser to align perfectly with the cutting wheel path. This may involve using a small screwdriver to adjust the laser module's position.
- Ruler/Angle Guide: Ensure the adjustable ruler and angle guide are securely attached and can be moved freely for desired measurements.

Figure 4.1: This image highlights the infrared positioning system that guides the cutting wheel for precise scoring, and the ball bearings in the sliding head that ensure smooth operation.

Figure 4.2: Details of the tile cutter's humanized design, including an accurate scale and angle adjustment ruler, and two support feet that swing 180 degrees for secure balance.
5. Operating Instructions
Follow these steps for effective and safe tile cutting:
- Measure and Mark: Use the integrated ruler and angle guide to accurately measure and mark your desired cut line on the tile. For angled cuts, adjust the guide to the required angle (0-45 degrees).
- Position the Tile: Place the tile securely on the support bracket, aligning your marked cut line with the cutting wheel path. Utilize the infrared laser for precise alignment. Ensure the tile is stable and does not wobble.
- Score the Tile: Position the cutting head at the edge of the tile furthest from you. Apply firm, consistent pressure to the handle and push it forward along the tile in a single, continuous motion. The goal is to create a deep, uniform score line across the entire tile surface. Avoid multiple passes, as this can lead to chipping.
- Break the Tile: Once the tile is scored, position the breaking mechanism (the foot at the end of the handle) directly over the score line. Apply downward pressure to the handle until the tile cleanly breaks along the score. For larger or thicker tiles, a quick, decisive press is often more effective.
- Inspect the Cut: Carefully remove the cut tile pieces and inspect the edges for cleanliness and accuracy.

Figure 5.1: A visual guide demonstrating the four steps for using the tile cutter: 1. Adjusting the infrared laser, 2. Placing the tile, 3. Pushing the handle to score, and 4. Pressing the handle to break the tile.

Figure 5.2: This image illustrates the high precision features of the tile cutter, including an adjustable laser guide for accurate cuts and the ability to set cutting angles from 0-45 degrees.
6. Maintenance
Regular maintenance ensures the longevity and optimal performance of your tile cutter:
- Cleaning: After each use, wipe down the rails, base, and cutting head with a damp cloth to remove tile dust and debris. Ensure all parts are dry before storage.
- Lubrication: Periodically apply a light lubricant (e.g., silicone spray) to the steel rails to ensure smooth operation of the cutting head.
- Cutting Wheel Inspection and Replacement: Regularly check the tungsten carbide cutting wheel for wear or damage. A dull or chipped wheel will result in poor cuts and increased chipping. To replace, consult the diagram in Figure 6.1 and carefully follow these steps:
- Loosen the screw holding the cutting wheel assembly.
- Remove the old cutting wheel.
- Insert the new cutting wheel, ensuring it is properly seated.
- Tighten the screw securely.
- Storage: Store the tile cutter in a dry environment to prevent rust and corrosion.

Figure 6.1: This image shows the included components, which typically include an extra cutting wheel and batteries for the laser. Refer to this for identifying the cutting wheel for replacement.
7. Troubleshooting
Refer to the following table for common issues and their solutions:
| Problem | Possible Cause | Solution |
|---|---|---|
| Tile chipping or uneven cuts | Dull or damaged cutting wheel; insufficient or excessive scoring pressure; multiple scoring passes; incorrect tile placement. | Replace cutting wheel; adjust scoring pressure (firm, single pass); ensure tile is stable and aligned. |
| Tile not breaking cleanly | Insufficient scoring depth; breaking mechanism not aligned with score line; tile too thick/hard for tool. | Ensure a deep, consistent score; align breaking mechanism precisely; verify tile thickness is within specifications. |
| Cutting head not sliding smoothly | Dust/debris on rails; lack of lubrication; damaged rails. | Clean rails thoroughly; apply lubricant; inspect rails for damage. |
| Infrared laser not working | Dead batteries; loose connection; laser module damage. | Replace batteries (2 included); check connections; contact VEVOR support if issue persists. |
8. Specifications
| Attribute | Value |
|---|---|
| Model Number | D-01B-600 |
| Max. Cutting Length | 24.0 inches / 600 mm |
| Min. Cutting Width | 1.4 inches / 35 mm |
| Cutting Thickness | 0.2 - 0.6 inches / 6 - 15 mm |
| Item Weight | 14.9 lbs / 6.78 kg |
| Product Dimensions (L x W x H) | 33.9 x 10.6 x 5.9 inches / 860 x 270 x 150 mm |
| Power Source | Hand-powered |
| Included Components | Manual Tile Cutter, 1 x Extra Cutting Wheel, 2 x Batteries |
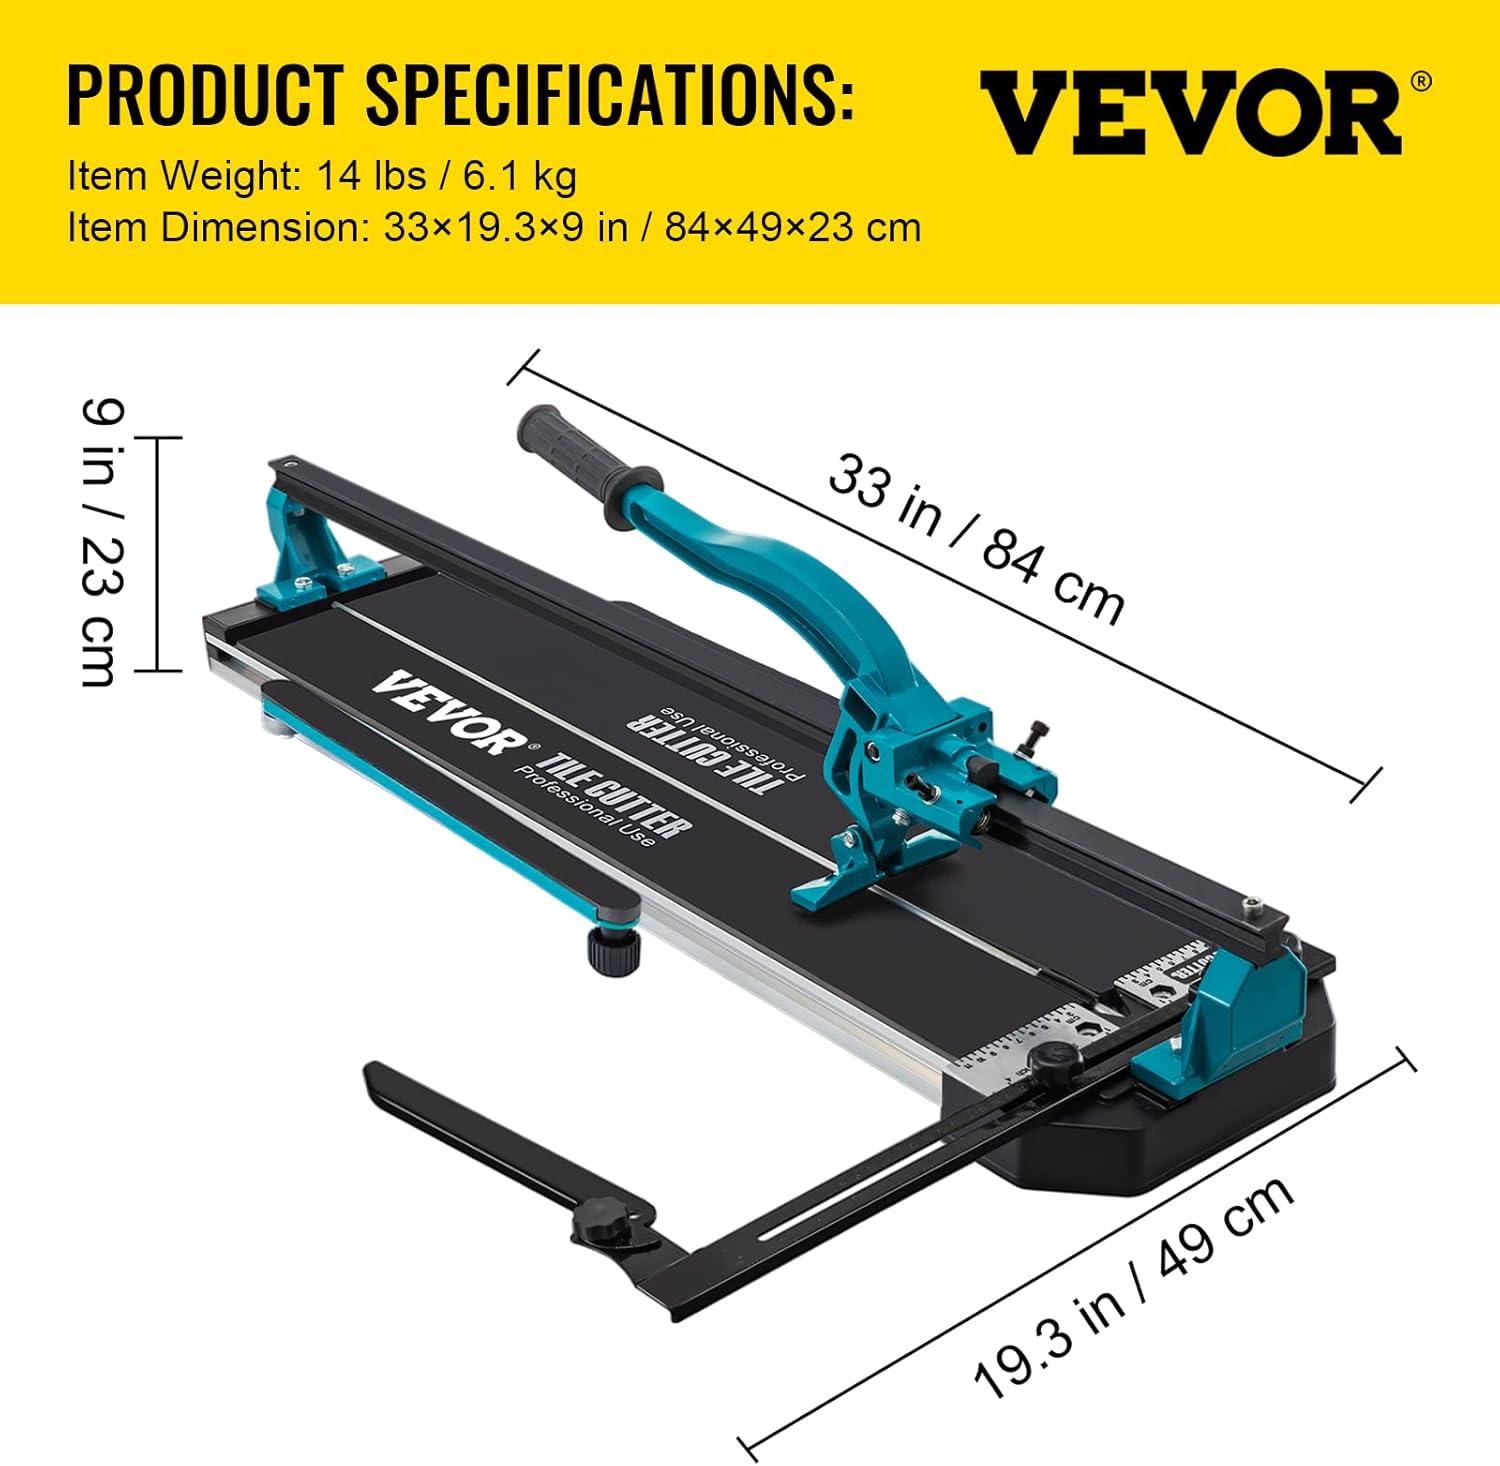
Figure 8.1: A diagram showing the overall dimensions of the VEVOR tile cutter: 33 inches (84 cm) in length, 19.3 inches (49 cm) in width, and 9 inches (23 cm) in height.
9. Warranty and Support
For warranty information or technical support, please refer to the documentation included with your purchase or visit the official VEVOR website. You may also contact VEVOR customer service directly for assistance with product inquiries, parts replacement, or troubleshooting beyond the scope of this manual.
VEVOR Official Website: www.vevor.com
Ask a question about this manual
Ask about setup, troubleshooting, compatibility, parts, safety, or missing instructions. Manuals+ will review the question and use this page’s manual context to help answer it.