GAPPO Y71001-2BK12-US
Gappo Matte Black Shower System 12 Inch User Manual
Model: Y71001-2BK12-US
Brand: GAPPO
Introduction
This manual provides comprehensive instructions for the installation, operation, and maintenance of your Gappo Matte Black Shower System 12 Inch. Please read this manual thoroughly before installation and use to ensure proper function and longevity of your product. This shower system features a 12-inch rainfall shower head and a handheld shower head, designed for a comfortable and efficient showering experience.
Safety Information
- Always turn off the main water supply before beginning any installation or maintenance.
- Ensure all connections are secure and watertight to prevent leaks.
- If you are unsure about any part of the installation process, consult a qualified plumber.
- Do not use abrasive cleaners or harsh chemicals on the matte black finish, as this may damage the surface.
- The pressure balance valve is designed to prevent scalding; however, always test water temperature before stepping into the shower.
Package Contents
Verify that all components listed below are present and undamaged before proceeding with installation.

Image: A visual representation of the complete Gappo shower system package contents, including the shower head, shower valve, shower handheld, shower handheld holder, 1.8m shower hose, shower arm, shower valve (rough-in), decoration cover, and various accessories like screws and anchors.
- 12-inch Rainfall Shower Head
- Shower Valve (Rough-in Valve Included)
- Handheld Shower Head
- Shower Handheld Holder
- 1.8m Shower Hose
- Shower Arm
- Decoration Cover
- Mounting Hardware and Accessories (screws, anchors, etc.)
Specifications
| Feature | Detail |
|---|---|
| Brand | GAPPO |
| Model Number | Y71001-2BK12-US |
| Color | Matte Black |
| Material | Brass, Metal |
| Finish Type | Matte |
| Number of Handles | 1 |
| Mounting Type | Wall Mount |
| Head Size | 12 inches |
| Item Weight | 10.98 pounds |
| Product Dimensions | 17.3 x 13.5 x 4.7 inches |
| Valve Type | Pressure Balance, cUPC Certified |
| Connecting Thread | NPT 1/2" |
Setup and Installation
Professional installation is recommended. Ensure you have all necessary tools and materials before starting. Refer to local plumbing codes for compliance.
1. Prepare the Installation Area
- Turn off the main water supply to your home.
- Remove any existing shower fixtures.
- Ensure the wall cavity is clear and ready for the rough-in valve installation.
2. Install the Rough-in Valve
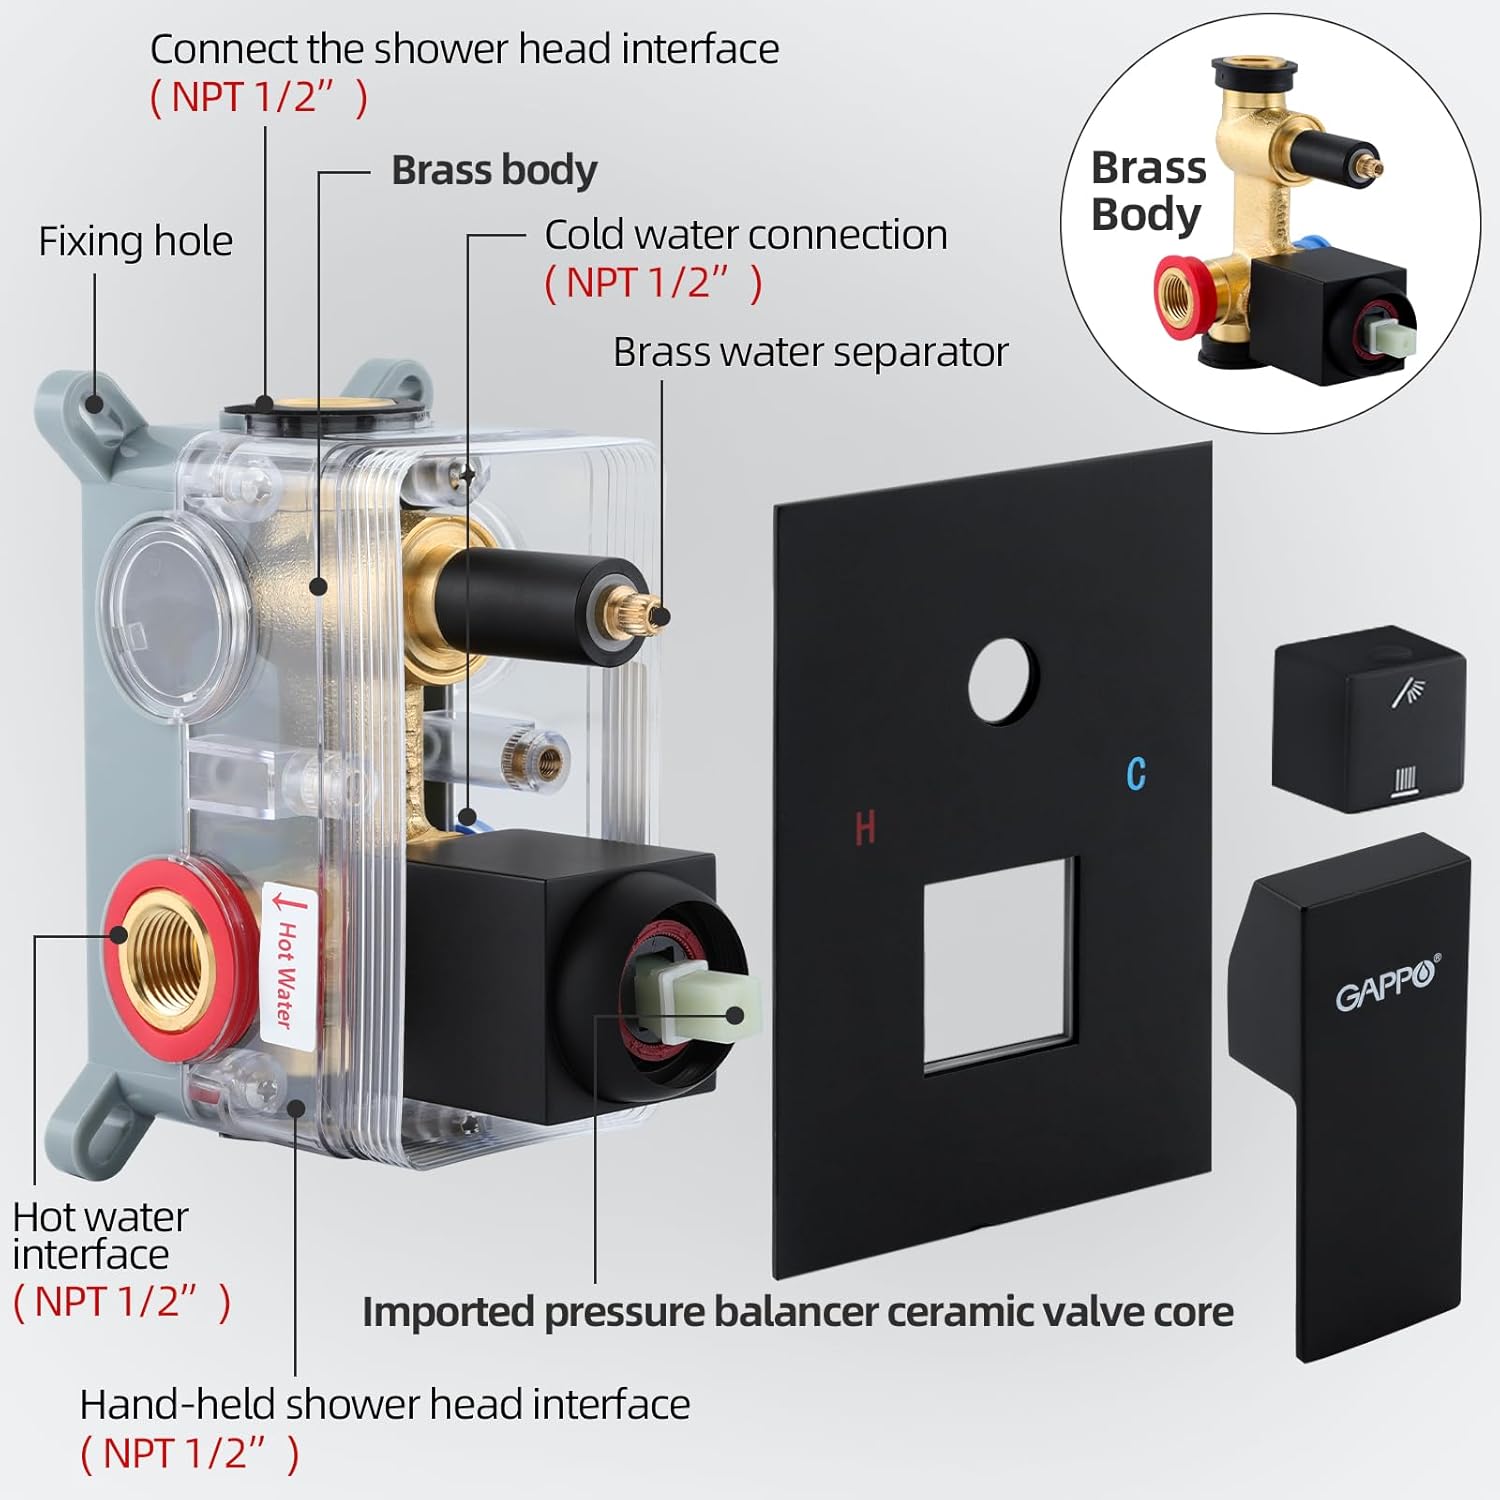
Image: A close-up view of the shower valve, highlighting its internal components and connection points. Labels indicate NPT 1/2" connections for hot water, cold water, the main shower head, and the handheld shower head. The image also shows the brass body and the imported pressure balancer ceramic valve core.
- Connect the hot and cold water lines to the designated NPT 1/2" inlets on the rough-in valve. The valve is cUPC certified and designed for standard U.S. plumbing connections.
- Connect the shower head outlet and handheld shower head outlet to their respective NPT 1/2" connections.
- Secure the valve firmly within the wall cavity according to the manufacturer's guidelines, ensuring it is level and at the correct depth for the trim plate.
- Perform a leak test by turning on the water supply briefly to check all connections.
3. Install the Shower Arm and Head

Image: A detailed view of the 12-inch rain shower head, illustrating its 360-degree rotation capability. Insets show the air injection technology, which mixes water with air to increase pressure, and a close-up of the easy-to-clean silicone nozzles.
- Thread the shower arm into the wall outlet, ensuring a tight seal with plumber's tape or sealant.
- Attach the 12-inch rainfall shower head to the shower arm. The shower head features a swivel ball joint allowing for 360-degree rotation for adjustable spray direction.
4. Install the Handheld Shower Head and Holder

Image: A close-up of the handheld shower head, emphasizing its TRP soft rubber nozzles and the spray pattern. An inset shows the connection point for the hose.
- Mount the handheld shower head holder to the wall at a desired height.
- Connect the 1.8m shower hose to the handheld shower head and to the designated outlet on the rough-in valve.
- Place the handheld shower head into its holder.
5. Install the Trim Plate and Handle
- Install the decorative trim plate over the rough-in valve, securing it with the provided screws.
- Attach the single handle to the valve stem. This handle controls both water temperature and flow.
Operating Instructions

Image: A graphic demonstrating the two primary functions of the Gappo shower system: a wide, gentle rainfall from the overhead shower head and a targeted spray from the handheld shower head.
Controlling Water Flow and Temperature
- To turn on the water, rotate the single handle.
- To adjust water temperature, rotate the handle left for hotter water and right for colder water. The pressure balance valve will maintain a consistent temperature, preventing sudden changes.
- To adjust water flow, pull the handle outwards or push it inwards.
Switching Between Shower Functions
- The shower system allows you to switch between the rainfall shower head and the handheld shower head.
- Locate the diverter knob or button on the valve trim plate.
- Rotate or push the diverter to select your desired shower function.

Image: The Gappo shower system in a modern bathroom setting, demonstrating water flowing from both the large overhead rainfall shower head and the flexible handheld shower head simultaneously, showcasing its dual functionality.
Maintenance
Cleaning the Finish
- To maintain the matte black finish, clean regularly with a soft, damp cloth.
- For stubborn spots, use a mild soap and water solution.
- Do not use abrasive cleaners, harsh chemicals, or scouring pads, as these will damage the finish and void the warranty.
- Rinse thoroughly and dry with a soft cloth to prevent water spots.
Cleaning Silicone Nozzles
- The rainfall shower head and handheld shower head are equipped with silicone nozzles.
- To remove mineral deposits (limescale), simply wipe the nozzles with your finger or a soft cloth. This flexible design allows for easy cleaning and prevents clogging.
- For more severe buildup, a solution of white vinegar and water can be used. Soak the shower head (if removable) or apply the solution to the nozzles, then scrub gently and rinse.
Troubleshooting
| Problem | Possible Cause | Solution |
|---|---|---|
| Low Water Pressure | Clogged shower head nozzles; partially closed shut-off valve; low household water pressure. | Clean shower head nozzles (wipe silicone nozzles); ensure shut-off valves are fully open; consult a plumber for household water pressure issues. |
| Water Leaking from Connections | Loose connections; damaged O-rings or seals; insufficient plumber's tape. | Turn off water supply, tighten connections; inspect and replace O-rings/seals if damaged; reapply plumber's tape. |
| Inconsistent Water Temperature | Pressure balance valve malfunction; issues with hot/cold water supply. | Ensure hot and cold water supplies are stable; if problem persists, contact customer support or a qualified plumber. |
| Diverter Not Switching Properly | Mineral buildup; internal mechanism issue. | Clean around the diverter knob; if still not working, contact customer support. |
Warranty and Support
Gappo stands behind the quality of its products. Your Gappo Shower System comes with a 3-year after-sale service.
If you encounter any problems with your shower head or handheld, or have questions regarding installation or operation, please do not hesitate to contact us. We are committed to providing 100% Satisfaction Guaranteed and will do our best to assist you.
For support, please visit the official Gappo store or contact customer service through the platform where you purchased the product.
Note: Please retain your proof of purchase for warranty claims.
Related Documents - Y71001-2BK12-US
 |
GAPPO Radiator Valves - Technical Passport and Specifications Comprehensive technical passport and specifications for GAPPO radiator valves, including models G261 through G266. Details on purpose, technical characteristics, dimensions, installation, operation, and warranty. |
 |
Built-In Soap Dispenser Installation Guide | Gappo Y35001 Comprehensive installation instructions and parts list for the Gappo Y35001 built-in soap dispenser. Includes step-by-step assembly guide and safety warnings. |
Ask a question about this manual
Ask about setup, troubleshooting, compatibility, parts, safety, or missing instructions. Manuals+ will review the question and use this page’s manual context to help answer it.