1. Introduction
This manual provides detailed instructions for the safe and efficient operation, setup, and maintenance of your HIGHTOP Electric Strapping Machine V2. This portable banding tool is designed for securing packages with PP (Polypropylene) and PET (Polyester) straps, suitable for various industrial and packaging applications. Please read this manual thoroughly before operating the machine to ensure proper usage and to prevent damage or injury.
2. Safety Instructions
- Always wear appropriate personal protective equipment (PPE), including safety glasses and gloves, when operating the strapping machine.
- Ensure the work area is clean, well-lit, and free from obstructions.
- Do not operate the machine in damp or wet conditions.
- Keep hands and loose clothing away from moving parts during operation.
- Use only the specified PP or PET strapping materials within the recommended width and thickness ranges (1/2-5/8 inch width, 0.4-1.2mm thickness).
- Never attempt to strap objects that are unstable or could collapse under tension.
- Disconnect the battery before performing any maintenance, cleaning, or when the machine is not in use.
- Do not modify the machine or use non-original replacement parts.
- Store the machine and batteries in a dry, secure location, out of reach of children.
3. Product Overview
The HIGHTOP Electric Strapping Machine V2 is designed for efficient and reliable strapping. Familiarize yourself with its components:

Figure 3.1: HIGHTOP Electric Strapping Machine V2 Components.
This image displays the various parts of the strapping machine, including the release handle, non-slip carrying handle, welding button, tension button, removable battery, ventilation hole, tension motor, indicator light/control panel, and alloy welded plate.
- Release Handle: Used to open the strap guide.
- Non-slip Carrying Handle: Provides a secure grip for portability.
- Welding Button: Initiates the friction welding process to seal the strap.
- Tension Button: Applies tension to the strap.
- Removable Battery: Powers the machine (4000mAh Li-ion).
- Ventilation Hole: Ensures proper cooling of internal components.
- Tension Motor: Drives the tensioning mechanism.
- Indicator Light/Control Panel: Displays settings and machine status.
- Alloy Welded Plate: The surface where the strap is friction welded.
4. Setup
4.1. Battery Installation and Charging
- Ensure the machine is powered off before installing or removing the battery.
- Insert a fully charged 14.4V 4000mAh Li-ion battery into the battery compartment until it clicks into place.
- To charge the battery, remove it from the machine and place it into the provided high-power charger. The charger typically indicates charging status. A full charge takes approximately 1 hour.
- The battery features a level display, allowing you to check the remaining charge without turning on the machine.
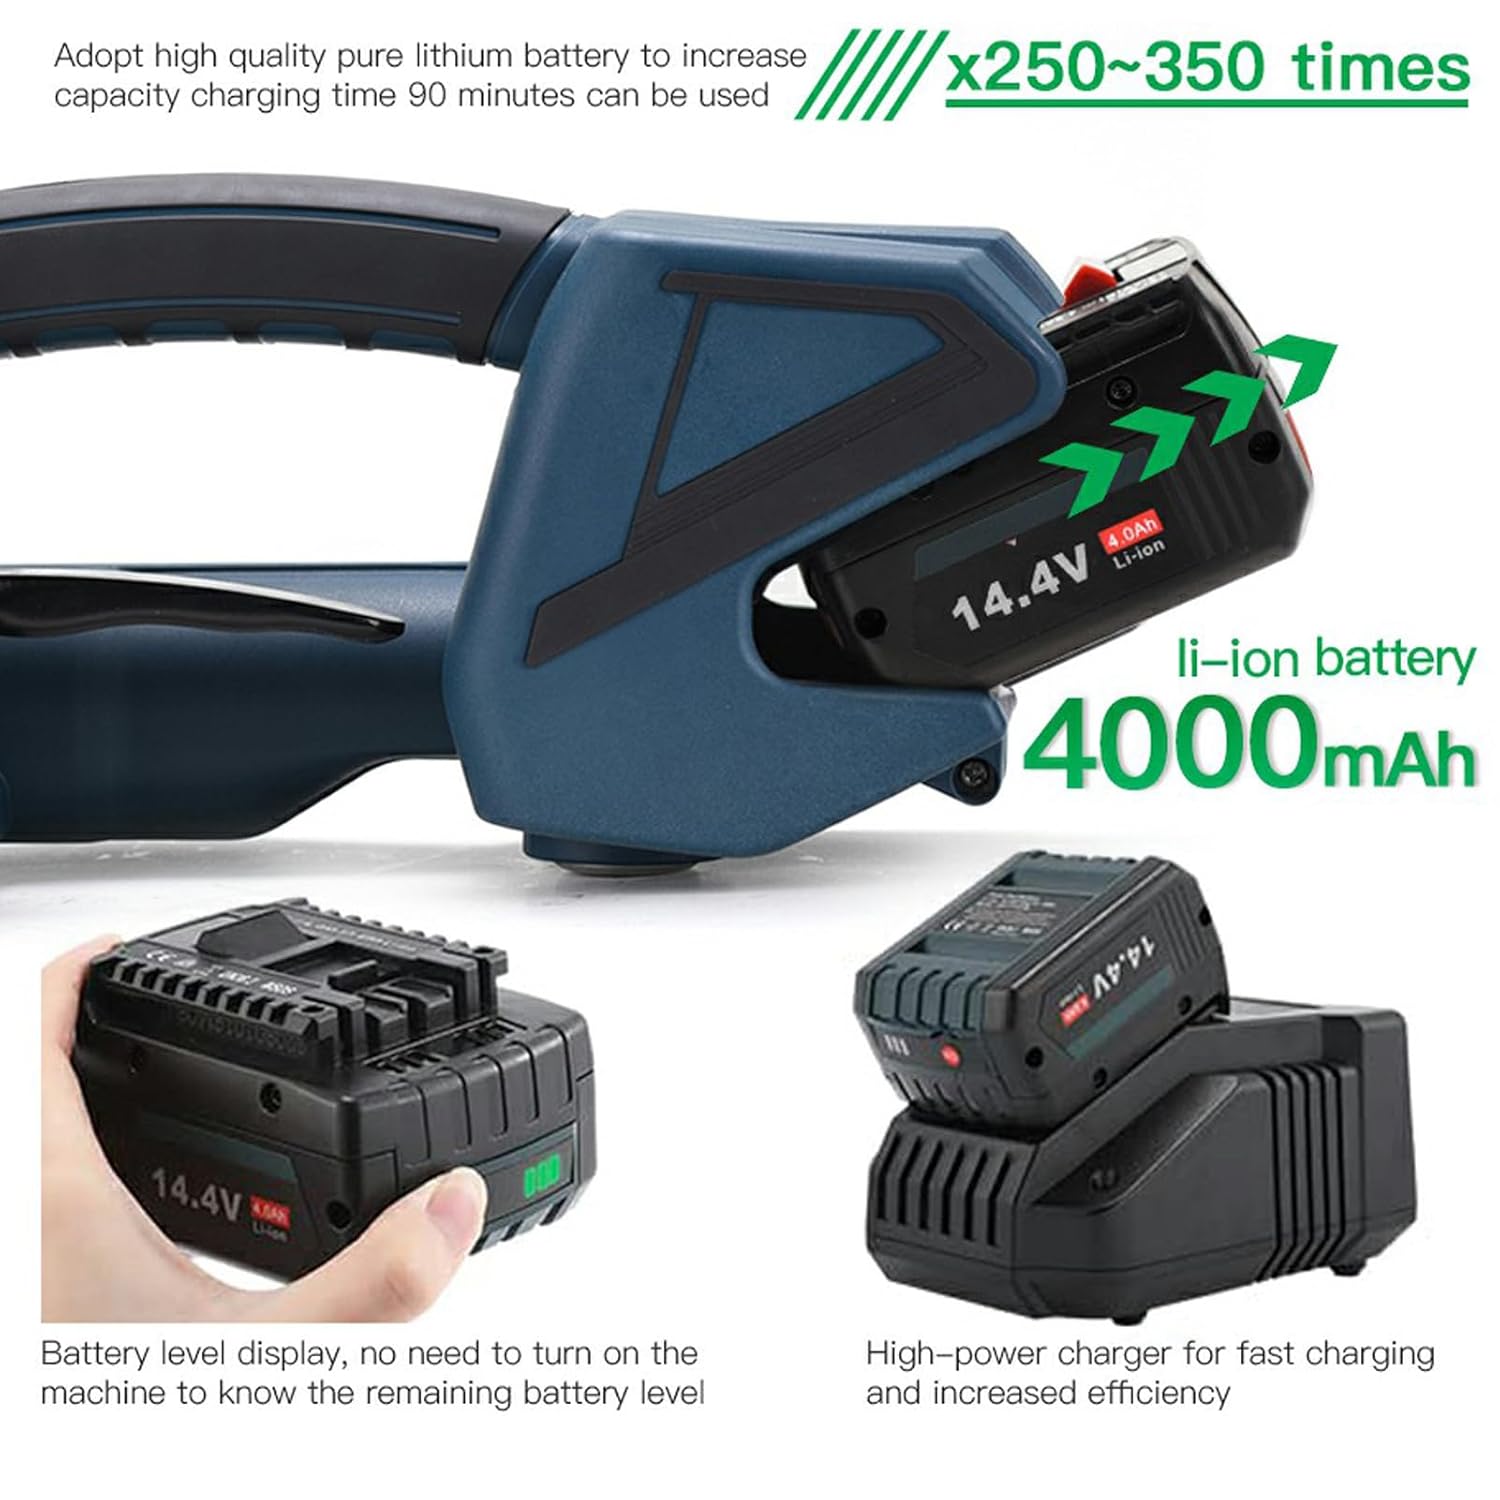
Figure 4.1: Battery and Charger.
This image shows the 14.4V 4000mAh Li-ion battery being inserted into the strapping machine and the separate battery charger.
4.2. Strap Loading
The machine supports PP and PET straps with widths of 1/2 to 5/8 inches (13-16mm) and thicknesses of 0.4 to 1.2mm.

Figure 4.2: Compatible Strapping Materials.
This image illustrates green PET strapping and white PP strapping, along with their respective specifications for width, thickness, and tensile strength.
- Press the release handle to open the strap guide.
- Feed the strap through the guide, ensuring it is properly aligned.
- Close the release handle, making sure the strap is securely held.
5. Operating Instructions
The HIGHTOP Electric Strapping Machine V2 features an LCD screen for easy adjustment of settings.
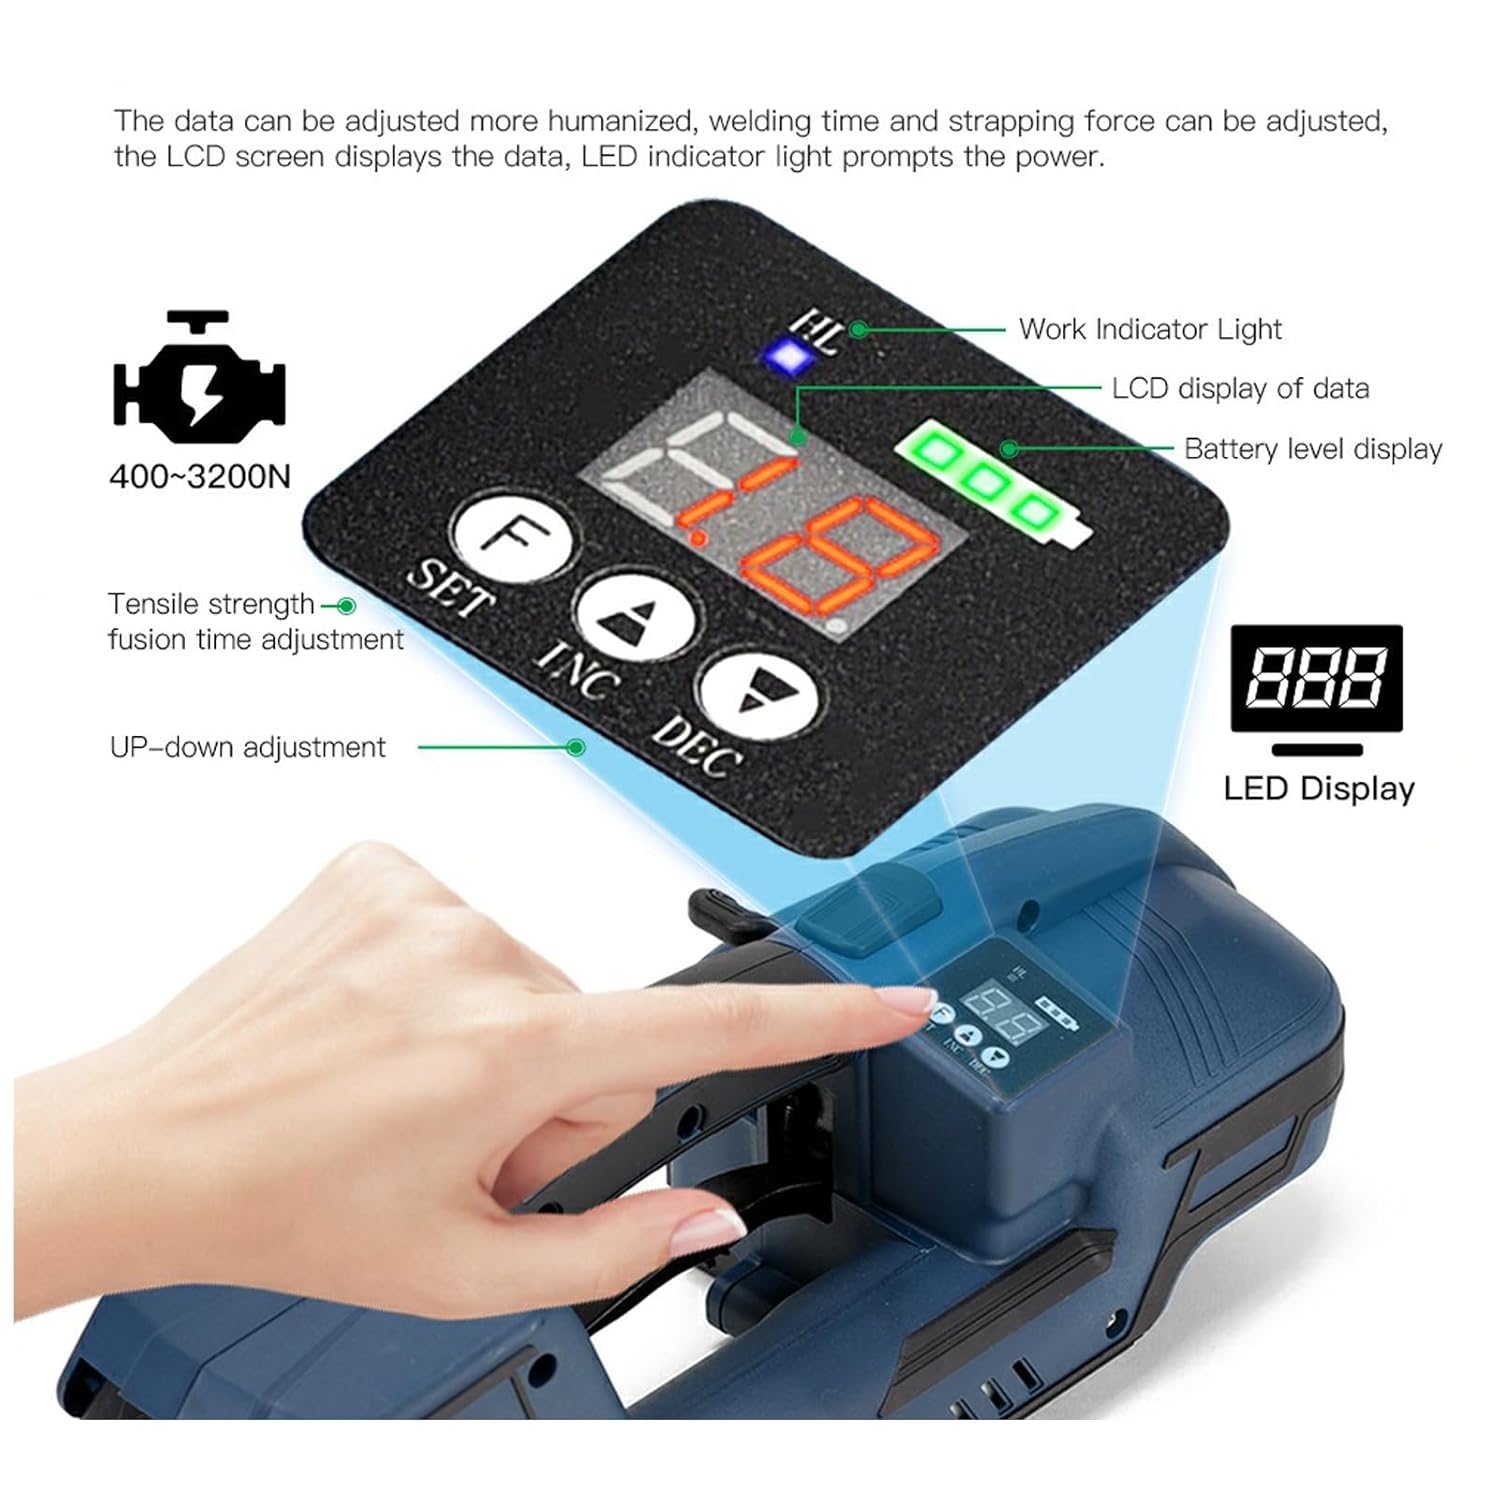
Figure 5.1: LCD Control Panel.
This image highlights the LCD screen and control buttons (SET, INC, DEC) for adjusting tensile strength and fusion time, along with the work indicator light and battery level display.
5.1. Adjusting Settings
- LCD Screen: Displays current settings for tensile strength and fusion time.
- SET Button: Used to switch between adjusting tensile strength (400-3200N) and fusion time.
- INC/DEC Buttons: Adjust the selected parameter (increase/decrease).
- Work Indicator Light: Illuminates during operation.
- Battery Level Display: Shows the remaining battery charge.
Adjust the tensile strength and fusion time according to the type of strap and the item being packaged. Refer to the strap manufacturer's recommendations for optimal settings.
5.2. Strapping Process
- Wrap the strap around the item to be packaged.
- Insert both ends of the strap into the machine's strap guide, ensuring they overlap correctly.
- Press the Tension Button to apply the desired tension to the strap. The machine will automatically tension the strap to the preset level.
- Once tensioned, press the Welding Button to initiate the friction welding process. The machine will weld and cut the strap automatically.
- Remove the machine from the newly strapped package.

Figure 5.2: Strapping Applications.
This collage shows the electric strapping machine being used to secure various items such as bricks, wood, steel, books, and other logistics packages.
6. Maintenance
- Cleaning: Regularly clean the machine's exterior with a dry, soft cloth. Ensure no dust or debris accumulates in the strap path or welding area.
- Battery Care: Store batteries in a cool, dry place. Avoid fully discharging batteries frequently to prolong their lifespan. Recharge batteries as needed.
- Inspection: Periodically inspect the strap guide, welding plate, and cutting mechanism for wear or damage. Replace worn parts as necessary.
- Lubrication: Consult with HIGHTOP customer support for any lubrication requirements.
7. Troubleshooting
| Problem | Possible Cause | Solution |
|---|---|---|
| Machine does not power on. | Battery is not installed correctly or is discharged. | Ensure battery is fully inserted. Charge or replace the battery. |
| Strap does not tension properly. | Incorrect tension setting; strap material incompatible; strap not inserted correctly. | Adjust tension setting via LCD panel. Verify strap type and dimensions. Re-insert strap correctly. If tension is still insufficient, contact customer support. |
| Welding is weak or fails. | Incorrect fusion time setting; dirty welding plate; incompatible strap material. | Adjust fusion time setting. Clean the alloy welded plate. Ensure correct strap type is used. If problems persist, contact customer support. |
| Strap jams in the machine. | Improper strap insertion; debris in strap path. | Power off the machine and carefully remove the jammed strap. Clean the strap path. Ensure correct strap loading. |
8. Specifications
| Feature | Detail |
|---|---|
| Model | V2 |
| Packing Tape Size (Width) | 13-16mm (1/2 - 5/8 inch) |
| Packing Tape Size (Thickness) | 0.4-1.2mm |
| Compatible Straps | PP, PET |
| Battery Parameters | 14.4V, 4.0Ah, 50/60Hz, 57.6Wh Lithium Ion |
| Motor Type | Brushed DC Motor |
| Battery Life (per charge) | Approx. 250-350 strips |
| Charging Time | Approx. 90 minutes |
| Tightening Speed | 100-200mm/S |
| Pull (Tension Force) | 900-3200N Adjustable |
| Splicing Time (Welding) | 0.5-3.5S Adjustable |
| Machine Weight | 3.1kg (6.83 lbs) |
| Product Dimensions | L380 x W130 x H130mm (11.98 x 6 x 5 inches) |
9. Warranty and Support
HIGHTOP provides professional support for its electric banding tools. During the warranty period, users are eligible for timely repair or replacement parts services, and free refunds for eligible issues.
For any issues, questions, or to inquire about accessories, please contact HIGHTOP customer support through the Amazon store. Professional technicians are available to guide operation and assist with troubleshooting to avoid operational errors.
Please note: If the tension is not sufficient, or if there are welding or tightening problems, refer to the troubleshooting section first, then contact support if the issue persists.