1. Introduction
This manual provides essential instructions for the installation and proper handling of the Generic LCD Screen with Digitizer Full Assembly, designed specifically for the Honor Pad 8 model HEY-W09. This replacement part is intended to restore display and touch functionality to your device.
The assembly includes the LCD display and the touch screen digitizer, pre-assembled for convenience. Please read all instructions carefully before proceeding with installation.
2. Important Safety Information
- Static Electricity: Electronic components are sensitive to static discharge. Always ground yourself using an ESD (Electrostatic Discharge) strap before handling the screen assembly or internal components of your device.
- Eye Protection: Wear appropriate eye protection during the entire installation process to guard against potential glass splinters.
- Fragile Component: The LCD screen and digitizer assembly is a glass product and is highly fragile. Handle with extreme care to prevent damage.
- Professional Installation Recommended: Due to the delicate nature and complexity of tablet repairs, professional installation is strongly recommended. Incorrect installation can lead to damage to the product or your device.
- Model Compatibility: Confirm your device model is Honor Pad 8 HEY-W09 before purchasing or attempting installation.
3. Before Installation Notes
Adhering to these preliminary steps is crucial for a successful installation and to prevent damage to the new screen or your device.
3.1. Test Before Installation
Before permanently installing the new screen, it is imperative to test its functionality. Do not remove any protective films, stickers, or tags from the new screen during this testing phase. Removing them may void the warranty.
Procedure:
- Ensure the device is powered off and disconnected from any power source.
- Carefully connect the flex cable of the new screen assembly to the corresponding connector on the device's motherboard. Do not apply excessive force.
- Power on the device.
- Verify that the display functions correctly (no lines, dead pixels, or discoloration) and that the touch screen responds accurately across the entire surface.
- If the test is successful, proceed with the full installation. If any issues arise, power off the device immediately and contact customer support. Do not force installation if the screen is not functioning correctly.

Image: Front view of the LCD screen and digitizer assembly. This image shows the display surface of the replacement screen, which should be tested for functionality before full installation.
3.2. Flex Cable Handling
The flex cable connecting the screen to the motherboard is extremely delicate. Avoid bending it excessively, especially at angles greater than 90 degrees. Over-bending can cause permanent damage, leading to a black display or other display malfunctions.

Image: Close-up view of the flex cable connector located on the back of the screen assembly. This component is critical for display functionality and must be handled with care to avoid damage from over-bending.
4. Setup and Installation Guide
This section outlines the general steps for replacing the screen assembly. Please note that specific disassembly and reassembly procedures for the Honor Pad 8 HEY-W09 may vary and require specialized tools and knowledge. Refer to device-specific repair guides or seek professional assistance if unsure.
4.1. Required Tools (Not Included)
- Small Phillips head screwdriver
- Prying tools (plastic spudgers, opening picks)
- Heat gun or hairdryer (for softening adhesive)
- Suction cup
- Tweezers
- Adhesive strips (for reassembly)
- ESD wrist strap
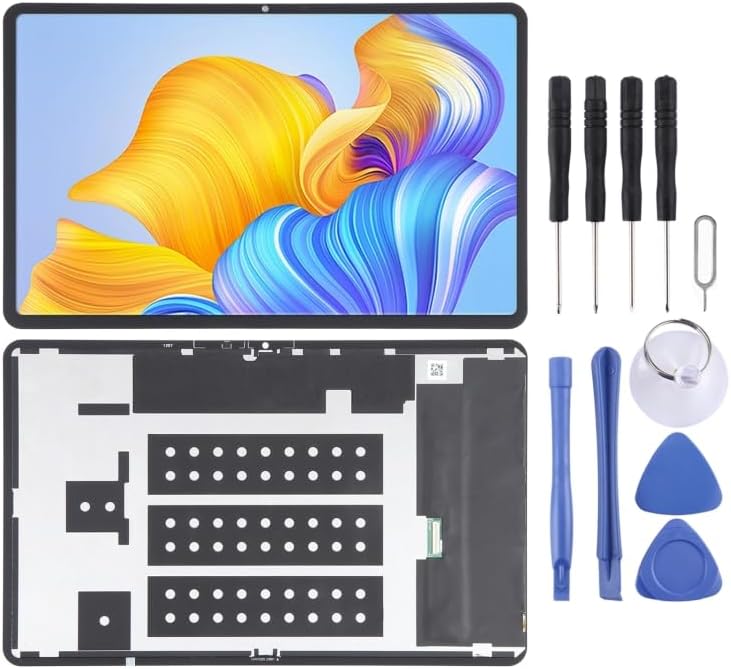
Image: The LCD screen assembly shown alongside a set of common repair tools, including screwdrivers, prying tools, and a suction cup. These tools are typically required for tablet screen replacement.
4.2. Disassembly (General Steps)
- Power Off: Ensure your Honor Pad 8 is completely powered off.
- Remove SIM Tray: If applicable, remove the SIM card tray.
- Heat Edges: Gently heat the edges of the tablet's screen to soften the adhesive.
- Pry Open: Use a suction cup and prying tools to carefully separate the old screen assembly from the device frame. Work slowly and cautiously to avoid damaging internal components.
- Disconnect Cables: Once the screen is partially lifted, locate and carefully disconnect the flex cables (display and digitizer) from the motherboard.
- Remove Old Screen: Completely remove the damaged screen assembly.
- Clean Frame: Thoroughly clean any old adhesive residue from the device frame.
4.3. Installation (General Steps)
- Pre-Installation Test: Perform the test described in Section 3.1.
- Connect Cables: Carefully connect the flex cables of the new screen assembly to the motherboard. Ensure they are seated correctly and securely.
- Apply Adhesive: Apply new adhesive strips around the perimeter of the device frame where the screen will sit.
- Position New Screen: Carefully align the new screen assembly with the device frame and gently press it into place. Ensure even pressure is applied.
- Secure: Use clamps or rubber bands to hold the screen firmly against the frame for several hours to allow the adhesive to cure.
- Final Test: After the adhesive has cured, power on the device and perform a final test of the display and touch functionality.
5. Operating
The LCD Screen with Digitizer Full Assembly is a replacement component that restores the visual display and touch input capabilities of your Honor Pad 8 HEY-W09. Once correctly installed, the device should operate as it did with its original screen, allowing for normal interaction with the tablet's operating system and applications.
6. Maintenance
To ensure the longevity and optimal performance of your new screen:
- Cleaning: Use a soft, lint-free cloth specifically designed for electronics to clean the screen. For stubborn smudges, lightly dampen the cloth with distilled water or a screen-cleaning solution. Avoid harsh chemicals, abrasive materials, or excessive moisture.
- Protection: Consider using a screen protector and a protective case for your Honor Pad 8 to prevent scratches and absorb impacts.
- Avoid Pressure: Do not place heavy objects on the screen or apply excessive pressure, as this can damage the display or digitizer.
- Temperature: Avoid exposing the device to extreme temperatures, which can affect screen performance and adhesive integrity.
7. Troubleshooting
If you encounter issues after installation, consider the following troubleshooting steps:
- Black Screen / No Display:
- Ensure the flex cable is securely connected to both the screen and the motherboard.
- Check for any kinks or sharp bends in the flex cable (refer to Section 3.2).
- Verify the device is powered on and has sufficient battery charge.
- Touch Not Responding / Ghost Touches:
- Ensure the digitizer flex cable is properly connected.
- Restart the device.
- Check for any debris or foreign objects between the screen and the frame.
- Display Anomalies (Lines, Discoloration, Dead Pixels):
- This may indicate a damaged screen. Re-check the flex cable connection.
- If the issue persists after re-seating the cable, the screen itself might be faulty.
If troubleshooting does not resolve the issue, it is recommended to seek professional repair assistance or contact the seller for further support.
8. Specifications
- Product Type: LCD Screen with Digitizer Full Assembly
- Compatibility: Honor Pad 8 (Model: HEY-W09)
- Brand: Generic
- Manufacturer: YUNCHAO
- ASIN: B0CB36QV16
- Item Weight: 2.35 pounds (packaging included)
9. Warranty and Support
This product is typically covered by a limited warranty against manufacturing defects. Please refer to the seller's return policy or contact the seller directly for specific warranty terms and support options. Keep your purchase receipt as proof of purchase.
For technical assistance or questions regarding installation, please contact the seller or a qualified repair technician.


