APORO T4
Occus APORO T4 Wired Teaching Amplifier User Manual
Model: APORO T4 | Brand: Generic
1. Introduction
The Occus APORO T4 Wired Teaching Amplifier is a compact and portable audio amplification device designed to enhance vocal clarity and projection. It is ideal for teachers, presenters, tour guides, and anyone requiring clear voice amplification in various settings. Its lightweight design and waist-hanging capability offer convenience and mobility during use.
2. Safety Information
Please read and understand all safety instructions before operating the device to ensure safe and proper use.
- Do not expose the device to water, rain, or excessive moisture.
- Keep the device away from direct sunlight, heat sources, or high temperatures.
- Use only the specified input voltage (110V) for charging.
- Do not attempt to disassemble, modify, or repair the device yourself. Refer all servicing to qualified personnel.
- Keep out of reach of children.
- Avoid dropping or subjecting the device to strong impacts.
3. Package Contents
Verify that all items are present in the package:
- Occus APORO T4 Amplifier Unit
- Wired Microphone
- USB Charging Cable
- Waist Strap
- User Manual
4. Product Overview
Familiarize yourself with the components and features of your APORO T4 amplifier.

Figure 4.1: Front view of the APORO T4 amplifier in black. The device features a prominent speaker grille and a digital display at the top, indicating "SP" (likely for speaker or sound output mode).

Figure 4.2: The APORO T4 amplifier is available in multiple color options, including black, blue, and red, catering to personal preference.

Figure 4.3: Top panel of the APORO T4 amplifier (blue model), illustrating the various ports and control buttons. From left to right, these include an antenna port, microphone input (MIC), recording button (REC), previous track button, play/pause button, next track button, mode key (M), and the power on/off and volume control dial (ON+).
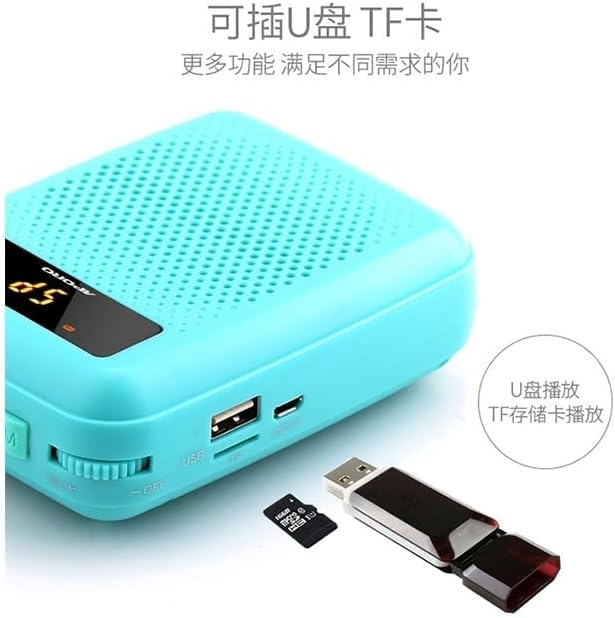
Figure 4.4: The APORO T4 amplifier supports external media playback via its USB port and TF (microSD) card slot, allowing users to play audio files directly from a USB flash drive or TF memory card.
5. Setup
5.1 Charging the Amplifier
- Connect the USB charging cable to the charging port on the amplifier.
- Plug the other end of the USB cable into a standard 110V USB power adapter (not included) or a computer USB port.
- The charging indicator light will illuminate. Once fully charged (typically 3-5 hours for the 2000-4000 mAh battery), the indicator light may change or turn off.
- Disconnect the charging cable once charging is complete.
5.2 Attaching the Waist Strap
- Locate the strap loops on the sides of the amplifier unit.
- Thread the waist strap through these loops.
- Adjust the strap length for comfortable and secure wearing around your waist.
5.3 Connecting the Microphone
- Insert the microphone's 3.5mm jack firmly into the "MIC" port on the top of the amplifier (refer to Figure 4.3).
- Ensure the microphone is securely connected for optimal sound input.
6. Operating Instructions
6.1 Powering On/Off and Volume Control
- To power on the device, rotate the ON+ dial (located on the right side of the top panel, refer to Figure 4.3) clockwise until you hear a click and the display illuminates.
- Continue rotating the dial clockwise to increase the volume.
- Rotate the dial counter-clockwise to decrease the volume.
- To power off, rotate the dial counter-clockwise until you hear a click and the display turns off.
6.2 Microphone Amplification
- Once the microphone is connected and the amplifier is powered on, speak into the microphone.
- Adjust the volume dial to achieve the desired amplification level.
- Maintain a suitable distance between the microphone and your mouth to prevent feedback (howling).
6.3 USB/TF Card Playback
- Insert a USB flash drive into the USB port or a TF (microSD) card into the TF card slot (refer to Figure 4.4).
- The amplifier should automatically detect the media and begin playing audio files.
- Use the "Previous Track" and "Next Track" buttons (refer to Figure 4.3) to navigate through your audio files.
- Press the "Play/Pause" button to pause or resume playback.
- Press the "Mode" button (M) to switch between different input modes (e.g., microphone, USB, TF card).
6.4 Recording Function
- Ensure a USB flash drive or TF card is inserted for storage.
- Press the "REC" (Record) button (refer to Figure 4.3) to start recording.
- Press the "REC" button again to stop recording. The recorded file will be saved to the inserted media.
7. Maintenance
- Cleaning: Use a soft, dry cloth to wipe the surface of the amplifier. Do not use liquid cleaners or abrasive materials.
- Storage: Store the device in a cool, dry place away from direct sunlight and extreme temperatures when not in use.
- Battery Care: To prolong battery life, avoid fully discharging the battery frequently. Charge the device regularly, even if not in use for extended periods (e.g., once every 3 months).
8. Troubleshooting
| Problem | Possible Cause | Solution |
|---|---|---|
| No sound output. | Device is off; Volume is too low; Microphone not connected properly; Microphone faulty. | Ensure device is powered on; Increase volume; Reconnect microphone firmly; Test with another microphone if available. |
| Sound is distorted or unclear. | Volume too high; Microphone too close to speaker; Low battery. | Decrease volume; Adjust microphone distance; Charge the device. |
| Device not turning on. | Battery is depleted; Power switch not fully engaged. | Charge the device fully; Ensure the ON+ dial is rotated completely to the 'on' position. |
| USB/TF card not playing. | Incorrect file format; Media not inserted correctly; Device not in correct mode. | Ensure audio files are in a compatible format (e.g., MP3); Reinsert USB/TF card; Press the 'M' (Mode) button to select the correct input mode. |
9. Specifications
| Model | APORO T4 |
| Brand | Generic |
| Item Type | Hand Tool Parts (as per product listing) |
| Origin | Mainland China |
| Built-in Battery Capacity | 2000 mAh - 4000 mAh |
| Input Voltage | 110V |
| Color | Black (as reviewed model) |
| ASIN | B0CB1T57KC |
| Manufacturer Part Number | OCS-E827C6BF537942AD6D7B8415E204D770 |
10. Warranty and Support
For specific warranty information and terms, please refer to the documentation provided with your purchase or contact the manufacturer directly. Technical support may be available through the manufacturer's official website or customer service channels.
Manufacturer: Generic
Ask a question about this manual
Ask about setup, troubleshooting, compatibility, parts, safety, or missing instructions. Manuals+ will review the question and use this page’s manual context to help answer it.