Introduction
This manual provides detailed instructions for assembling, operating, and maintaining your Roroom DIY Miniature Dollhouse Kit, model AW02-003 Dreamy Book Hall. This kit is designed for individuals aged 14 years and older and requires self-assembly. Please read all instructions carefully before beginning the assembly process.
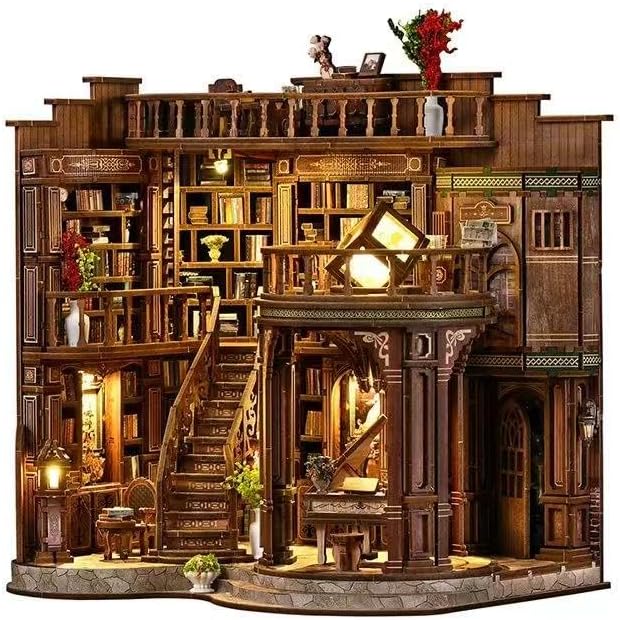
Image: The fully assembled Roroom Dreamy Book Hall miniature dollhouse kit, showcasing its detailed interior with bookshelves, stairs, and illuminated sections.
Safety Information
Warning: Not suitable for persons under 14 years of age due to small parts and complex assembly requirements.
Always handle components with care. Keep small parts away from young children to prevent choking hazards. Use appropriate tools safely, such as scissors and an exacto knife, with adult supervision if necessary.
Package Contents
Verify that all components listed below are present in your kit. If any parts are missing, please refer to the Support section.
- Pre-cut wooden, paper, and plastic components for the Dreamy Book Hall structure and furniture.
- English Instruction Manual with step-by-step assembly guides.
- LED lighting components and wiring.
- Music movement mechanism.
- Dust-proof cover.
- Various miniature ornaments and decorative elements.
Required (Not Included):
- Silicone liquid glue.
- 2x AAA batteries for LED lights.
- Basic assembly tools: scissors, exacto knife, pencil, tweezers (recommended).

Image: A visual representation of some of the diverse components included in the kit, such as pre-cut wooden boards, paper details, and miniature items.
Assembly Instructions
The Roroom Dreamy Book Hall kit contains 888 pieces and typically requires 8-10 hours for assembly. Patience and attention to detail are crucial for a successful build.
- Preparation: Unpack all materials. Identify and organize components using the numbering system provided in the English instruction manual. Ensure you have all necessary tools and non-included items (glue, batteries).
- Component Separation: Carefully detach wooden pieces from their frames. Use an exacto knife for precision cuts and to remove any burrs. Sand edges if necessary for a smooth fit.
- Step-by-Step Assembly: Follow the English instruction manual precisely. Each step is numbered and illustrates how to connect specific parts. Pay close attention to the orientation of pieces.
- Adhesion: Apply silicone liquid glue sparingly to secure components. Allow adequate drying time as specified in the manual before proceeding to the next step, especially for structural elements.
- Detailing: Attach paper cutouts and small decorative elements. Tweezers can be helpful for handling tiny parts.
- Electrical Wiring: Install the LED lighting system according to the wiring diagrams in the manual. Ensure all connections are secure and correctly oriented.
- Music Movement Installation: Integrate the music movement mechanism as instructed.
- Final Touches: Once the main structure and details are complete, insert 2x AAA batteries into the designated battery compartment for the LED lights. Test the lighting and music functions.

Image: Close-up of hands carefully assembling small wooden components, highlighting the detailed work involved in the kit.

Image: An array of pre-cut wooden puzzle pieces and miniature furniture parts, illustrating the complexity and detail of the kit's components.
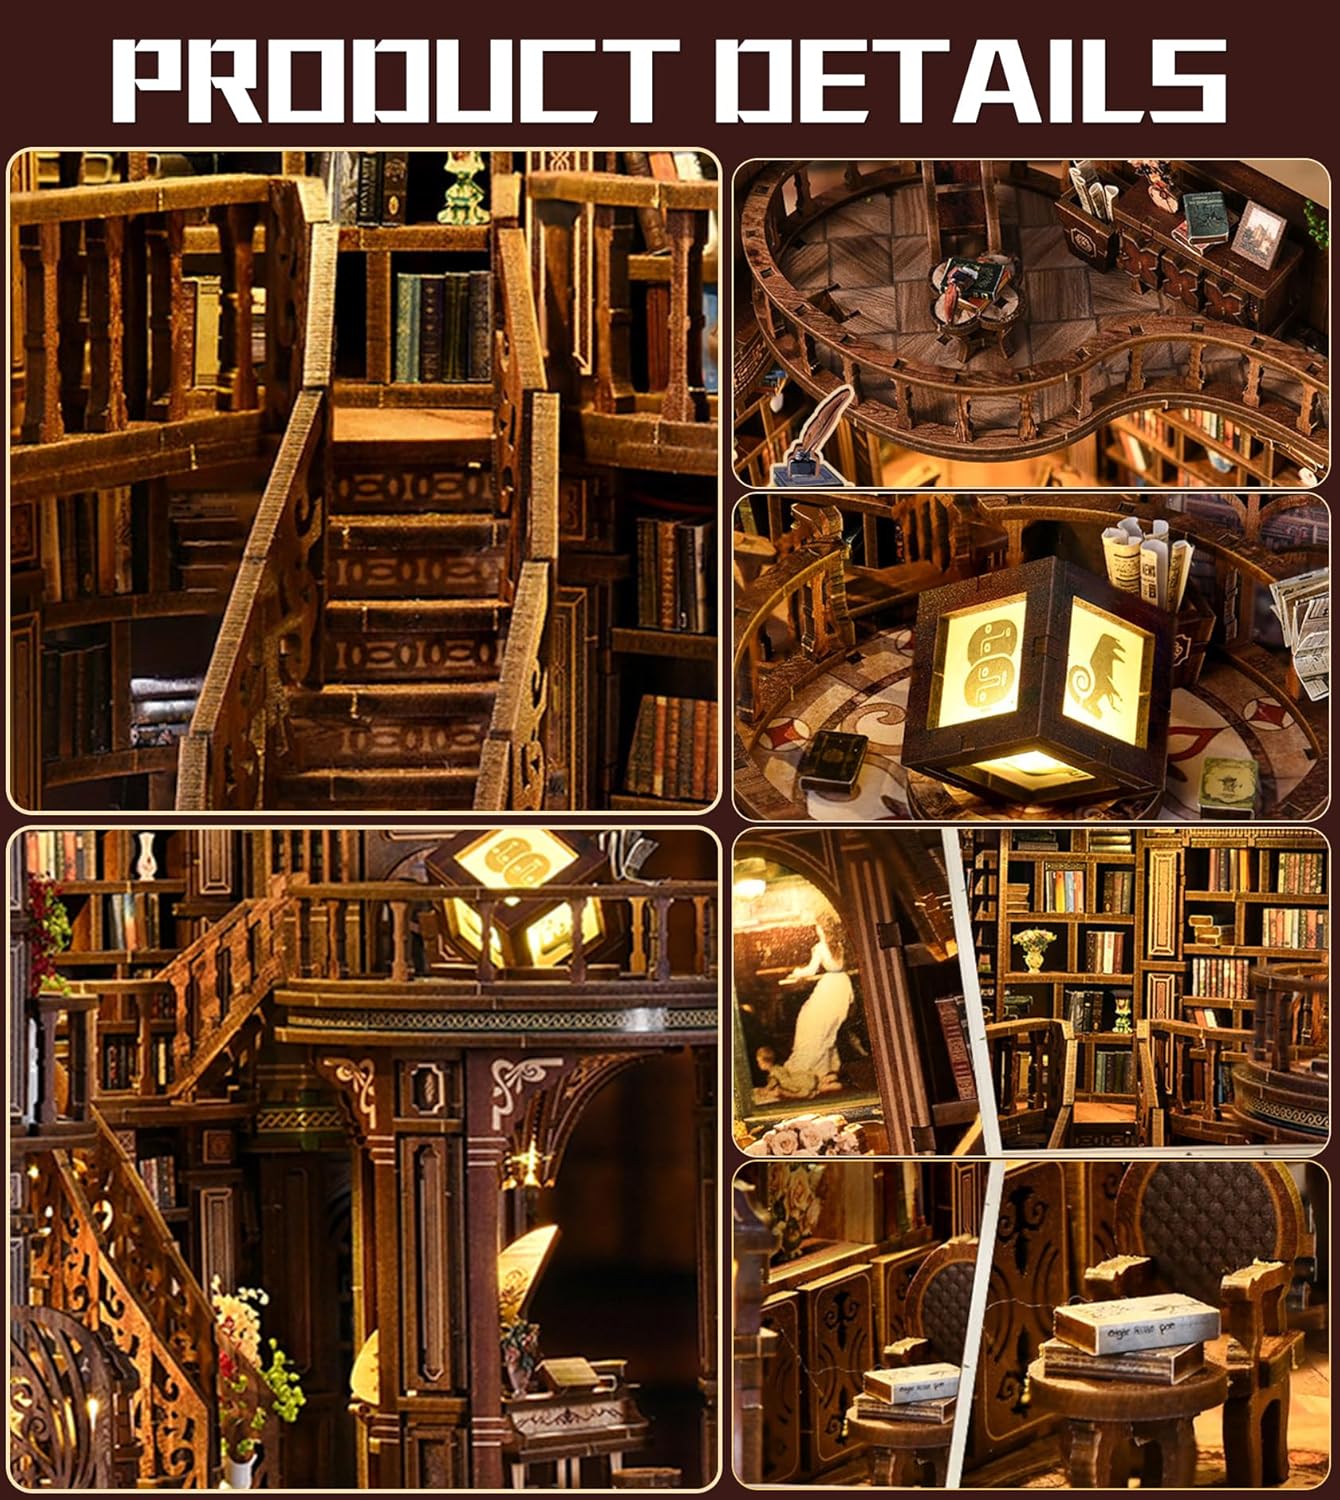
Image: A collage of detailed views from the assembled dollhouse, featuring the grand staircase, filled bookshelves, and various miniature furniture pieces.
Operating Instructions
LED Lighting System
The Dreamy Book Hall features an integrated LED lighting system to illuminate its interior. After successful assembly and battery installation:
- Locate the touch switch, typically integrated into the base or a prominent feature of the dollhouse.
- Gently touch the switch to turn the LED lights on or off.
- Ensure 2x AAA batteries are correctly installed in the battery compartment for the lights to function.
Music Movement
The kit includes a music movement mechanism that adds an auditory element to your miniature scene.
- To activate the music, locate the winding key or mechanism as indicated in your specific instruction manual.
- Gently wind the mechanism to play the melody.
Maintenance
- Dust Protection: Utilize the included dust-proof cover to protect the assembled dollhouse from dust accumulation.
- Cleaning: To clean the dollhouse, gently wipe surfaces with a soft, dry cloth. Avoid using water, solvents, or abrasive cleaners, as these can damage the wood, paper, and painted surfaces.
- Battery Replacement: If the LED lights dim or stop working, replace the 2x AAA batteries. Ensure correct polarity when inserting new batteries.
- Storage: Store the dollhouse in a stable environment, away from direct sunlight, extreme temperatures, and high humidity to prevent warping or damage to materials.
Troubleshooting
- Problem: Missing or Damaged Parts
- Solution: While kits are inspected for completeness, if you find any missing or damaged parts upon opening, please contact Roroom customer support immediately. Refer to the Support section for contact information.
- Problem: Difficulty with Assembly / Parts Not Fitting
- Solution: Review the English instruction manual carefully. Ensure you are using the correct parts for each step, matching them by their positioning numbers. Some parts may require gentle force or minor sanding for a perfect fit. Patience is key for intricate details.
- Problem: LED Lights Not Working
- Solution:
- Verify that 2x AAA batteries are installed correctly with the proper polarity.
- Check if the batteries are fresh and fully charged.
- Inspect all wiring connections to ensure they are secure and not loose or damaged. Refer to the wiring diagram in your manual.
- Ensure the touch switch is functioning correctly.
- Problem: Insufficient Glue
- Solution: The kit does not include glue. It is essential to prepare your own silicone liquid glue before starting assembly. Ensure you have an adequate supply for the entire project.
Specifications
| Feature | Detail |
|---|---|
| Model Number | AW02-003 |
| Finished Dimensions (L x W x H) | 9 x 6.7 x 9 inches (23 x 17 x 23 cm) |
| Item Weight | 3 pounds (1.36 kg) |
| Material | Wood, Paper, Plastic |
| Recommended Age | 14 years and up |
| Number of Pieces | 888 pieces |
| Approximate Assembly Time | 8-10 hours |
| Power Source (Lights) | 2x AAA Batteries (not included) |

Image: Product information summary, including recommended age, number of pieces, estimated assembly time, and difficulty rating.
Support
For any questions regarding assembly, missing parts, or technical assistance, please contact Roroom customer support. Refer to the product packaging or the seller's information on the purchase platform for specific contact details.
Roroom is committed to assisting you with any issues to ensure a satisfactory experience with your DIY kit.


