1. Product Overview
The FORGING MOUNT 2-in-1 Monitor and Laptop Desk Mount Arm is designed to optimize your workspace by providing flexible and ergonomic positioning for both your monitor and laptop. This versatile mount supports monitors from 13 to 32 inches and laptops up to 17 inches, with a robust weight capacity of 10kg (22 lbs) per arm. It features VESA compatibility for 75x75mm and 100x100mm mounting patterns, ensuring broad compatibility with various displays.
Its full-motion design allows for extensive adjustability, including height, 360-degree rotation, 180-degree swivel, and ±90-degree tilt, promoting an ergonomic setup that can help reduce strain. The integrated cable management system helps maintain a tidy and organized desk. This mount offers two installation options: a sturdy C-clamp for desk edges or a grommet mount for desks with existing holes, providing flexibility for different desk types.

Figure 1: FORGING MOUNT 2-in-1 Monitor and Laptop Arm in use, showing a monitor and laptop side-by-side on a desk. This image illustrates the product's ability to hold both devices simultaneously, freeing up valuable desk space and creating an ergonomic setup.
2. Package Contents
Please verify that all components listed below are present and undamaged before proceeding with installation. If any parts are missing or damaged, please contact customer support.
- Monitor Arm Assembly (Main Pole, Monitor Arm, Laptop Arm)
- Laptop Tray
- C-Clamp Mounting Hardware
- Grommet Mounting Hardware
- VESA Mounting Screws (M4x12, M5x12)
- Allen Wrenches (various sizes)
- Instruction Manual

Figure 2: All components included in the FORGING MOUNT 2-in-1 Monitor and Laptop Arm package. This image provides a visual reference for all parts you should find in the box.
3. Specifications
| Feature | Specification |
|---|---|
| Model Number | FM4507 |
| Compatible Monitor Size | 13 - 32 inches |
| Compatible Laptop Size | Up to 17 inches |
| Weight Capacity (per arm) | 10 kg (22 lbs) |
| VESA Compatibility | 75x75mm, 100x100mm |
| Mounting Options | C-Clamp, Grommet |
| Desk Thickness (C-Clamp) | 10 - 75 mm |
| Desk Thickness (Grommet) | 10 - 75 mm |
| Grommet Hole Diameter | 10 - 65 mm |
| Rotation | 360° (screen), 180° (arm joints) |
| Tilt | ±90° |
| Material | Carbon Steel, Polycarbonate |
| Color | Black |

Figure 3: Detailed product dimensions of the FORGING MOUNT 2-in-1 Monitor and Laptop Arm. This diagram provides key measurements for installation planning, including a maximum height adjustment of 403mm.
4. Setup and Installation
Follow these steps to properly install your FORGING MOUNT arm. Ensure your desk is sturdy enough to support the weight of the mount and your devices.
4.1 Choose Mounting Method
Decide whether to use the C-clamp or grommet mount based on your desk type and preference.
- C-Clamp Mount: Ideal for desks with edges, no drilling required. Supports desk thickness 10-75mm.
- Grommet Mount: Requires a hole in the desk (diameter 10-65mm). Supports desk thickness 10-75mm.

Figure 4: Illustration of the two installation methods for the FORGING MOUNT desk mount: C-clamp mount and grommet mount. This image clarifies how each mounting option is secured to the desk.
4.2 Install the Pole
- For C-Clamp: Attach the C-clamp to the main pole. Position the clamp on the edge of your desk and tighten the knob until the pole is securely fastened and stable.
- For Grommet Mount: Insert the grommet bolt through the desk hole. Attach the base plate and tighten the nut from underneath the desk until the pole is firm.
4.3 Attach Arms to Pole
Slide the monitor arm and laptop arm onto the main pole. Adjust their initial height as desired, then tighten the securing screws on the arm collars.
4.4 Mount Monitor and Laptop
- Monitor: Attach the VESA plate to the back of your monitor using the appropriate VESA screws. Slide the monitor (with VESA plate) onto the monitor arm's head and secure it.
- Laptop: Place your laptop onto the laptop tray. Ensure it is centered and stable. The tray includes adjustable clips to help secure the laptop.
5. Operating and Adjustments
The FORGING MOUNT arm offers a range of adjustments to achieve your preferred ergonomic setup.
5.1 Height Adjustment
To adjust the height of the arms along the main pole, loosen the collar screw on each arm, slide the arm to the desired height, and then re-tighten the screw firmly.
5.2 Screen Rotation and Swivel
The monitor plate can rotate 360 degrees, allowing you to switch between landscape and portrait orientations. Each arm joint can swivel 180 degrees, providing flexibility to position your monitor and laptop precisely where you need them.
5.3 Tilt Adjustment
The monitor and laptop tray can be tilted ±90 degrees (up or down) to reduce glare and optimize your viewing angles. Loosen the tilt knob, adjust the angle, and then tighten the knob to secure.
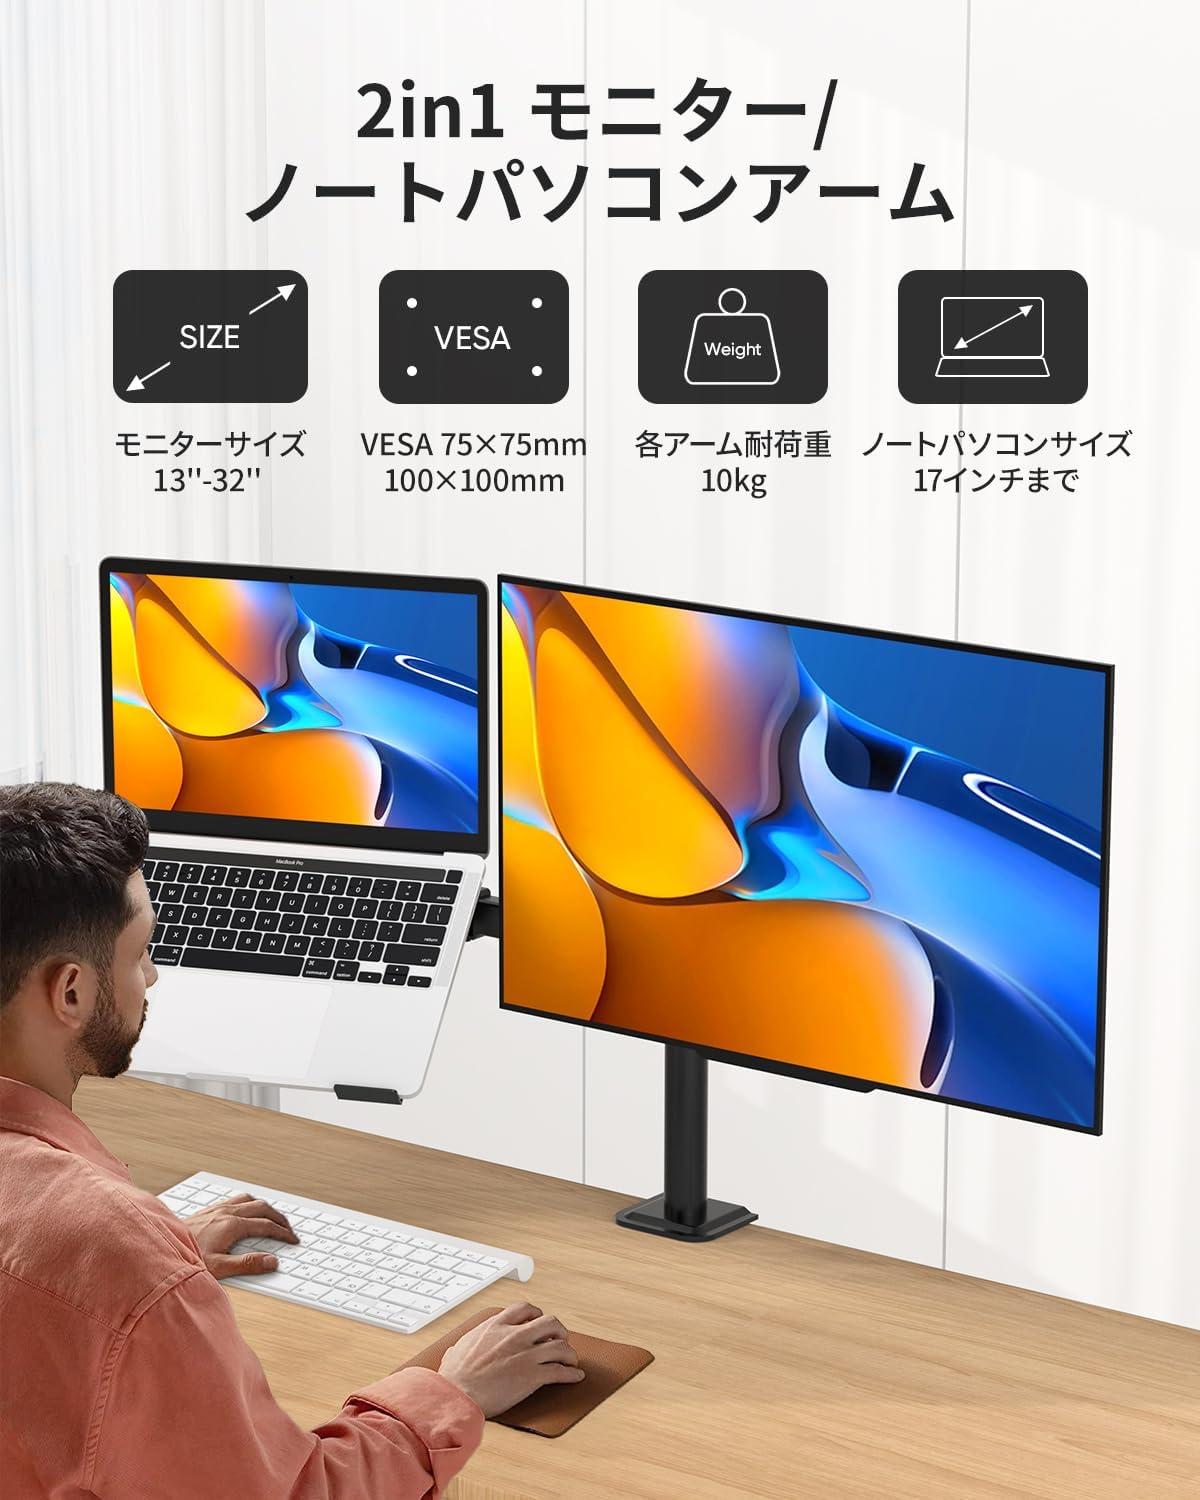
Figure 5: This diagram details the extensive adjustability of the arm, including 360-degree rotation, 180-degree swivel, and ±90-degree tilt, allowing users to customize their viewing angles and height for optimal comfort and productivity.
5.4 Tension Adjustment
If an arm sags or is too stiff to move, use the provided Allen wrenches to adjust the tension screws located at the arm joints. Turn clockwise to increase tension (for heavier devices) or counter-clockwise to decrease tension (for lighter devices).
5.5 Cable Management
Utilize the integrated cable clips along the arms and the main pole to route and organize your power and data cables. This helps maintain a clean and professional workspace.

Figure 6: This image highlights the integrated cable management feature, which allows users to route power and data cables along the arm and down the pole, keeping the workspace organized and clutter-free.
6. Maintenance
- Regular Checks: Periodically inspect all screws and connections to ensure they remain tight and secure. Loose connections can affect stability and performance.
- Cleaning: Clean the arm and laptop tray with a soft, damp cloth. Avoid using harsh chemicals or abrasive cleaners, as these can damage the finish.
- Weight Capacity: Always adhere to the maximum weight capacity of 10kg (22 lbs) per arm. Exceeding this limit can cause damage to the mount or your devices.
7. Troubleshooting
If you encounter any issues with your FORGING MOUNT arm, refer to the following common problems and solutions:
- Arm sags or won't stay in position:
Solution: The tension in the arm joints may need adjustment. Use the provided Allen wrench to tighten the tension screws located at the arm joints. Turn clockwise to increase tension for heavier devices, or counter-clockwise to decrease tension for lighter devices. - Monitor/Laptop is not level:
Solution: Ensure that the VESA plate is securely attached to your monitor and that the laptop tray is properly seated. Adjust the tilt mechanism and tighten the tilt knob firmly. - Cables are messy or getting caught:
Solution: Utilize the integrated cable management clips along the arms and the main pole. Route your power and data cables through these clips to keep them organized and prevent snagging. - Mount feels unstable or wobbly:
Solution: Double-check that the C-clamp or grommet mount is securely fastened to your desk. Ensure your desk itself is stable and capable of supporting the combined weight of the mount and your devices.
8. Warranty and Customer Support
FORGING MOUNT is committed to providing high-quality products. This product is backed by our commitment to quality and customer satisfaction. For any questions, concerns, or assistance with your product, please contact our customer support team.
You can reach us through your purchase platform:
- Navigate to Account Service.
- Go to Order History.
- Locate your purchase from FORGING MOUNT.
- Select Ask a Question to contact our support team directly.
Our team will be happy to assist you with any product-related inquiries.