1. Introduction
This manual provides essential information for the proper installation, adjustment, and maintenance of your new Generic carburetor. This carburetor is designed as a replacement part for various two-stage snow blowers, ensuring reliable engine performance. Please read this manual thoroughly before attempting any installation or service.
2. Safety Information
WARNING: Failure to follow these safety instructions may result in serious injury or property damage.
- Always disconnect the spark plug wire and ensure the engine is cool before performing any service or maintenance.
- Work in a well-ventilated area when handling gasoline. Gasoline is highly flammable and its vapors are explosive.
- Wear appropriate personal protective equipment (PPE), including safety glasses and gloves.
- Keep children and pets away from the work area.
- Refer to your snow blower's original owner's manual for specific safety procedures and engine service guidelines.
3. Product Components
The carburetor assembly includes the main carburetor unit and essential accessories for installation.
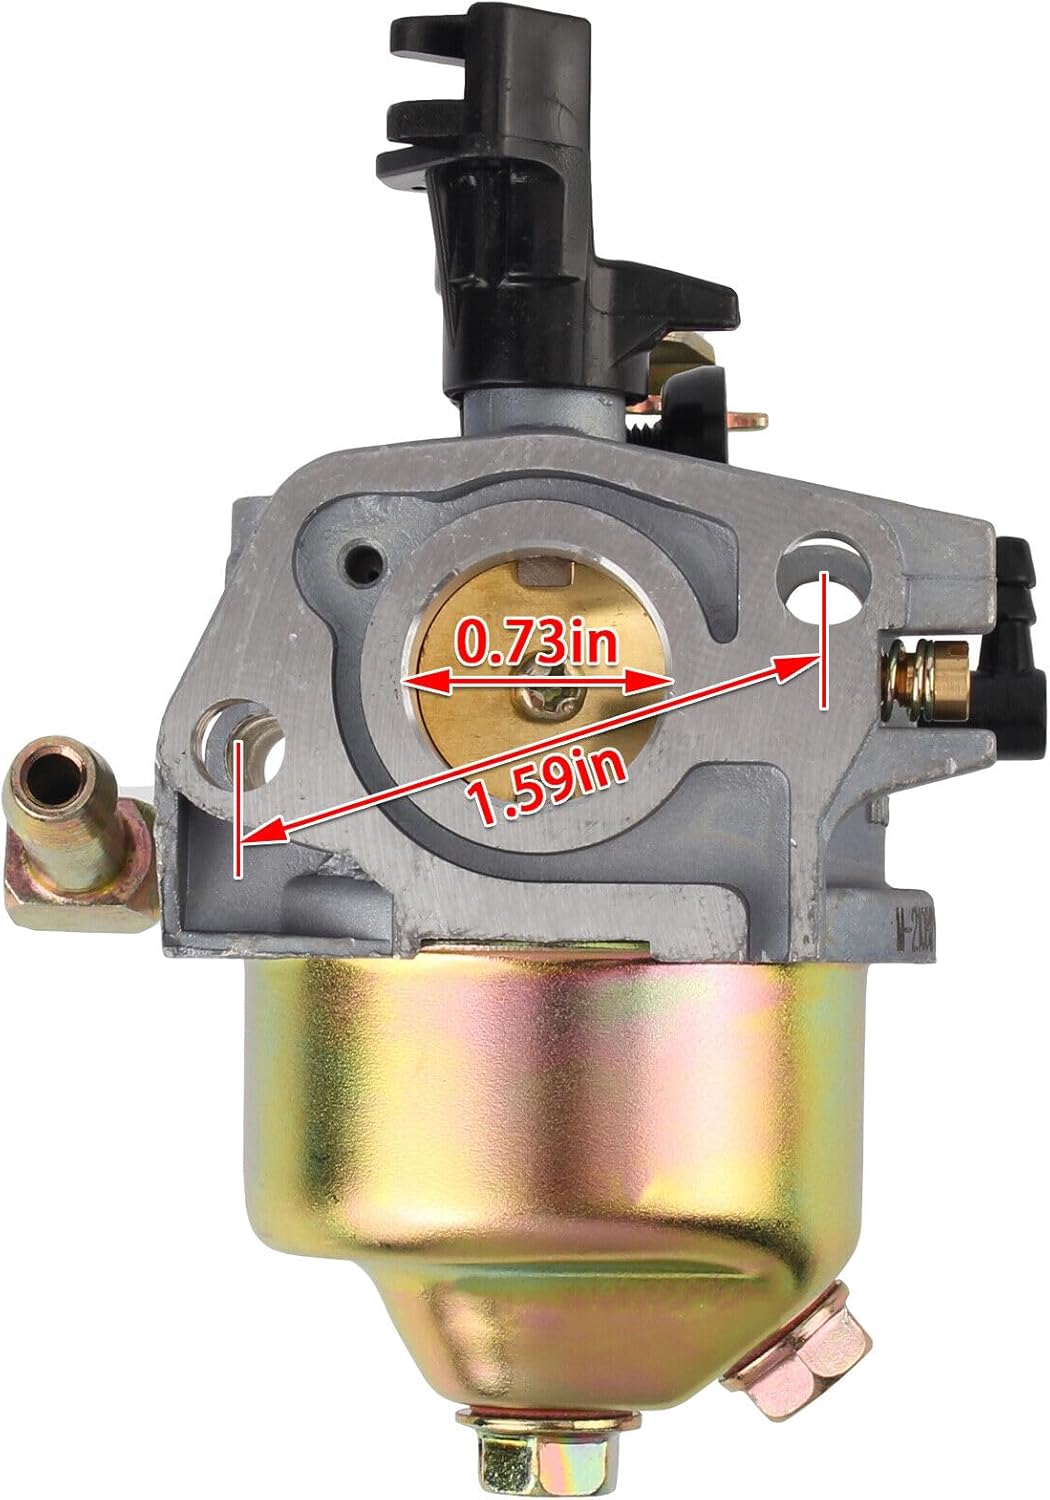
Image 3.1: Carburetor Front View with Dimensions. This image displays the carburetor from a front-side angle, highlighting key dimensions for the intake and outlet ports, measuring approximately 0.73 inches and 1.59 inches respectively. The main body is grey, and the fuel bowl is gold-colored.
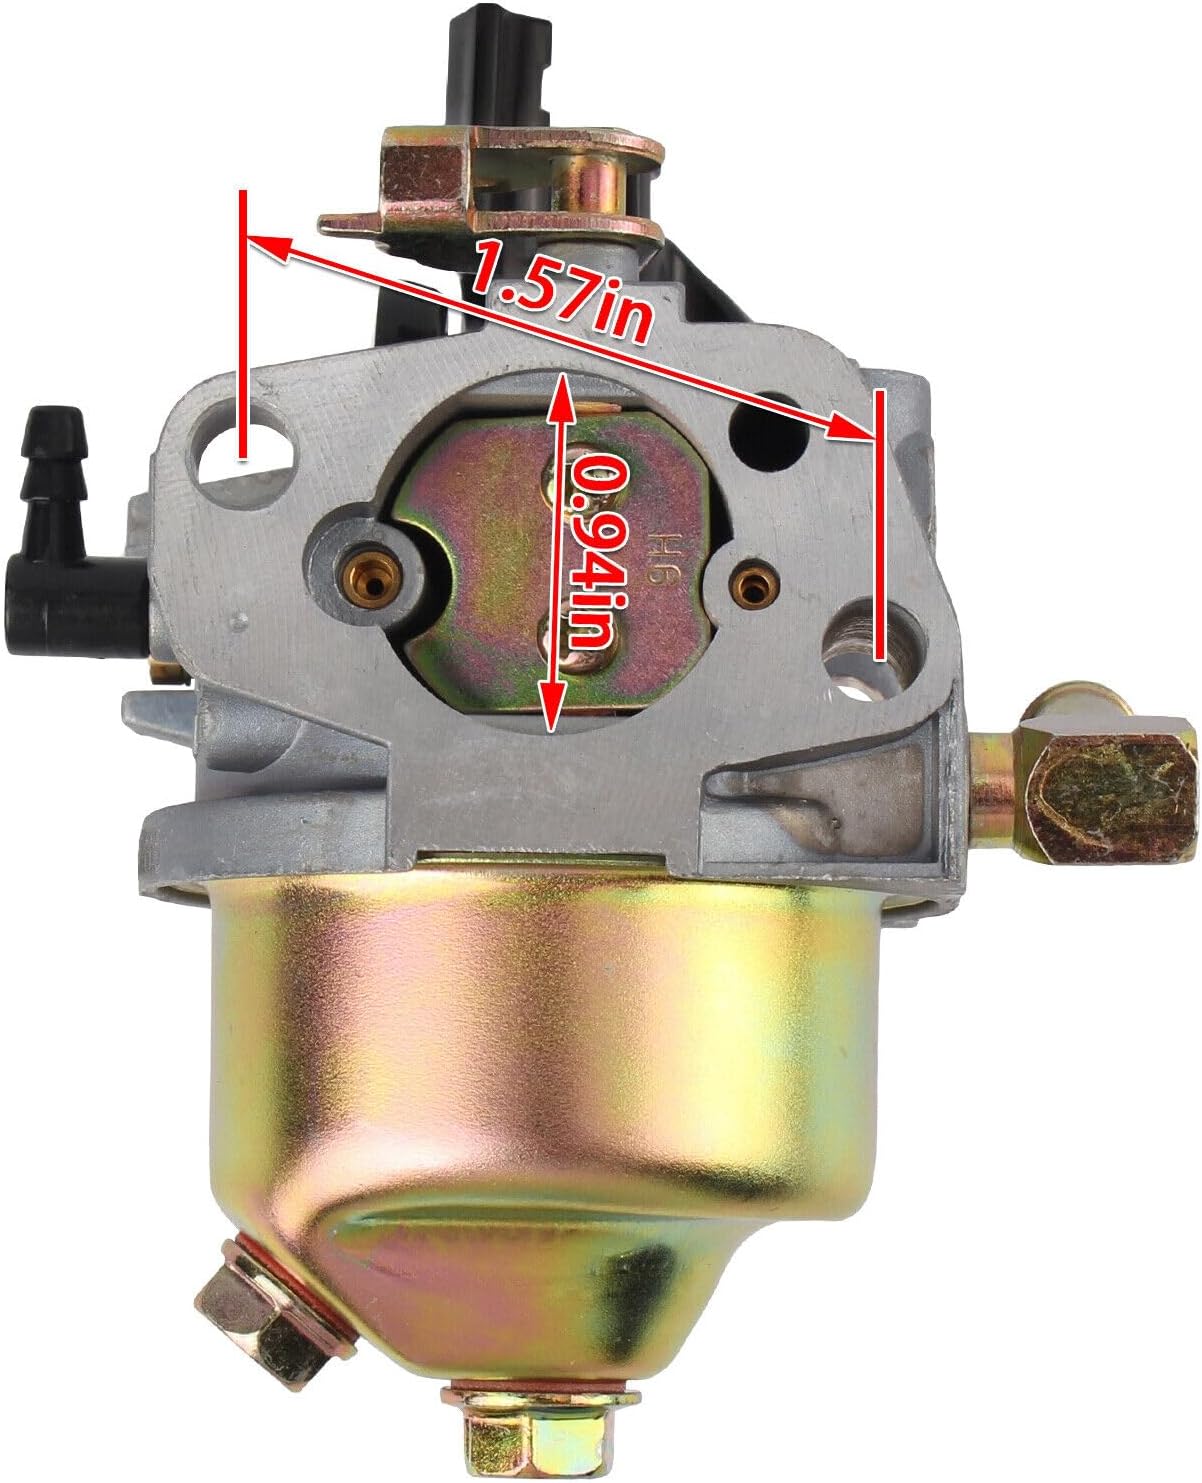
Image 3.2: Carburetor Side View with Dimensions. This view shows the carburetor from another side, indicating the height and width of the intake opening, approximately 0.94 inches and 1.57 inches. The choke lever is visible at the top.

Image 3.3: Included Accessories. This image displays the additional components provided with the carburetor: three different-shaped gaskets, a red primer bulb, a black fuel line, and a red inline fuel filter.
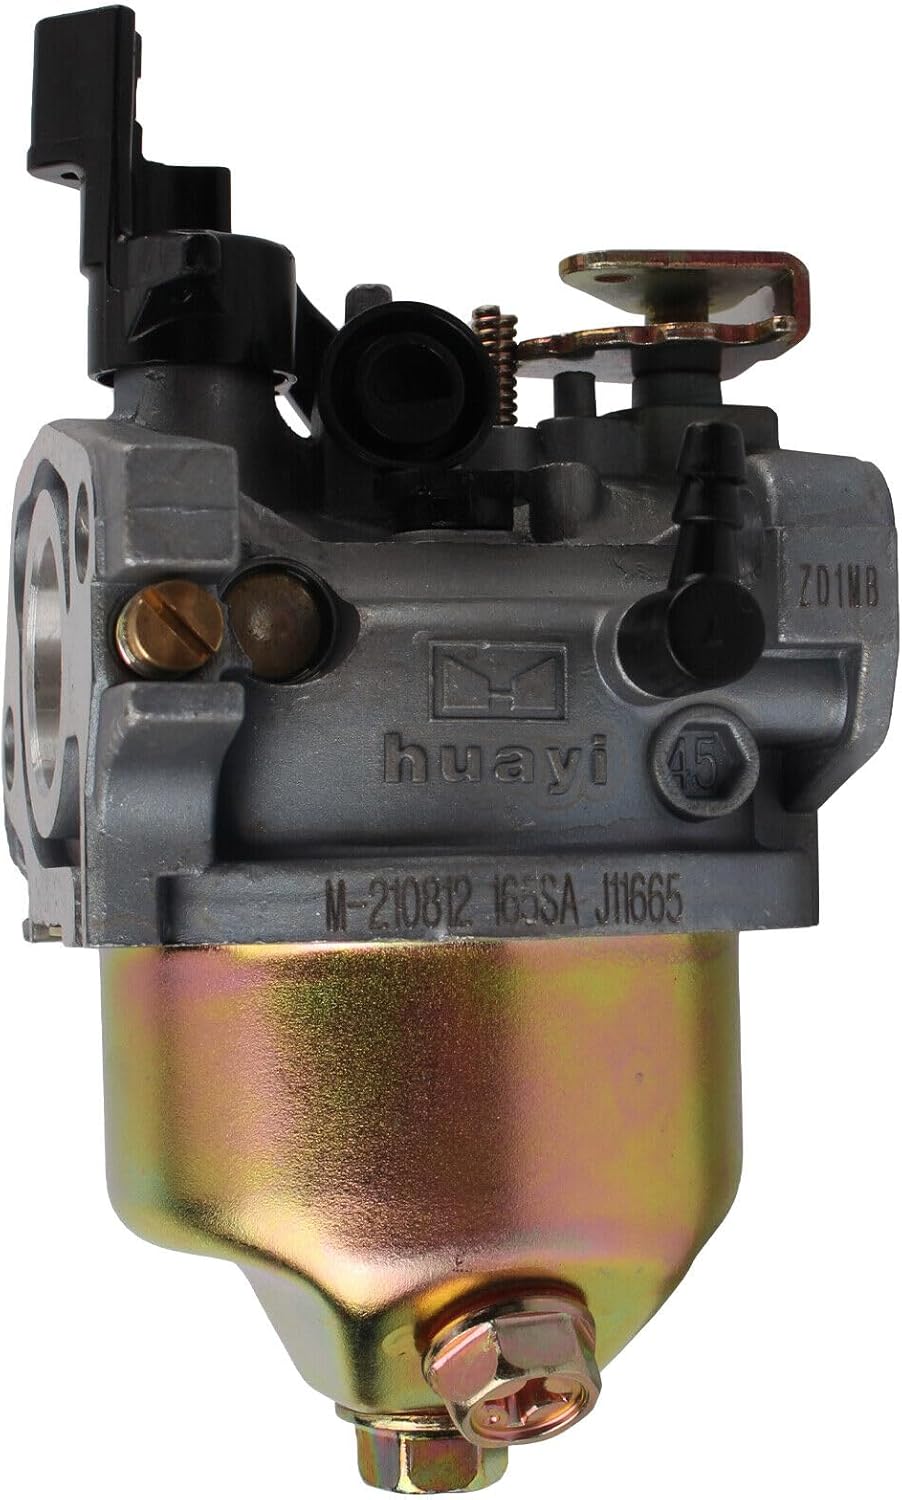
Image 3.4: Carburetor Front View with Branding. A clear front view of the carburetor, showing the 'huayi' branding and the model number 'M-210812 165SA J11665' stamped on the body.

Image 3.5: Carburetor Intake Side. This image provides a view into the intake side of the carburetor, showing the throttle plate and the internal bore where air and fuel mix.

Image 3.6: Carburetor Rear View. The rear view of the carburetor, displaying the mounting holes for attachment to the engine and the fuel inlet port.
4. Compatibility
This carburetor is designed to be compatible with a wide range of two-stage snow blowers, primarily those with 179cc to 208cc engines. It replaces various OEM part numbers and fits models from brands such as Cub Cadet, Ariens, Bolens, and Craftsman.
Key Compatible Models and Part Numbers:
- Cub Cadet: 524SWE, 31BM53TR710, 2X 24" 208cc models. Replaces PN: 751-10974, 951-05118B, 951-05251, 951-10638, 951-10638A, 951-10974, 951-10974A, 951-12705, 951-14023A, 951-14026A, 951-14027A.
- Ariens: Sno-Tek 920402, 920403, 920313, 920314, ST24.
- Craftsman: Various 24" snowthrowers with 179cc and 208cc engines, including models 247.889751, 247.88957, 247.889571, 247.887050, 247.887550, 247.88787, 247.881723, 247.881733, 247.881980, 247.88691, 247.887040, 247.88705, 247.887200, 247.887791, 247.887890, 247.88791, 247.88955, 247.889550, 247.889571, 247.881731, 247.985370, 247.886914, 247.985360, 247.881730, 247.881731, 247.881990, 247.886940, 247.88970, 247.889701, 247.881722.
- Bolens: Model 31A-32AD765.
- Columbia: 31AM63K2897, 31AM2P5B897, 31AM63K2597.
- Other: Models with 165SB, 170SC, 370-QU, 670-QUB, 265-SU, 952Z165-SUC, 365-SUB engines.
Always verify the part number and visual appearance of your existing carburetor against the images and part numbers provided to ensure proper fitment.
5. Installation
Carburetor replacement requires mechanical aptitude. If you are unsure about any step, it is recommended to consult a qualified service technician or refer to your snow blower's specific service manual.
General Installation Steps:
- Preparation: Ensure the engine is cool. Disconnect the spark plug wire. Turn off the fuel supply and drain the fuel tank if necessary. Place absorbent rags under the carburetor to catch any spilled fuel.
- Remove Air Filter Assembly: Carefully remove the air filter housing and air filter to gain access to the carburetor.
- Disconnect Linkages and Hoses: Note the routing and connection points of all fuel lines, primer lines, and throttle/choke linkages. Take photos if needed for reassembly. Disconnect them from the old carburetor.
- Remove Old Carburetor: Unbolt the old carburetor from the engine. Be careful not to damage the intake manifold or engine block. Remove any old gaskets.
- Clean Mounting Surfaces: Thoroughly clean the engine's intake manifold and any other mating surfaces to ensure a proper seal with the new gaskets.
- Install New Gaskets: Place the new gaskets in their correct positions. Ensure they are oriented correctly to prevent vacuum leaks.
- Mount New Carburetor: Carefully position the new carburetor and secure it with the mounting bolts. Do not overtighten.
- Reconnect Linkages and Hoses: Reattach all fuel lines, primer lines, and throttle/choke linkages to their original positions. Ensure all connections are secure and free of kinks. Install the new fuel filter if applicable.
- Reinstall Air Filter Assembly: Reattach the air filter and housing.
- Refuel and Test: Refill the fuel tank. Reconnect the spark plug wire. Prime the carburetor if your model has a primer bulb. Start the engine and check for fuel leaks and proper operation.
6. Carburetor Adjustment
After installation, minor adjustments may be necessary to ensure optimal engine performance. Most modern small engine carburetors are factory-set and may not have adjustable mixture screws. If your carburetor has adjustment screws, proceed with caution.
Idle Speed Adjustment:
- Locate the idle speed screw (usually a larger screw with a spring, affecting the throttle plate position at idle).
- With the engine running and warmed up, turn the screw clockwise to increase idle speed or counter-clockwise to decrease it.
- Adjust until the engine idles smoothly without stalling or engaging the auger/impeller prematurely.
Mixture Screw Adjustment (if present):
If your carburetor has high-speed and/or low-speed mixture screws, they are typically set to a base position (e.g., 1.5 turns out from lightly seated). Fine-tuning should be done with the engine warmed up:
- Low-Speed Mixture: Adjust for smooth acceleration from idle without hesitation. Turn slowly in small increments (1/8 turn) until the engine runs smoothly.
- High-Speed Mixture: Adjust for maximum power under load. This is often done with the engine running at full throttle. Turn slowly until the engine runs smoothly and powerfully without sputtering or bogging down.
CAUTION: Overtightening mixture screws can damage the carburetor. Always turn screws gently until they lightly seat, then back them out to the recommended setting.
7. Maintenance
Regular maintenance of your carburetor and fuel system is crucial for reliable snow blower operation.
- Fuel Quality: Always use fresh, clean gasoline. Stale fuel can cause varnish and gum deposits in the carburetor. Consider using a fuel stabilizer, especially during storage.
- Fuel Filter: Inspect and replace the fuel filter annually or if it appears clogged. A clogged filter restricts fuel flow to the carburetor.
- Air Filter: Ensure the air filter is clean and free of debris. A dirty air filter can restrict airflow, leading to a rich fuel mixture and poor engine performance.
- Carburetor Cleaning: If the engine runs poorly due to fuel contamination, the carburetor may need cleaning. This involves disassembling the carburetor, cleaning jets and passages with carburetor cleaner, and replacing gaskets. This task is best performed by an experienced technician.
- Seasonal Storage: Before storing your snow blower for the off-season, either run the engine until it runs out of fuel or drain the fuel system completely to prevent fuel degradation and carburetor issues.
8. Troubleshooting Common Issues
If your snow blower experiences problems after carburetor installation, consider the following common issues:
| Symptom | Possible Cause | Solution |
|---|---|---|
| Engine will not start | No fuel, clogged fuel filter, incorrect choke setting, spark plug issue, vacuum leak. | Check fuel level, replace fuel filter, ensure choke is set correctly, inspect spark plug, check for proper gasket sealing. |
| Engine runs rough or stalls | Incorrect idle adjustment, dirty carburetor jets, old fuel, air leak, clogged air filter. | Adjust idle speed, clean carburetor, use fresh fuel, check all connections for leaks, clean/replace air filter. |
| Loss of power or engine bogs down | Clogged fuel filter, dirty carburetor jets, incorrect mixture adjustment (if applicable), restricted exhaust. | Replace fuel filter, clean carburetor, adjust mixture screws, check exhaust for blockages. |
| Fuel leaks | Loose fuel line connections, damaged fuel lines, improperly seated fuel bowl gasket, faulty float needle. | Tighten connections, replace damaged lines, ensure fuel bowl gasket is correctly installed, inspect float and needle valve. |
If troubleshooting steps do not resolve the issue, professional service may be required.
9. Specifications
- Product Type: Replacement Carburetor
- Brand: Generic
- Model Number: TRD-RST-11287 (Internal reference)
- Vehicle Service Type: Snowblower
- Recommended Uses: Snowblower engine fuel delivery system
- Key Features:
- Precision-machined for OEM-style performance.
- Tested for tough conditions (mud, dust, water, extreme temperatures).
- Cost-effective replacement solution.
- Built with enhanced materials and finish to prevent rust and wear.
10. Warranty and Support
For warranty information and customer support, please refer to the seller or retailer from whom you purchased this product. Specific warranty terms and contact details are typically provided at the point of sale or on the seller's website.


