1. Introduction
This instruction manual provides comprehensive guidance for the installation, operation, and maintenance of your XISEDO Android Car Stereo. Please read this manual thoroughly before installation and use to ensure proper function and to maximize your experience with the device.
This head unit is designed for specific Mercedes-Benz models:
- Mercedes-Benz Sprinter (2007-2018)
- Mercedes-Benz Vito (2011-2015)
- Mercedes-Benz B200 W245 (2005-2011)
Important Note: If your vehicle has a factory BOSE or Harman Kardon amplifier, a fiber decoder must be purchased separately for compatibility.
2. Product Overview
The XISEDO Android Car Stereo is a 9-inch in-dash head unit featuring an IPS touchscreen display, Android 10.0 operating system, and a 6-core CPU. It offers advanced connectivity and entertainment options for your vehicle.
Key Features:
- Android 10.0 Operating System with 6-core CPU, 2GB RAM, 32GB ROM
- 9-inch IPS Capacitive Touchscreen with 1024x600 resolution
- Built-in Apple Carplay and Android Auto (via Zlink application)
- Integrated GPS Navigation (supports Google Maps, Waze, and other Android navigation apps)
- Bluetooth for hands-free calling and music streaming
- Built-in WiFi module
- FM/AM Radio
- USB Support
- Support for Steering Wheel Control (CANBUS adapter included)
- Support for Rear View Camera (AHD and CCD, camera not included)
- Support for OBD2 functions (OBD2 dongle not included)
- 1080P Video Player
- Subwoofer Output, Aux Input and Output
3. Setup and Installation
Professional installation is highly recommended for this car stereo. Incorrect installation can lead to damage to the unit or your vehicle's electrical system.
3.1 Package Contents
Before beginning installation, verify that all components are present:
- XISEDO Android Car Stereo Head Unit
- Power Harness
- RCA Cable
- CAM Cable (Wifi & Bluetooth ANT integrated)
- USB Cable 1
- USB Cable 2
- GPS Antenna
- Adapter
- CANBUS
- Screen
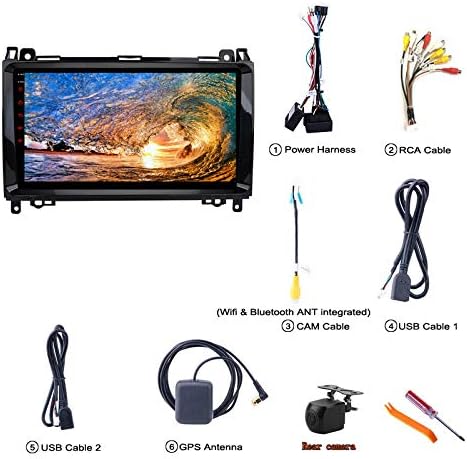
Figure 3.1: Included accessories for the XISEDO Android Car Stereo. This image displays the main head unit, power harness, RCA cables, camera input cable, two USB extension cables, a GPS antenna, and basic installation tools.
3.2 Pre-Installation Check
Compare your vehicle's original dashboard with the provided images to ensure compatibility before proceeding with installation.

Figure 3.2: Visual comparison of various Mercedes-Benz original dashboards (B-class, Sprinter, Viano, Vito) and an example of the XISEDO car stereo after installation, demonstrating fitment.
3.3 Wiring and Connections
- Power Harness: Connect the main power harness to the vehicle's wiring. Ensure correct polarity and secure connections.
- CANBUS Adapter: The included CANBUS adapter supports original steering wheel buttons. Connect it according to the vehicle's wiring diagram.
- GPS Antenna: Mount the GPS antenna in a location with a clear view of the sky, typically on the dashboard or under the windshield, to ensure optimal signal reception.
- USB Cables: Connect the provided USB cables for external device connectivity (e.g., USB drives, smartphones for Carplay/Android Auto).
- RCA Cables: Use RCA cables for audio/video input/output, including subwoofer output or external amplifier connections.
- CAM Cable: This cable integrates Wi-Fi and Bluetooth antennas. Ensure it is properly connected for wireless functionality.
- Rear View Camera (Optional): If installing a rear view camera (not included), connect it to the designated input. The system automatically switches to the camera view when reversing.
4. Operating Instructions
4.1 Initial Power On and System Interface
After successful installation, turn on your vehicle's ignition. The stereo will boot up, displaying the Android 10.0 interface. The main screen provides access to various applications and settings.

Figure 4.1: Examples of the XISEDO Android car stereo user interface, showcasing different screens with application icons and the Android 10 operating system logo.
4.2 Apple Carplay and Android Auto
The unit supports both Apple Carplay and Android Auto via the pre-installed Zlink application. Connect your smartphone using a USB cable or Bluetooth for wired/wireless connections.
- Ensure Zlink application is open on the head unit.
- Connect your iPhone for Apple Carplay or Android phone for Android Auto via USB.
- Follow on-screen prompts to establish the connection.
- For wireless connections, pair your phone via Bluetooth first, then initiate Carplay/Android Auto through Zlink.

Figure 4.2: Visual guide for connecting Apple Carplay and Android Auto to the XISEDO car stereo, illustrating the Zlink application interface and wired/wireless connection options.
4.3 GPS Navigation
The unit comes with built-in GPS functionality. You can use pre-installed navigation apps or download others from the Google Play Store.
- Access navigation applications like Google Maps or Waze from the main menu.
- Ensure the GPS antenna is properly installed for accurate positioning.
- Navigation can be used simultaneously with other audio functions (e.g., listening to music or radio).
4.4 Bluetooth Connectivity
Pair your smartphone via Bluetooth for hands-free calling and audio streaming.
- Go to the "Bluetooth" application on the head unit.
- Enable Bluetooth on your smartphone and search for available devices.
- Select the car stereo from the list and enter the pairing code (usually "0000" or "1234").
- Once paired, you can make/receive calls, access your phonebook, and stream music.

Figure 4.3: The Bluetooth interface of the XISEDO car stereo, displaying a numeric keypad for making calls and icons for Bluetooth functions.
4.5 Radio (FM/AM)
Access the "Radio" application to tune into FM or AM stations. You can scan for stations, save presets, and adjust settings.
4.6 USB Playback
Connect USB storage devices to the provided USB ports to play audio or video files. The unit supports various music (MP3/WMA/AAC/RM/FLAC) and video (MPEG-1/2/4/H264/H263/VC1/RV/RMVB/DivX/Sorenson SparK/Spark/VP8/AVS Stream) formats.
4.7 Steering Wheel Control
The included CANBUS adapter enables integration with your vehicle's original steering wheel controls. This allows you to manage audio playback, volume, and other functions without taking your hands off the wheel.
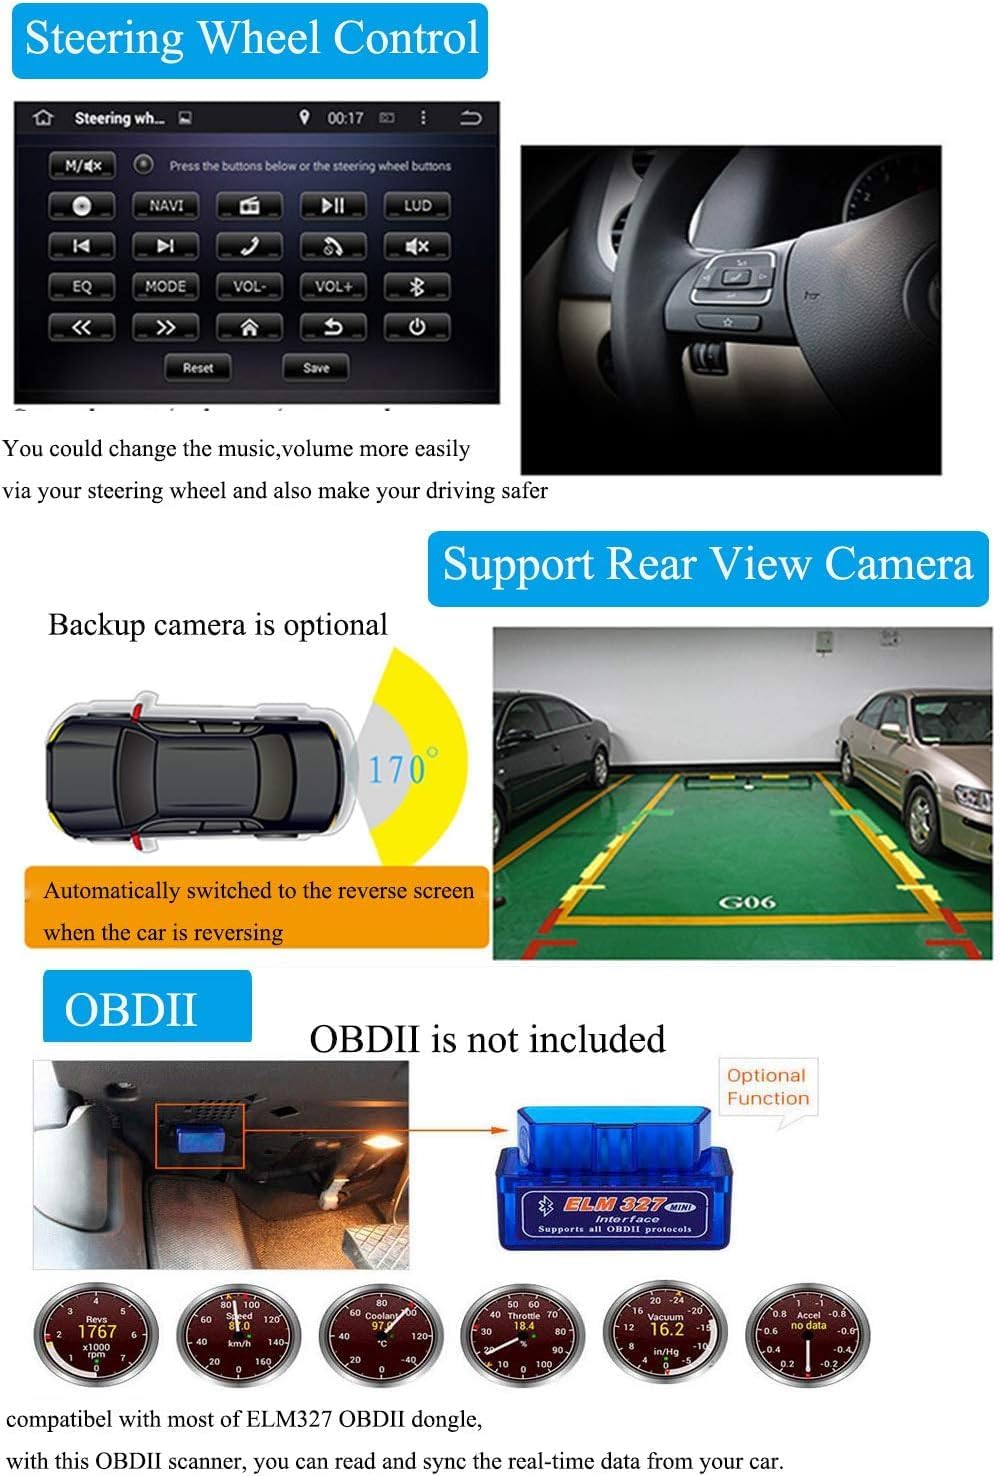
Figure 4.4: The steering wheel control learning interface, allowing customization of button functions, and an illustration of rear view camera integration.
4.8 Rear View Camera Support
The unit supports AHD and CCD (CVBS-PAL/CVBS-NTSC) rear view cameras (camera not included). When a compatible camera is connected and the vehicle is shifted into reverse, the display will automatically switch to the camera feed.
4.9 OBD2 Functions (Optional)
The stereo is compatible with most ELM327 OBD2 dongles (not included). When connected, you can use the Torque Pro application (or similar) to monitor real-time vehicle data, such as engine RPM, speed, fuel consumption, and diagnostic trouble codes.
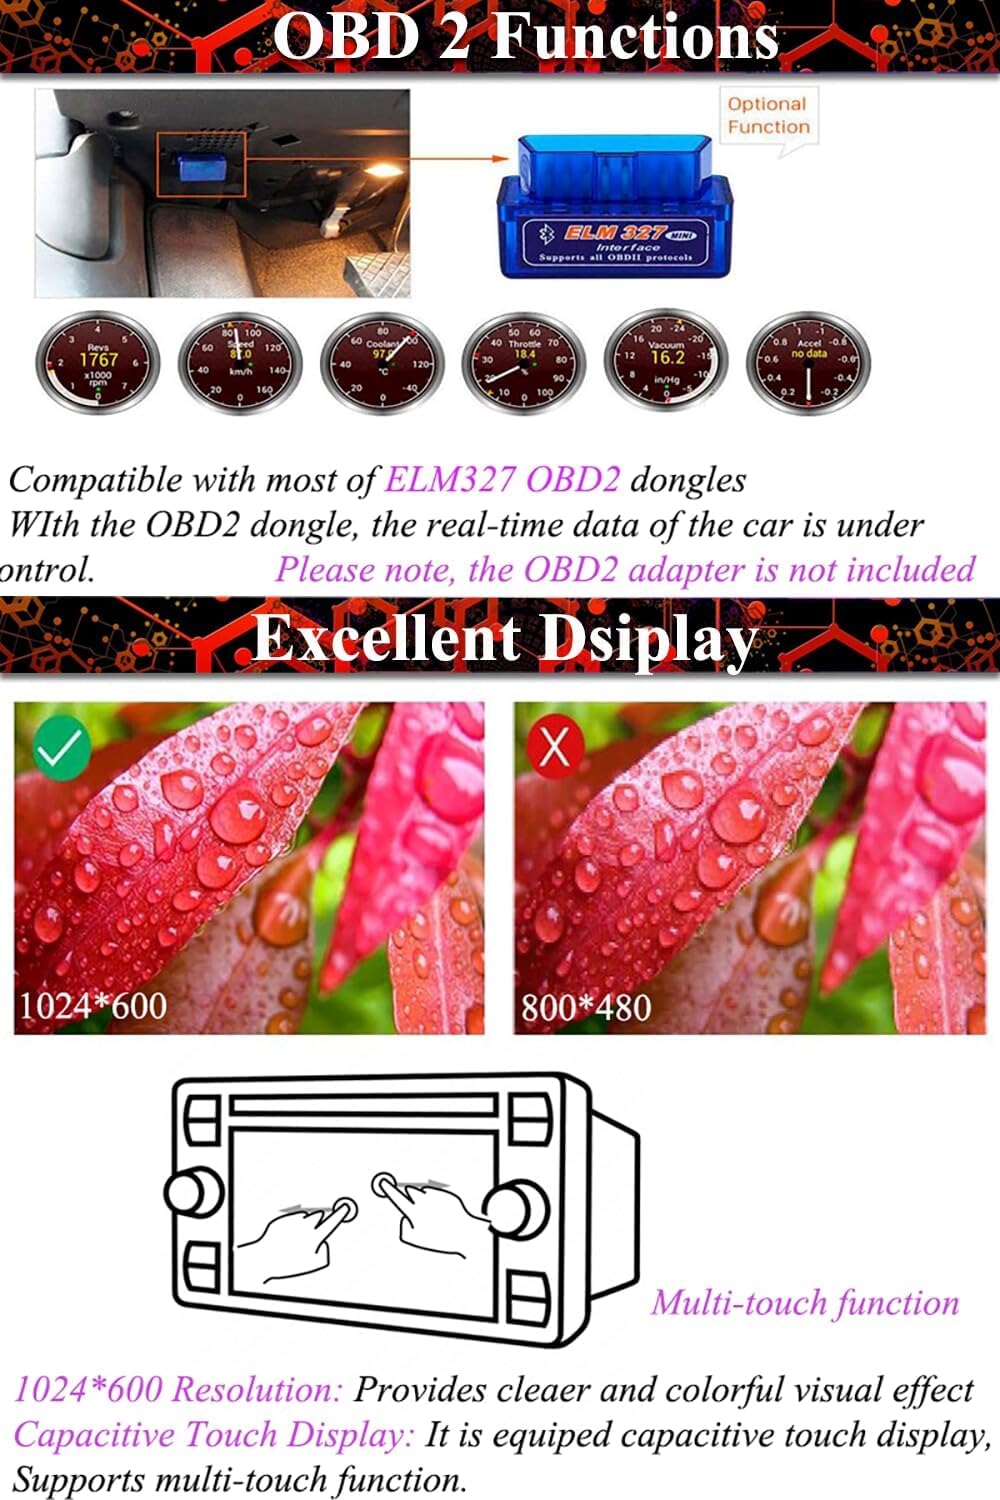
Figure 4.5: Illustration of OBD2 functionality, including the OBD2 port location, an ELM327 dongle, and examples of vehicle data displayed on the stereo screen. Also highlights the 1024x600 display resolution.
5. Maintenance
- Screen Cleaning: Use a soft, lint-free cloth to clean the touchscreen. Avoid abrasive cleaners or solvents that could damage the display.
- Software Updates: Periodically check for software updates to ensure optimal performance and access to new features. Follow the instructions provided by the manufacturer for safe updates.
- General Care: Keep the unit free from dust and moisture. Avoid exposing it to extreme temperatures.
6. Troubleshooting
| Problem | Possible Cause | Solution |
|---|---|---|
| Unit does not power on. | Incorrect wiring; Blown fuse; Vehicle power issue. | Check power connections and fuses. Consult a professional installer. |
| No sound. | Volume too low; Mute activated; Speaker wiring issue; Amplifier not connected (if applicable). | Increase volume. Check mute status. Verify speaker connections. Ensure external amplifier is correctly wired or fiber decoder is used for factory systems. |
| GPS signal lost or inaccurate. | GPS antenna improperly installed or obstructed. | Ensure GPS antenna has a clear view of the sky. Check antenna connection. |
| Bluetooth not connecting. | Bluetooth off on phone/unit; Incorrect pairing process. | Ensure Bluetooth is enabled on both devices. Re-attempt pairing process. Clear previous pairings. |
| Steering wheel controls not working. | CANBUS adapter not connected or configured correctly. | Verify CANBUS adapter connection. Check steering wheel control settings in the unit's menu. |
| Touchscreen unresponsive. | System freeze; Software issue. | Perform a soft reset (refer to device settings for reset option). If issue persists, contact support. |
7. Specifications
| Feature | Detail |
|---|---|
| Brand | XISEDO |
| Model Name | L-K140 |
| Operating System | Android 10.0 |
| CPU | 6 CORE |
| RAM | 2GB |
| ROM | 32GB |
| Screen Size | 9 Inches |
| Resolution | 1024 x 600 |
| Touch Screen Type | Capacitive |
| Display Type | IPS LED |
| Connectivity | Bluetooth, Wi-Fi, USB, Auxiliary |
| GPS | Built-in, supports Google Maps/Waze online navigation |
| Radio | FM, AM (FM Range: 87.5-108MHz) |
| Video Decoder | 1080P |
| Audio Output Mode | AUX, Stereo |
| Included Components | Adapter, CANBUS, Screen |
| Compatible Devices | Smartphone |
| Vehicle Service Type | Car |
8. Warranty and Support
For technical assistance, troubleshooting beyond this manual, or warranty inquiries, please contact XISEDO customer support. Refer to your purchase documentation for specific warranty terms and contact information.
The "Instructions" application on the head unit itself may also contain a digital user manual or quick start guide.