SDKEHUI 50W CO2 Laser
SDKEHUI 50W CO2 Laser Engraver and Cutter User Manual
Model: 50W CO2 Laser
1. Introduction
This manual provides comprehensive instructions for the safe and efficient operation, setup, and maintenance of your SDKEHUI 50W CO2 Laser Engraver and Cutter. This machine is designed for precision engraving and cutting of various non-metallic materials, featuring a 20x12 inch (300x500 mm) working area, autofocus capability, and compatibility with popular design software like LightBurn.
2. Safety Information
Operating a laser engraver requires strict adherence to safety protocols to prevent injury and damage. Please read and understand all safety warnings before operating the machine.
2.1 Laser Safety
- This machine is a Class 2 laser product with 0.819 mW output power.
- Always wear appropriate laser safety glasses when the laser is in operation and the viewing window is open or if there is any risk of direct or reflected laser exposure.
- Never look directly into the laser beam or at reflections.
- Ensure the transparent viewing window is closed during operation to protect against laser radiation.
2.2 Ventilation and Fume Extraction
- Operate the machine in a well-ventilated area.
- The integrated air support function and exhaust fan help remove smoke and debris. Ensure these are functioning correctly.
- Some materials produce toxic fumes when laser processed. Always research material safety data sheets (MSDS) before engraving or cutting.
2.3 General Safety Precautions
- Keep the work area clean and free of flammable materials.
- Do not leave the machine unattended during operation.
- Ensure the emergency stop button is easily accessible.
- Disconnect power before performing any maintenance or cleaning.
3. Setup
3.1 Unpacking and Placement
Carefully unpack the laser engraver from its packaging. Ensure all components are present and undamaged. The machine dimensions are approximately 37.8 x 26.57 x 23.62 inches. Place the machine on a stable, level surface in a well-ventilated area, away from direct sunlight and heat sources.

Figure 3.1: Front view of the laser engraver with the lid open, showcasing the internal working area and components.

Figure 3.2: Labeled diagram of the laser engraver highlighting key features such as the 12"x20" working area, high-precision laser head, advanced digital controller, transparent viewing window, and emergency stop button.
3.2 Electrical and Data Connections
- Connect the power cable to a grounded electrical outlet.
- Connect the machine to your computer via USB 2.0 cable. The machine also supports offline U disk and WIFI for data transfer.
- Ensure the power supply and motherboard are installed separately to prevent magnetic interference.
3.3 Software Installation
The machine is compatible with various design software, including LightBurn, CorelDraw, AutoCAD, and Illustrator. Install your preferred software on a Windows system. Refer to the software's documentation for specific installation instructions.

Figure 3.3: Digital control panel for precise operation and design creation.
4. Operating Instructions
4.1 Material Preparation
The 300 x 500 mm (20x12 inch) honeycomb cutting platform is suitable for various non-metallic materials. Ensure your material is flat and securely placed on the honeycomb bed. The machine can process materials such as wood, rubber, acrylic, fabric, leather, paper, fiberglass, plexiglass, tile, plastic, marble, cardboard, melamine, mylar, pressboard, veneer wood, cork, and corian.
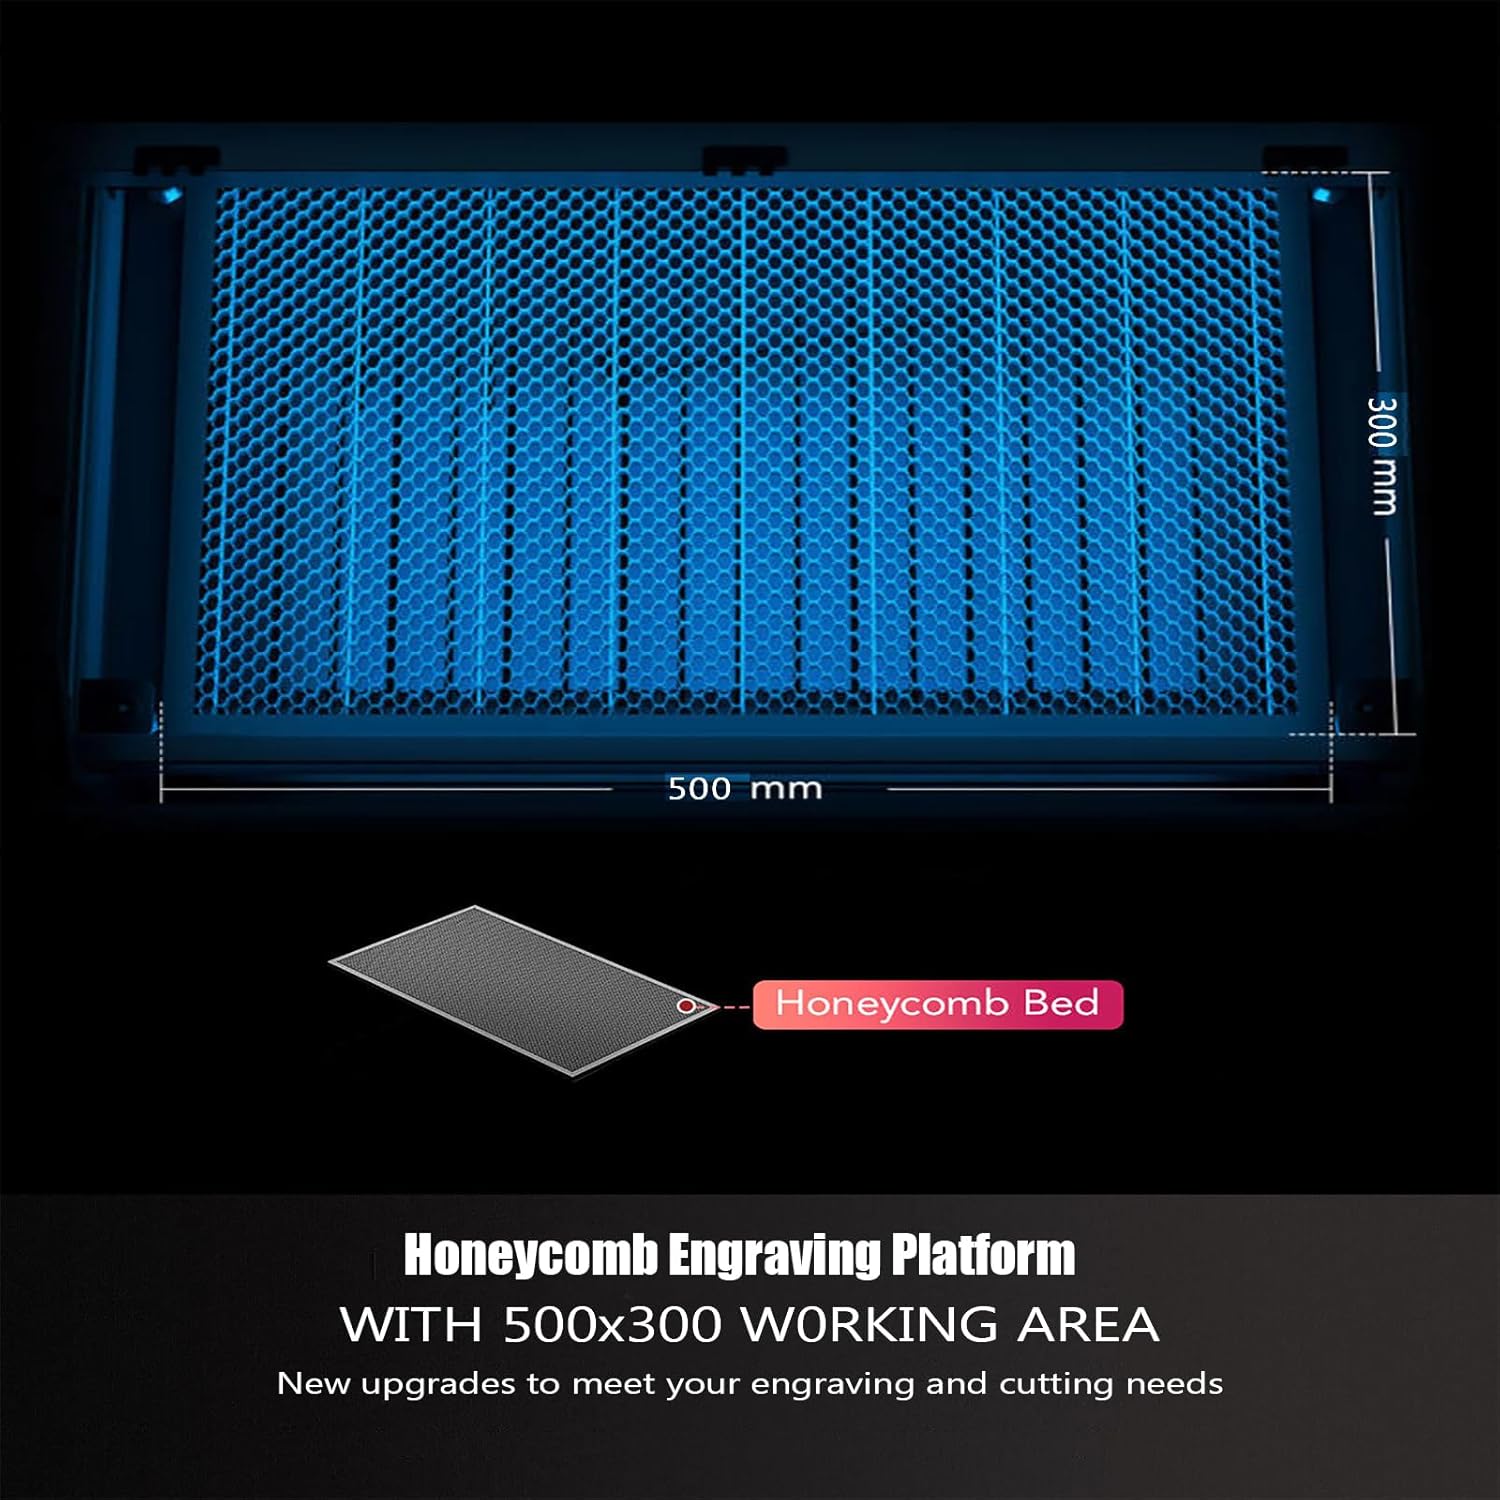
Figure 4.1: Honeycomb engraving platform with a spacious 500x300 mm working area.

Figure 4.2: Wide application range demonstrating various materials that can be engraved or cut.

Figure 4.3: More materials and creations possible with the laser engraver.
4.2 Autofocus Function
The machine features a fast autofocus tool that allows you to quickly correct the laser's sharpness directly from the control panel. This eliminates the need for manual adjustments and ensures optimal engraving and cutting quality.
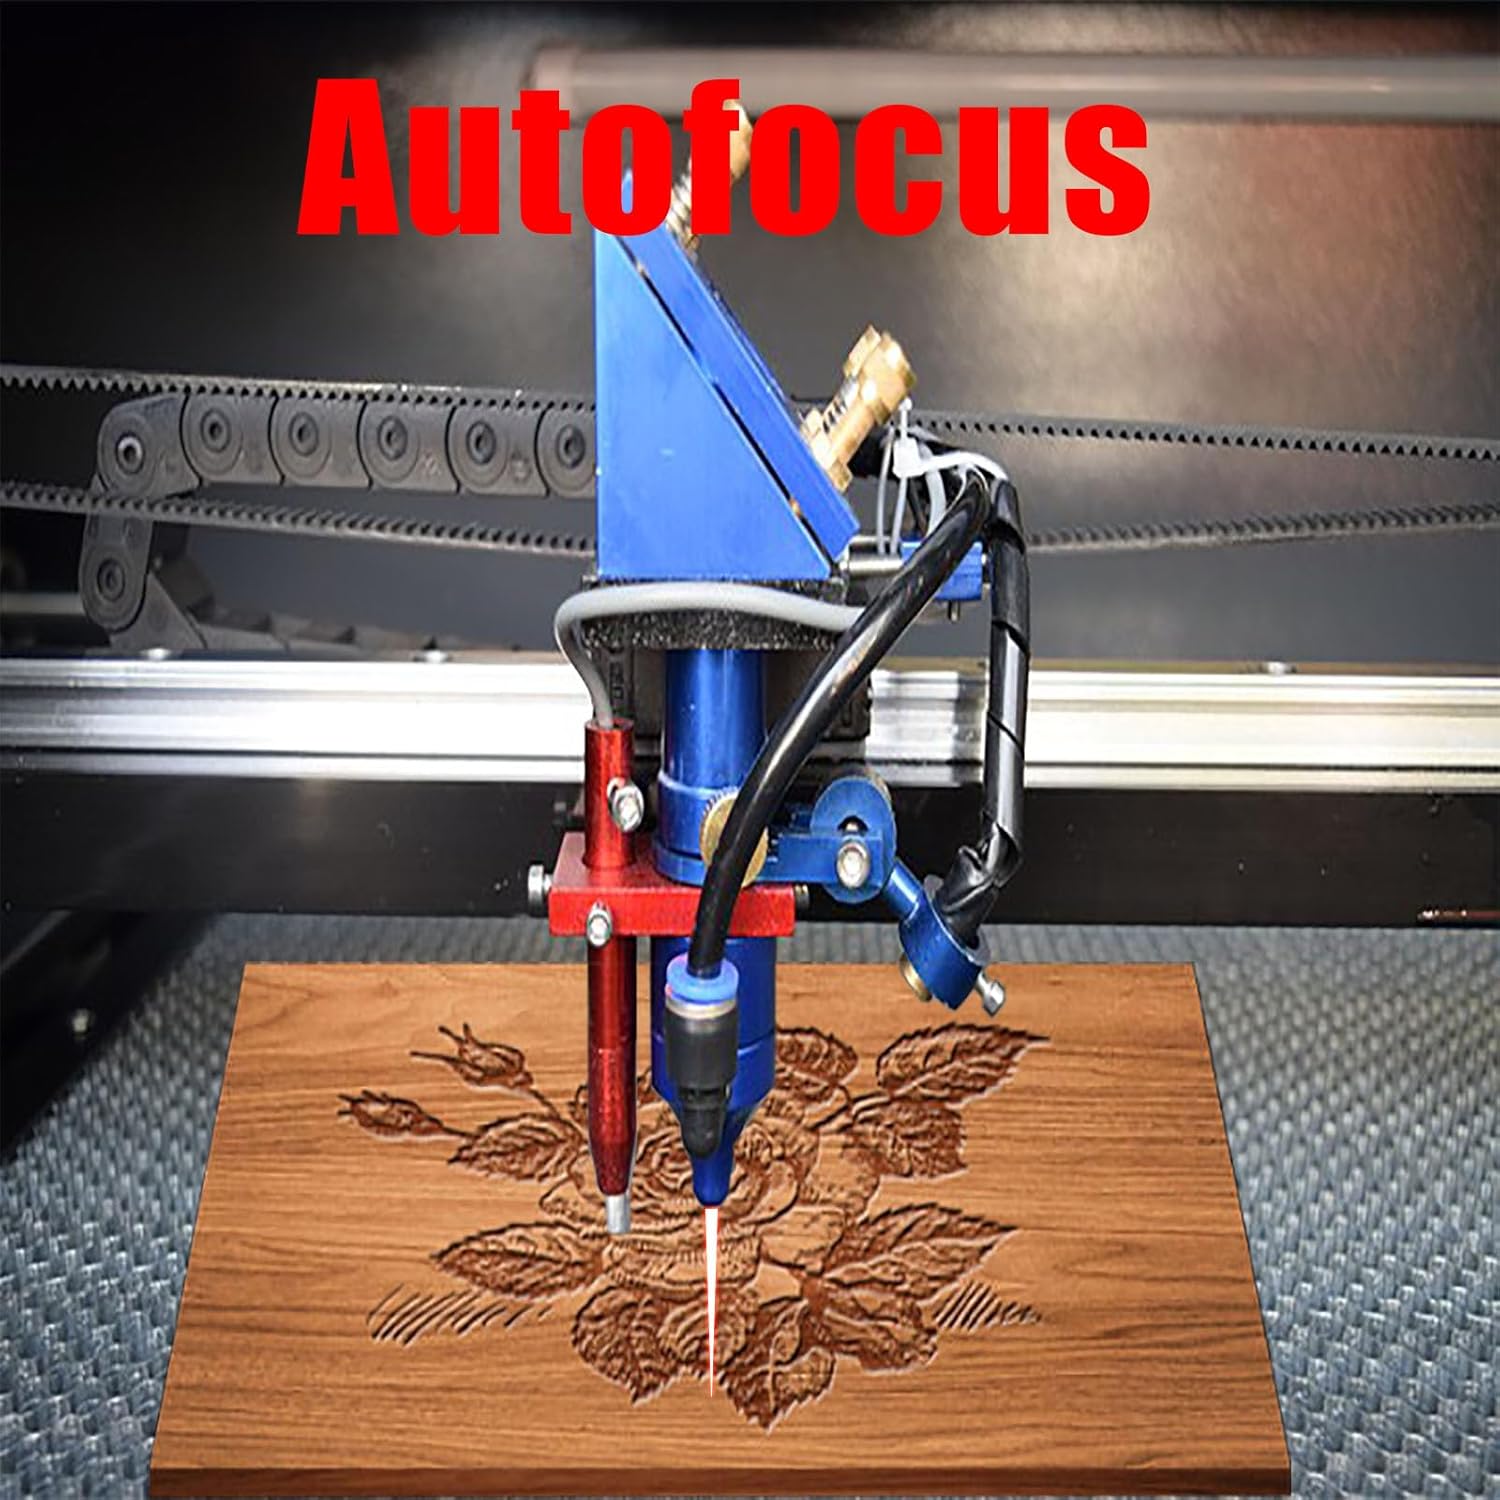
Figure 4.4: Autofocus mechanism in action, ensuring precise laser focus on the material.
4.3 Starting an Operation
- Design your project using compatible software (e.g., LightBurn).
- Place your material on the honeycomb bed.
- Use the autofocus function to set the correct focal distance.
- Ensure the transparent viewing window is closed.
- Initiate the engraving/cutting process from your software or the machine's control panel.
- Monitor the process. The red dot pointer indicates the precise position of the laser.

Figure 4.5: High-performance 50W DC laser tube, offering a high-efficiency laser beam with a lifespan of up to 3,000 hours.
5. Maintenance
Regular maintenance ensures the longevity and optimal performance of your laser engraver.
- Cleaning: Regularly clean the honeycomb bed, laser lens, and mirrors to prevent debris buildup, which can affect laser performance. The integrated air support and exhaust fan help manage debris during operation.
- Cooling System: Ensure the cooling system (if external, not specified but implied for CO2 lasers) is functioning correctly to maintain the laser tube's temperature.
- Laser Tube Lifespan: The high-performance DC laser tube has a lifespan of up to 3,000 hours. Monitor its performance and replace it when necessary.
- Operational Breaks: To maintain optimal performance and extend the machine's life, it is recommended to take a break of about 30 minutes after 3-4 hours of continuous operation.
6. Troubleshooting
This section addresses common issues you might encounter. For more complex problems, contact customer support.
| Problem | Possible Cause | Solution |
|---|---|---|
| Laser not firing or weak output | Misaligned mirrors/lens, dirty optics, laser tube issue, incorrect power settings. | Check alignment, clean optics, verify power settings in software. If the laser tube is old, consider replacement. |
| Poor engraving/cutting quality | Incorrect focus, wrong speed/power settings, material issues, dirty optics. | Use autofocus, adjust speed/power settings for the material, ensure material is flat, clean optics. |
| Machine not responding | Loose cable connections, software communication error, emergency stop engaged. | Check all cables (power, USB), restart software and machine, disengage emergency stop button. |
| LCD display shows error | Internal fault detected by the machine. | Refer to the error code displayed on the LCD and consult the manufacturer's specific error code guide (not provided in this manual). |
7. Specifications
- Product Dimensions: 37.8 x 26.57 x 23.62 inches
- Item Model Number: 50W CO2 Laser
- ASIN: B0C9T8LCZY
- Manufacturer: globalmachineshop
- Date First Available: June 30, 2023
- Laser Class: 2 (0.819 mW output power)
- Working Area: 300 x 500 mm (approx. 20x12 inches)
- Laser Tube Lifespan: Up to 3,000 hours
- Connectivity: USB2.0, Offline U disk, WIFI
- Software Compatibility: LightBurn, CorelDraw, AutoCAD, Illustrator
- System Compatibility: Windows System
- Features: Autofocus, Honeycomb cutting platform, Integrated air support and exhaust fan, Red dot pointer, Automatic lifting platform.
8. Warranty and Support
Information regarding product warranty and customer support details are typically provided with your purchase documentation or can be found on the manufacturer's official website. Please refer to those resources for specific warranty terms, technical assistance, and contact information.
Ask a question about this manual
Ask about setup, troubleshooting, compatibility, parts, safety, or missing instructions. Manuals+ will review the question and use this page’s manual context to help answer it.