1. Introduction
This manual provides detailed instructions for the safe and effective use of your Jyving LS-K03C Multi-Tool Kit. This kit is designed for various electrical wiring tasks, including crimping terminals and cutting cables. Please read this manual thoroughly before operation and retain it for future reference.
2. Product Components
The Jyving LS-K03C Multi-Tool Kit includes the following components:
- LS-03C Crimping Tool: Designed for pressing pre-insulated terminals (0.5-6mm²).
- LS-206 Cable Cutter: Capable of cutting cables up to 35mm² maximum.
- Replaceable Dies/Jaws:
- A16WF: For wire-end ferrules (6-16mm²).
- A04WF: For twin wire-end ferrules (1.0-6.0mm²).
- A101: For non-insulated terminals (0.5-10mm²).
- A03B: For non-insulated open plug-type connectors (0.5-6mm²).
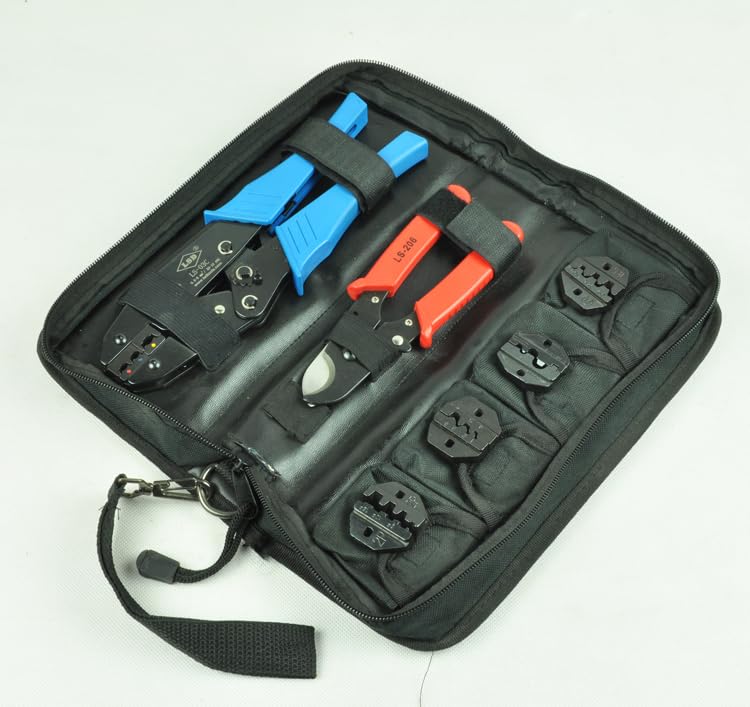
Image 2.1: Complete Jyving LS-K03C Multi-Tool Kit stored in its carrying case, showing the crimping tool, cable cutter, and various dies.
3. Safety Information
Always follow these safety guidelines to prevent injury and damage to the tools:
- Wear appropriate personal protective equipment, including safety glasses, when using these tools.
- Ensure the tool is clean and in good working condition before each use.
- Do not use tools for purposes other than their intended design.
- Keep hands and fingers clear of moving parts and cutting edges.
- Store tools in a dry, secure place, out of reach of children.
- Never use excessive force; if a tool is not performing as expected, inspect it for damage or incorrect setup.
4. Setup and Die Installation
The LS-03C crimping tool uses replaceable dies for different terminal types. Ensure the correct dies are installed for your application.
4.1 Identifying Dies
Each die is marked with an alphanumeric code (e.g., A16WF, A04WF, A101, A03B) and the corresponding wire gauge or terminal type. Refer to the 'Product Components' section for specific applications.

Image 4.1: Various replaceable dies for the crimping tool, each marked with its specific application and size range.
4.2 Installing/Changing Dies
- Ensure the crimping tool is open and disengaged.
- Locate the two screws on each side of the crimping jaws that secure the dies.
- Using an appropriate screwdriver, loosen and remove these screws.
- Carefully remove the currently installed dies.
- Insert the desired new dies, ensuring they are correctly oriented and seated flush within the tool's mechanism.
- Reinsert and tighten the screws firmly to secure the new dies. Do not overtighten.

Image 4.2: Close-up view of the LS-03C crimping tool's jaws, highlighting the screws used to attach and replace the dies.
5. Operating Instructions
5.1 Using the LS-03C Crimping Tool
The LS-03C crimping tool is designed for precise crimps. Always select the correct die for your terminal and wire size.
- Prepare the Wire: Strip the insulation from the end of the wire to the appropriate length for your terminal.
- Select Terminal and Die: Choose the correct terminal and ensure the corresponding die is installed on the crimping tool.
- Insert Terminal: Place the terminal into the appropriate slot on the crimping die.
- Insert Wire: Insert the stripped wire into the terminal, ensuring all strands are within the crimp barrel.
- Crimp: Squeeze the handles of the crimping tool firmly and completely until the ratchet mechanism releases. This ensures a full and secure crimp.
- Inspect Crimp: Remove the crimped terminal and inspect it for a secure connection. The wire should be firmly held, and the insulation crimp (if applicable) should grip the wire's insulation.

Image 5.1: The LS-03C crimping tool, ready for use with its blue ergonomic handles.
5.2 Using the LS-206 Cable Cutter
The LS-206 cable cutter is designed for clean cuts on various cable types up to 35mm².
- Identify Cable: Ensure the cable to be cut is within the cutter's capacity (max 35mm²).
- Position Cable: Place the cable between the cutter blades at the desired cutting point.
- Cut: Squeeze the handles firmly and steadily to cut through the cable. Ensure a clean, straight cut.
- Safety: Keep fingers clear of the blades during operation.
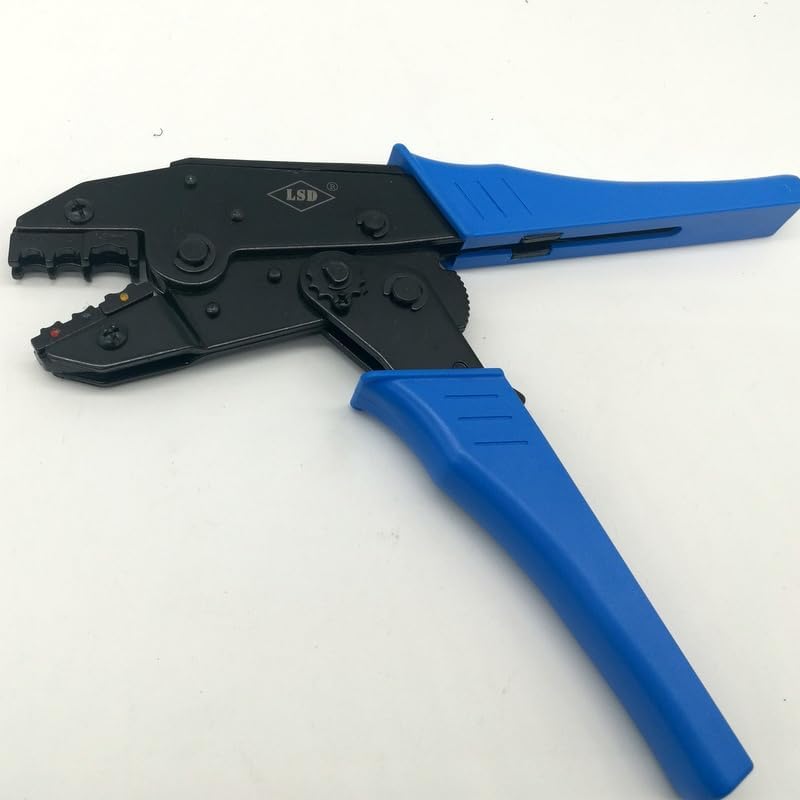
Image 5.2: The LS-206 cable cutter featuring red handles, designed for efficient cable cutting.
6. Maintenance
Proper maintenance ensures the longevity and performance of your tools:
- Cleaning: After each use, wipe down the tools with a clean, dry cloth to remove any dirt, dust, or debris. For stubborn grime, a mild solvent can be used, ensuring it does not damage plastic components.
- Lubrication: Periodically apply a light machine oil to the pivot points and moving parts of both the crimping tool and cable cutter to ensure smooth operation.
- Inspection: Regularly inspect the dies for wear or damage. Worn dies can lead to poor crimps. Inspect cable cutter blades for nicks or dullness.
- Storage: Store the tools and dies in the provided carrying case in a dry environment to prevent rust and damage.
7. Troubleshooting
If you encounter issues with your Jyving LS-K03C Multi-Tool Kit, consider the following:
- Poor Crimp Quality:
- Ensure the correct die is selected for the terminal and wire size.
- Verify the wire is stripped to the correct length and fully inserted into the terminal.
- Confirm the crimping tool handles are fully squeezed until the ratchet releases.
- Inspect dies for wear or damage; replace if necessary.
- Difficulty Cutting Cable:
- Check if the cable diameter exceeds the LS-206 cutter's maximum capacity (35mm²).
- Inspect the cutter blades for damage or dullness.
- Stiff Tool Operation:
- Apply a small amount of lubricant to the pivot points.
- Clean any accumulated dirt or debris from the tool's mechanism.
8. Specifications
| Feature | Specification |
|---|---|
| Manufacturer | Jyving |
| Model Number | JY-LS-K03C |
| LS-03C Crimping Capacity | 0.5-6mm² (pre-insulated terminals) |
| LS-206 Cable Cutter Capacity | Max 35mm² |
| Die A16WF Capacity | 6-16mm² (wire-end ferrules) |
| Die A04WF Capacity | 1.0-6.0mm² (twin wire-end ferrules) |
| Die A101 Capacity | 0.5-10mm² (non-insulated terminals) |
| Die A03B Capacity | 0.5-6mm² (non-insulated open plug-type connector) |
| Tool Kit Size | 275*121*7mm |
| Batteries Required | No |
9. Warranty and Support
For warranty information or technical support, please refer to the retailer or manufacturer's official website. Keep your purchase receipt as proof of purchase.