EVDANCE EV-ACS4001U
EVDANCE Level 2 EV Charger User Manual
Model: EV-ACS4001U
1. Introduction
Thank you for choosing the EVDANCE Level 2 EV Charger. This portable electric vehicle charging station is designed to provide efficient and reliable charging for your electric vehicle. Operating at 40Amp/240V, it delivers a formidable 9.6 KW charging capability, significantly reducing charging times compared to standard Level 1 chargers. This manual provides essential information for the safe and effective use of your charger, including setup, operation, maintenance, and troubleshooting.
The EVDANCE EV Charger is universally compatible with all non-Tesla EVs and hybrids that utilize the standard J1772 plug connector. For Tesla vehicles, a J1772 to Tesla adapter is required.

Image: EVDANCE Level 2 EV Charger components and design.
2. Safety Information
Your safety is paramount. Please read and understand all safety warnings and instructions before operating the charger. Failure to follow these instructions may result in electric shock, fire, or serious injury.
General Safety Precautions:
- Ensure the NEMA 14-50P outlet is properly installed by a qualified electrician and meets all local electrical codes.
- Do not use the charger if the cable, plug, or charging connector is damaged.
- Do not attempt to open, disassemble, or modify the charger.
- Keep the charger and cables away from water, flammable materials, and extreme temperatures.
- Always disconnect the charger from the vehicle and power source when not in use or during maintenance.
Integrated Safety Features:
The EVDANCE Level 2 EV Charger is equipped with a comprehensive 10-point safety system to ensure maximum protection during charging:
- CCID20 Leakage Protection: Detects and prevents current leakage.
- Short Circuit Protection: Guards against electrical shorts.
- Over-Heat Protection: Monitors and prevents overheating of the unit.
- Ground Fault Protection: Protects against ground faults.
- Over-Current Safeguard: Prevents damage from excessive current.
- Low-Voltage Defense: Protects against insufficient voltage.
- Over-Voltage Prevention: Guards against excessive voltage.
- Lightning Protection: Offers protection against lightning strikes.
- Overcharge Protection: Prevents battery overcharging.
- IP66 Waterproof Rating: Ensures reliable performance in various weather conditions, protecting against dust and strong jets of water.

Image: Overview of the 10 intelligent safety protections.
3. What's in the Box
Upon opening your EVDANCE Level 2 EV Charger package, please verify that all the following components are included:
- 1 x EVDANCE EV Charger Unit
- 1 x Control Box Holder
- 1 x Charger Cable Holder
- 1 x Carry Bag
- 1 x User Manual (this document)

Image: All components included in the package.
4. Setup
Follow these steps to set up your EVDANCE Level 2 EV Charger:
4.1 Power Outlet Requirements:
The charger requires a dedicated 240V NEMA 14-50P outlet. If you do not have one, it is highly recommended to have a qualified electrician install it to ensure proper wiring and safety compliance.
4.2 Mounting the Charger:
The charger comes with a control box holder and a charger cable holder for convenient wall mounting. Choose a suitable location near your NEMA 14-50P outlet, ensuring it is within reach of your vehicle's charging port and protected from direct impact or excessive moisture.
- Mark the desired positions for the mounting screws for both the control box holder and the cable holder.
- Drill pilot holes if necessary, then secure the holders to the wall using appropriate screws (not included, as wall materials vary).
- Place the charger control box into its holder and wrap the charging cable around the cable holder when not in use.
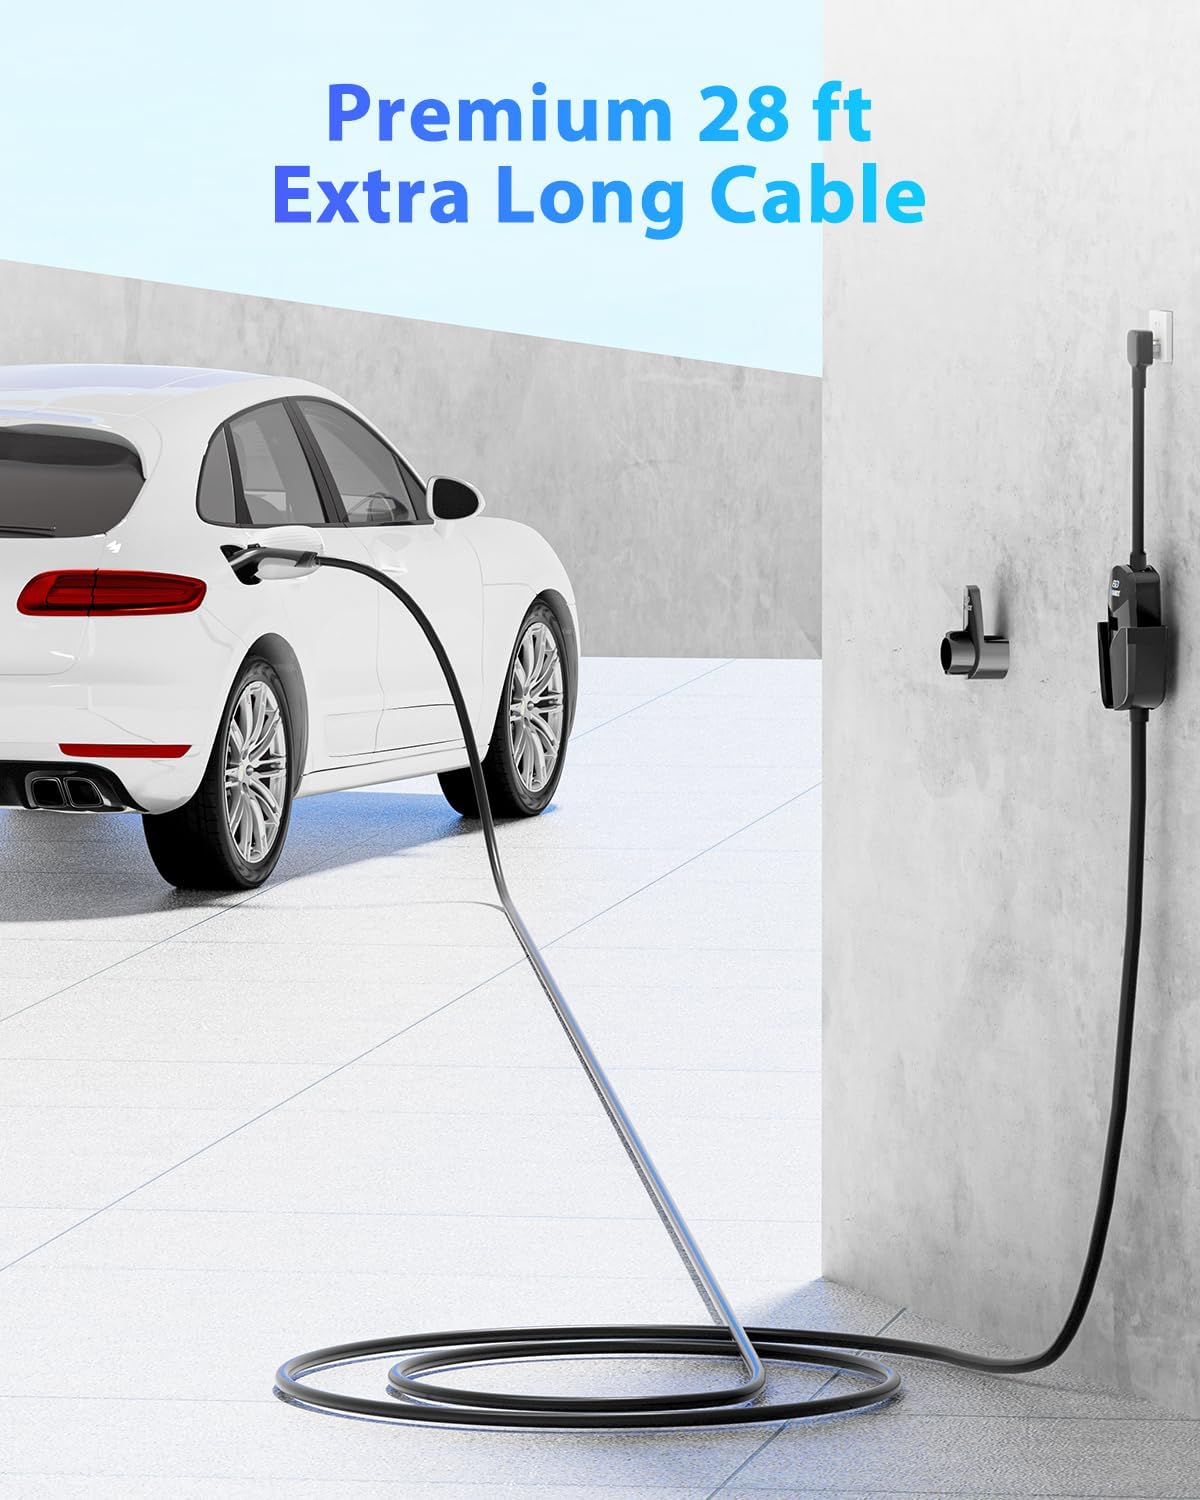
Image: Example of the EV charger mounted on a wall, showing the long cable reaching the vehicle.
5. Operating Instructions
Operating your EVDANCE EV Charger is straightforward. The unit features a 1.77-inch TFT screen and intuitive buttons for control.
5.1 Connecting to Your Vehicle:
- Plug the NEMA 14-50P power plug into your dedicated 240V outlet.
- Open your vehicle's charging port.
- Insert the J1772 charging connector firmly into your vehicle's charging port. Ensure it clicks into place.
- The charger will automatically begin communication with your vehicle and initiate charging based on its current settings.
Note: For Tesla vehicles, a J1772 to Tesla adapter is required to connect the charger to your car.
5.2 Adjusting Charging Current:
The charger allows you to adjust the current limit (10A/16A/20A/24A/32A/40A) to match your home's circuit capacity or your charging needs. This is crucial for safety and to prevent overloading your electrical system.
- Press the 'A' button on the charger's control panel to cycle through the available amperage settings.
- The selected current will be displayed on the TFT screen. Choose an amperage that is safe for your electrical circuit.
5.3 Setting a Delayed Start Time:
To take advantage of off-peak electricity rates or to manage your home's power consumption, you can set a delayed start time for charging.
- Press the 'Clock' button on the charger's control panel.
- Use the 'A' button to adjust the desired delay time in hours.
- Confirm your selection by pressing the 'Clock' button again. The charger will begin charging after the set delay.

Image: Charger display showing options for adjustable current and delayed start time.
5.4 Real-Time Charge Monitoring:
The 1.77-inch TFT screen provides instant updates on your charging progress. You can view:
- Voltage (V): The current voltage being supplied.
- Current (A): The current amperage being drawn.
- Power Load (KW): The real-time power consumption.
- Temperature: The internal temperature of the charger.
- Charging Time: Duration of the current charging session.
- Energy Delivered (kWh): Total energy delivered during the session.

Image: Detailed view of the charger's screen displaying real-time charging information.
6. Maintenance
Proper maintenance ensures the longevity and safe operation of your EVDANCE EV Charger.
6.1 Cleaning:
- Disconnect the charger from the power source and the vehicle before cleaning.
- Wipe the exterior of the charger and cables with a soft, damp cloth. Do not use harsh chemicals, abrasive cleaners, or solvents.
- Ensure the charging connector is free of dust, dirt, or moisture before connecting to the vehicle.
6.2 Inspection:
- Regularly inspect the charging cable, plug, and connector for any signs of damage, such as fraying, cracks, or discoloration.
- Check the NEMA 14-50P outlet for any signs of overheating or loose connections.
- If any damage is observed, discontinue use immediately and contact customer support.
6.3 Storage:
- When not in use, store the charger in a cool, dry place, away from direct sunlight and extreme temperatures.
- Utilize the provided cable holder to neatly store the charging cable, preventing kinks or damage.
- The included carry bag is ideal for portable storage and transport.
7. Troubleshooting
If you encounter issues with your EVDANCE EV Charger, refer to the following common problems and solutions:
| Problem | Possible Cause | Solution |
|---|---|---|
| Charger not starting/no power | No power from outlet; charger not plugged in correctly; vehicle not ready to charge. | Check the NEMA 14-50P outlet for power; ensure the charger plug is fully inserted; verify vehicle's charging settings. |
| Slow charging speed | Amperage setting is too low; vehicle's charging limit; electrical circuit limitation. | Increase the charger's amperage setting (up to 40A) if your circuit allows; check vehicle's charging settings; consult an electrician if your circuit cannot support higher amperage. |
| Charger unit or cable gets hot | High amperage setting; poor ventilation; prolonged use at maximum capacity. | Lower the amperage setting (e.g., from 40A to 32A or 24A) to reduce heat generation; ensure adequate airflow around the charger; this unit has over-heat protection and will stop charging if it exceeds safe temperatures. |
| Charging stops unexpectedly | Safety protection activated (e.g., over-heat, over-current, ground fault); loose connection; vehicle fault. | Check the charger's screen for error codes or indicators; ensure all connections are secure; allow the unit to cool down if overheating was detected; consult vehicle manual for charging issues. |
| Display not working | No power; internal fault. | Ensure the charger is receiving power; if power is present and the display remains off, contact customer support. |
If the problem persists after attempting these solutions, please contact EVDANCE customer support for further assistance.
8. Specifications
Below are the technical specifications for the EVDANCE Level 2 EV Charger (Model EV-ACS4001U):
| Feature | Detail |
|---|---|
| Model Number | EV-ACS4001U |
| Input Voltage | 240 Volts |
| Amperage | 40 Amps (Adjustable: 10A/16A/20A/24A/32A/40A) |
| Wattage | 9.6 KW |
| Connector Type | NEMA 14-50P (Power Plug), J1772 (Vehicle Connector) |
| Cable Length | 25 ft |
| Item Weight | 11.18 pounds |
| Package Dimensions | 16.97 x 13.46 x 5.28 inches |
| Special Features | Adjust Current, Delay Charging |
| Waterproof Rating | IP66 |
| Mounting Type | Wall Mount |
9. Warranty and Support
EVDANCE stands behind the quality of its products.
9.1 Warranty Information:
This EVDANCE Level 2 EV Charger comes with a 24-Month Warranty from the date of purchase. This warranty covers defects in materials and workmanship under normal use. Please retain your proof of purchase for warranty claims.
9.2 Customer Support:
For technical assistance, warranty claims, or any questions regarding your EVDANCE EV Charger, please contact our customer support team. Refer to the contact information provided on the product packaging or the official EVDANCE website.
When contacting support, please be prepared to provide your product model number (EV-ACS4001U) and a detailed description of the issue.