1. Introduction
This manual provides essential instructions for the installation, setup, and operation of your FrSky Tandem TD SR18 Dual-Band Receiver. The SR18 receiver operates simultaneously on both 900MHz and 2.4GHz frequencies, offering enhanced reliability, extended range, and advanced stabilization features for RC fixed-wing aircraft and FPV drones.
Please read this manual thoroughly before using the receiver to ensure correct operation and to maximize its performance and longevity.
2. Product Overview
2.1 Key Features
- Simultaneous Dual-Band Operation (900MHz & 2.4GHz) with TD Mode.
- Dual Power Balancing Consumption for efficient power management.
- Integrated Advanced Stabilization Functions for flight control.
- Built-in High-Precision Telemetry Sensors (e.g., Altitude, Vertical Speed).
- Basic Black-Box Data Recording capability.
- Integrated Power Switch Function, compatible with optional external switches.
- 4ms Race Mode with Telemetry for high-performance applications.
- Extended Control Range, adjustable based on RF power settings.
- 18 Configurable Channel Ports: CP1 supports PWM / SBUS Out / FBUS / S.Port / SBUS In (Redundancy Function); CP2-18 support PWM / SBUS Out / FBUS / S.Port.
- SBUS Out Port (supports 16CH / 24CH mode) and SBUS In Port (supports signal redundancy).
- Over-The-Air (OTA) Firmware Update capability.
- Dual XT30 Power Input Connectors for robust power supply.
- Triple Antenna Design (two 2.4GHz antennas and one 900MHz antenna).
2.2 Receiver Layout
The FrSky TD SR18 receiver features a compact design with clearly labeled ports and indicators. Familiarize yourself with the layout before proceeding with installation.

Figure 1: Top view of the FrSky TD SR18 receiver, showing channel ports, battery inputs, and branding.
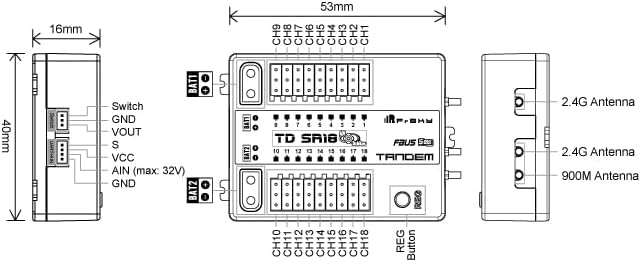
Figure 2: Technical diagram illustrating the dimensions and port assignments of the TD SR18 receiver, including antenna connections and the REG button.
3. Specifications
| Frequency | 900MHz & 2.4GHz Dual-Band |
| Dimensions (L*W*H) | 53mm * 40mm * 16mm |
| Weight | 29.1g |
| Operating Voltage | 4-10V (Recommended 2S Li Batteries) |
| Operating Current | ≤195mA |
| Continuous Current (Power Device) | ≤30A |
| Instantaneous Current (Power Device) | ≤60A |
| Voltage Measurement Range (AIN) | 0-35V (Battery Voltage Divider Ratio: 1:10) |
| Compatibility | FrSky Tandem series radio & TD protocol capable RF module |
| Antenna Design | Triple Antenna (2x 2.4G & 1x 900M antennas) |
| Channel Ports | 18 Configurable Channel Ports |
4. Setup
4.1 Binding Procedure
- Power on your FrSky Tandem series radio and navigate to the Model Setup menu.
- Select the TD protocol and initiate the binding process on your radio.
- While holding the REG button on the TD SR18 receiver, connect power to the receiver. The LED on the receiver will indicate binding mode.
- Once the binding is successful, the LED on the receiver will change to a solid green. Power cycle the receiver and radio to confirm the connection.

Figure 3: The TD SR18 receiver showing the location of the REG (Registration/Bind) button.
4.2 Antenna Installation and Placement
Proper antenna placement is crucial for optimal signal reception and range. The TD SR18 uses a triple antenna design: two 2.4GHz antennas and one 900MHz antenna.
- Mount the antennas at a 90-degree angle to each other to ensure diverse polarization and minimize signal loss.
- Keep antennas away from carbon fiber structures, metal parts, and other electronic components that may cause interference.
- Ensure the active parts of the antennas (the unshielded tips) are exposed and not obstructed.

Figure 4: Example of triple antenna connection and recommended orientation for the TD SR18 receiver.
4.3 Wiring Connections
Refer to Figure 2 for a detailed diagram of the receiver's ports. Connect your servos, ESCs, and other peripherals as follows:
- Power Input (BAT1, BAT2): Connect your power source(s) to the XT30 connectors. The receiver supports dual power input for redundancy.
- PWM Channels (CP1-CP18): Connect servos or ESCs directly to the corresponding PWM output pins.
- FBUS / S.Port: These ports allow for telemetry data transmission and connection to other FrSky Smart Port compatible devices.
- SBUS Out: Provides a single serial output for up to 16 or 24 channels, depending on the mode configured.
- SBUS In (CP1): Used for signal redundancy when connecting another receiver or flight controller.
- AIN: Analog input for external voltage measurement (e.g., main battery voltage). Ensure correct voltage divider ratio (1:10) is used.
- Switch Port: Connect an optional external power switch for convenient power control.
5. Operating Instructions
5.1 Stabilization Functions
The TD SR18 features advanced stabilization. Configuration of these functions (e.g., flight modes, gain settings) is performed through your FrSky Tandem series radio. Refer to your radio's instruction manual for detailed setup procedures for the stabilization system.
5.2 Telemetry
The receiver provides real-time telemetry data such as altitude, vertical speed, and battery voltage. This data can be viewed on your FrSky Tandem series radio. Ensure telemetry is enabled and configured correctly in your radio's model settings.
5.3 Black-Box Data Recording
The basic black-box function records flight data. This data can be useful for analyzing flight performance or troubleshooting. Consult your radio's manual or FrSky's official resources for instructions on accessing and interpreting black-box data.
5.4 Over-The-Air (OTA) Firmware Update
The TD SR18 supports OTA firmware updates via your FrSky Tandem series radio. This allows for convenient updates without physical connection to a computer. Always ensure your radio's firmware is up-to-date before attempting an OTA update on the receiver.
6. Maintenance
- Firmware Updates: Regularly check the FrSky official website for the latest firmware versions for your receiver and radio. Keeping firmware updated ensures optimal performance and access to new features.
- Physical Inspection: Periodically inspect the receiver, antennas, and wiring for any signs of damage, wear, or loose connections.
- Environmental Protection: Protect the receiver from moisture, extreme temperatures, and excessive vibrations. Consider using conformal coating or heat shrink for additional protection in harsh environments.
7. Troubleshooting
- Receiver Not Binding:
- Ensure your radio is in TD mode and the binding process is initiated correctly.
- Verify the receiver is powered on while holding the REG button.
- Check for firmware compatibility between the radio and receiver.
- No Signal / Intermittent Signal:
- Inspect antenna connections and ensure they are securely attached.
- Review antenna placement to avoid obstruction or interference from other components.
- Check the range and environment for potential sources of 2.4GHz or 900MHz interference.
- Stabilization Issues:
- Verify that the stabilization functions are correctly configured in your radio.
- Ensure the receiver is mounted securely and oriented correctly in the aircraft.
- Check for any mechanical issues with servos or control surfaces.
- Telemetry Not Working:
- Confirm telemetry is enabled in your radio's model settings.
- Check all connections, especially FBUS/S.Port, for proper seating.
8. Warranty and Support
For warranty information and technical support, please refer to the official FrSky website or contact your authorized FrSky dealer. Keep your proof of purchase for warranty claims.
FrSky Official Website: www.frsky-rc.com


