
wanjiaone TX26C0
Multifunctional LED Desk Lamp User Manual
Model: TX26C0 | Brand: wanjiaone
1. Introduction
Thank you for purchasing the wanjiaone Multifunctional LED Desk Lamp. This lamp is designed to provide versatile lighting solutions for your home or office, featuring an eye-caring LED light, wireless charging, a USB charging port, an integrated clock, alarm, date, temperature display, and a phone holder. Please read this manual carefully before use to ensure proper operation and maintenance.
Package Contents:
- LED Desk Lamp
- Power Adapter
- User Manual
2. Important Safety Instructions
- Do not disassemble or modify the lamp.
- Keep the lamp away from water or other liquids.
- Use only the provided power adapter.
- Avoid direct eye exposure to the LED light for extended periods.
- Ensure the lamp is placed on a stable, flat surface.
- Unplug the lamp during lightning storms or when unused for long periods.
3. Product Overview
This section provides a visual guide to the main components and features of your wanjiaone Multifunctional LED Desk Lamp.
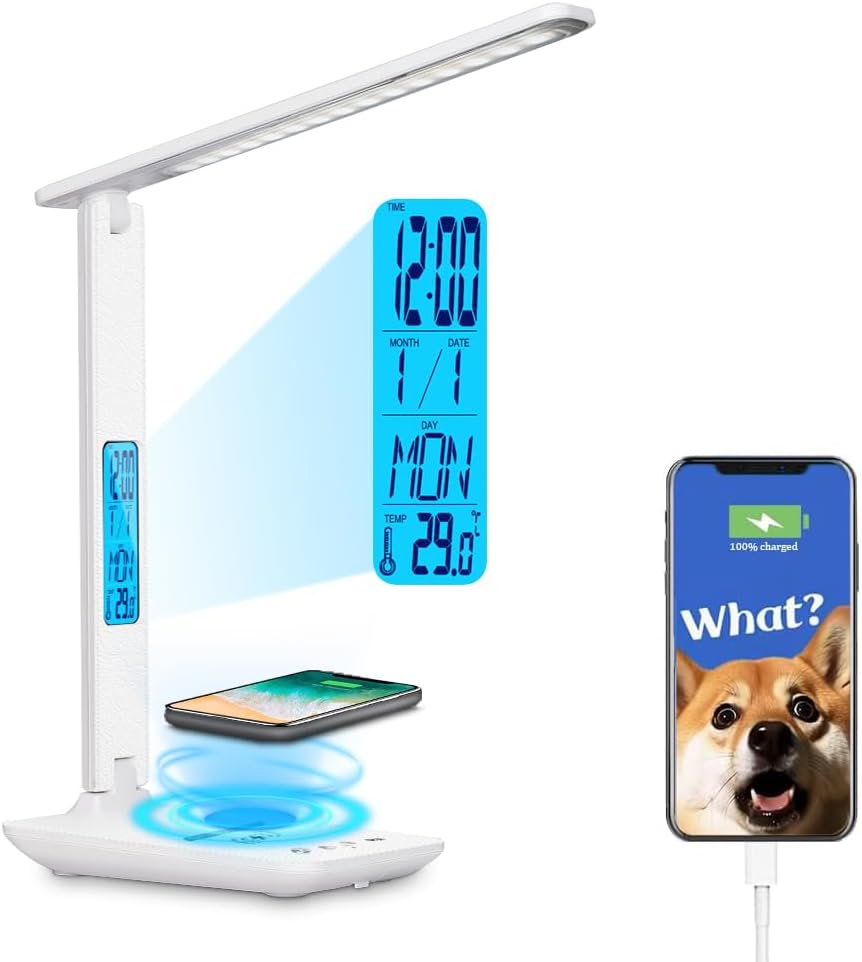
Figure 3.1: Overview of the wanjiaone Multifunctional LED Desk Lamp, highlighting the main lamp head, adjustable arm with LCD display, base with wireless charging pad, and USB charging port.
Key Features:
- LED Light Panel: Provides adjustable illumination.
- Adjustable Arm: Allows for multi-angle positioning (180° vertical foldable, 180° horizontal rotation, 90° vertical foldable).
- LCD Display: Shows time, date, day, and temperature. Includes alarm function.
- Wireless Charging Pad: For compatible smartphones.
- USB Charging Port: For wired device charging.
- Phone Holder: Integrated into the base for convenient device placement.
- Touch Control Panel: For power, brightness, and lighting mode adjustments.

Figure 3.2: Detail of the lamp's base, illustrating the wireless charging pad and the USB charging port in use with two smartphones.

Figure 3.3: Close-up view of the integrated LCD display, which shows the current time, date, day of the week, and ambient temperature.
4. Setup Instructions
- Unpack the Lamp: Carefully remove all components from the packaging.
- Position the Lamp: Place the lamp on a stable, flat surface.
- Connect Power: Insert the power adapter into the DC 12V input port located at the back of the lamp base. Plug the adapter into a standard electrical outlet.
- Activate Display Battery: Locate the battery compartment on the back of the lamp's vertical arm (near the LCD display). Pull out the white insulating paper to activate the display's internal battery. This battery maintains time settings during power outages.

Figure 4.1: Rear view of the lamp's vertical arm, indicating the location of the display setting buttons and the battery compartment for the LCD display.
5. Operating Instructions
5.1. Light Control
The lamp features a touch-sensitive control panel on its base.

Figure 5.1.1: Touch control panel on the lamp base, showing buttons for power (on/off), brightness adjustment (up/down), and light mode selection.
- Power On/Off (⏻): Touch once to turn the lamp on or off.
- Brightness Adjustment (▲ / ▼): Touch ▲ to increase brightness, ▼ to decrease brightness. There are 5 brightness levels.
- Lighting Mode (M): Touch to cycle through 3 lighting modes:
- White Light (6000K): Suitable for focused work or study.
- Natural Light (4000K): Ideal for general reading and daily tasks.
- Warm Light (3500K): Best for relaxation or ambient lighting.

Figure 5.1.2: Visual representation of the three lighting modes (color temperatures) and five brightness levels available on the lamp.
5.2. LCD Display Settings (Clock, Alarm, Date, Temperature)
The LCD display is located on the vertical arm of the lamp. Control buttons for the display are on the back of the arm.
Figure 5.2.1: Rear view of the lamp's vertical arm, indicating the location of the display setting buttons (Mode, Set, Up, Down) and the battery compartment.
- Set Time/Date:
- Press the "Set" button once to enter time setting mode. The hour digit will flash.
- Use the "Up" and "Down" buttons to adjust the hour.
- Press "Set" again to move to minute setting, then adjust with "Up" and "Down".
- Continue pressing "Set" to cycle through year, month, and date settings, adjusting each with "Up" and "Down".
- Press "Set" one last time to exit setting mode.
- Set Alarm:
- Press the "Mode" button until the alarm icon appears on the display.
- Press "Set" to enter alarm time setting. The hour digit will flash.
- Adjust the alarm hour and minute using "Up" and "Down", pressing "Set" to confirm each.
- After setting the alarm time, press "Set" again to enable/disable the alarm.
- Temperature Display: The temperature is displayed automatically. You can switch between Celsius and Fahrenheit by pressing the "Down" button while in normal time display mode.
- LCD Backlight: To turn the LCD backlight on or off, press and hold the main power button on the lamp base for approximately three seconds. This controls the display light independently from the main lamp light.
5.3. Wireless Charging
The lamp base includes a 10W wireless charging pad for compatible devices.
- Place your Qi-enabled smartphone directly onto the wireless charging pad located on the lamp base.
- Ensure the phone is centered on the pad for optimal charging.
- A charging indicator (if present on your phone) will confirm charging has begun.
- Remove any metal objects or thick cases from your phone that may interfere with wireless charging.

Figure 5.3.1: A smartphone placed on the wireless charging pad of the lamp, indicating active charging.
5.4. USB Charging Port
A USB charging port is available on the back of the lamp base for wired charging.
- Connect your device's USB charging cable to the USB port on the lamp base.
- Connect the other end of the cable to your device.
- Charging will begin automatically.
5.5. Phone Holder
The lamp base features a built-in phone holder for convenient viewing.
- Simply place your smartphone into the designated slot on the lamp base.
- This allows for hands-free viewing of videos or video calls.

Figure 5.5.1: A smartphone securely positioned in the integrated phone holder on the lamp's base.
5.6. Multi-angle Adjustment
The lamp's design allows for flexible positioning of the light source.
- 180° Vertical Foldable: The main arm can be folded vertically up to 180 degrees.
- 180° Horizontal Rotation: The lamp head can rotate horizontally up to 180 degrees.
- 90° Vertical Foldable: The lamp head can also fold vertically up to 90 degrees relative to the arm.

Figure 5.6.1: Diagram showing the various articulation points of the lamp, allowing for 180-degree vertical folding, 180-degree horizontal rotation of the light panel, and 90-degree vertical folding of the light panel.
6. Maintenance
- Cleaning: Disconnect the power adapter before cleaning. Use a soft, dry cloth to wipe the lamp. Do not use abrasive cleaners or solvents.
- Storage: If storing the lamp for an extended period, unplug it and store it in a cool, dry place.
- LED Light Source: The LED light source is integrated and not user-replaceable.
7. Troubleshooting
| Problem | Possible Cause | Solution |
|---|---|---|
| Lamp does not turn on. | Power adapter not connected or faulty. | Ensure the power adapter is securely plugged into the lamp and the wall outlet. Test the outlet with another device. |
| Wireless charging not working. | Phone not Qi-compatible or not positioned correctly. Obstruction (e.g., thick case, metal). | Verify your phone supports Qi wireless charging. Reposition the phone on the center of the pad. Remove phone case or any metal objects. |
| USB charging not working. | USB cable faulty or not properly connected. | Try a different USB cable. Ensure the cable is firmly connected to both the lamp and the device. |
| LCD display is blank or incorrect. | Battery insulating paper not removed or display battery depleted. Settings incorrect. | Ensure the white insulating paper is removed from the display battery compartment. Reset time/date using the buttons on the back of the arm. |
| LCD backlight is off. | Backlight has been turned off. | Press and hold the main power button on the lamp base for three seconds to toggle the LCD backlight. |
8. Specifications
| Model Name | TX26C0 |
| Brand | wanjiaone |
| Product Dimensions | 6.69"D x 4.53"W x 13.39"H |
| Item Weight | 1.1 Pounds |
| Light Source Type | LED |
| Wattage | 10 watts |
| Light Color Modes | White (6000K), Natural (4000K), Warm (3500K) |
| Brightness Levels | 5 levels |
| Control Method | Touch |
| Power Source | Corded Electric |
| Special Features | Adjustable Color Temperature, Dimmable, Energy Efficient, Flexible, Wireless Charging, USB Charging Port, Clock, Phone Holder |
| Base Material | Plastic |
| Included Components | LED Desk Lamp, Adapter, User Manual |
9. Warranty and Support
wanjiaone offers a 30-DAY MONEY BACK GUARANTEE and a 12-MONTH WARRANTY for this LED desk light.
For any questions, issues, or warranty claims, please contact wanjiaone customer support through your Amazon order. Please provide your order number for faster assistance.
We are committed to resolving your problems and ensuring your satisfaction.
Related documentsTX26C0


Ask a question about this manual
Ask about setup, troubleshooting, compatibility, parts, safety, or missing instructions. Manuals+ will review the question and use this page’s manual context to help answer it.