UPGRAVITY Dual Monitor Wall Mount and Single Monitor Wall Arm Bundle
UPGRAVITY Dual and Single Monitor Wall Mount Instruction Manual
Model: Dual Monitor Wall Mount and Single Monitor Wall Arm Bundle
Introduction
This manual provides detailed instructions for the installation, operation, and maintenance of your UPGRAVITY Dual Monitor Wall Mount and Single Monitor Wall Arm Bundle. Please read this manual thoroughly before installation to ensure proper setup and safe use. This product is designed to create a more flexible and ergonomic workspace by securely holding your monitors.

Image: The UPGRAVITY Dual Monitor Wall Mount and Single Monitor Wall Arm, showcasing both products included in the bundle.
Safety Information
Always follow these safety guidelines to prevent injury or damage to the product:
- Ensure the wall structure can support the combined weight of the mount and monitors.
- Do not install into drywall alone. Mount the bracket on a cement wall, wood stud, or concrete brick wall.
- Do not exceed the maximum weight capacity of 17.6 lbs (8 kg) per arm.
- Use all provided hardware and tools. Do not substitute parts.
- Keep children and pets away during installation.
- If you encounter any difficulties, consult a qualified professional.
Package Contents
Verify that all components are present before beginning installation:
- Dual Monitor Wall Mount Assembly (1 set)
- Single Monitor Wall Arm Assembly (1 set)
- VESA Plates (3 total)
- Mounting Hardware Kit (screws, anchors, washers)
- Tools (Allen wrenches)
- Instruction Manual (this document)
Product Overview
The UPGRAVITY monitor wall mount bundle features a high-quality gas spring mechanism for smooth adjustments. Key features include:
- Universal Compatibility: Fits 17-32 inch LCD LED flat/curved computer screens.
- VESA Patterns: Supports 75x75mm and 100x100mm VESA patterns.
- Weight Capacity: Each arm holds 2.2-17.6 lbs (1-8 kg).
- Full Motion Adjustments: Tilt (+35°/-35°), Swivel (+90°/-90°), Rotation (360°).
- Dynamic Height Adjustability: Gas spring allows for easy height changes.
- Cable Management: Integrated system to keep cables organized.

Image: Diagram illustrating universal compatibility for the dual monitor mount, including supported screen sizes (up to 32"), weight capacity (17.6 lbs x2), and VESA patterns (75x75mm/100x100mm).
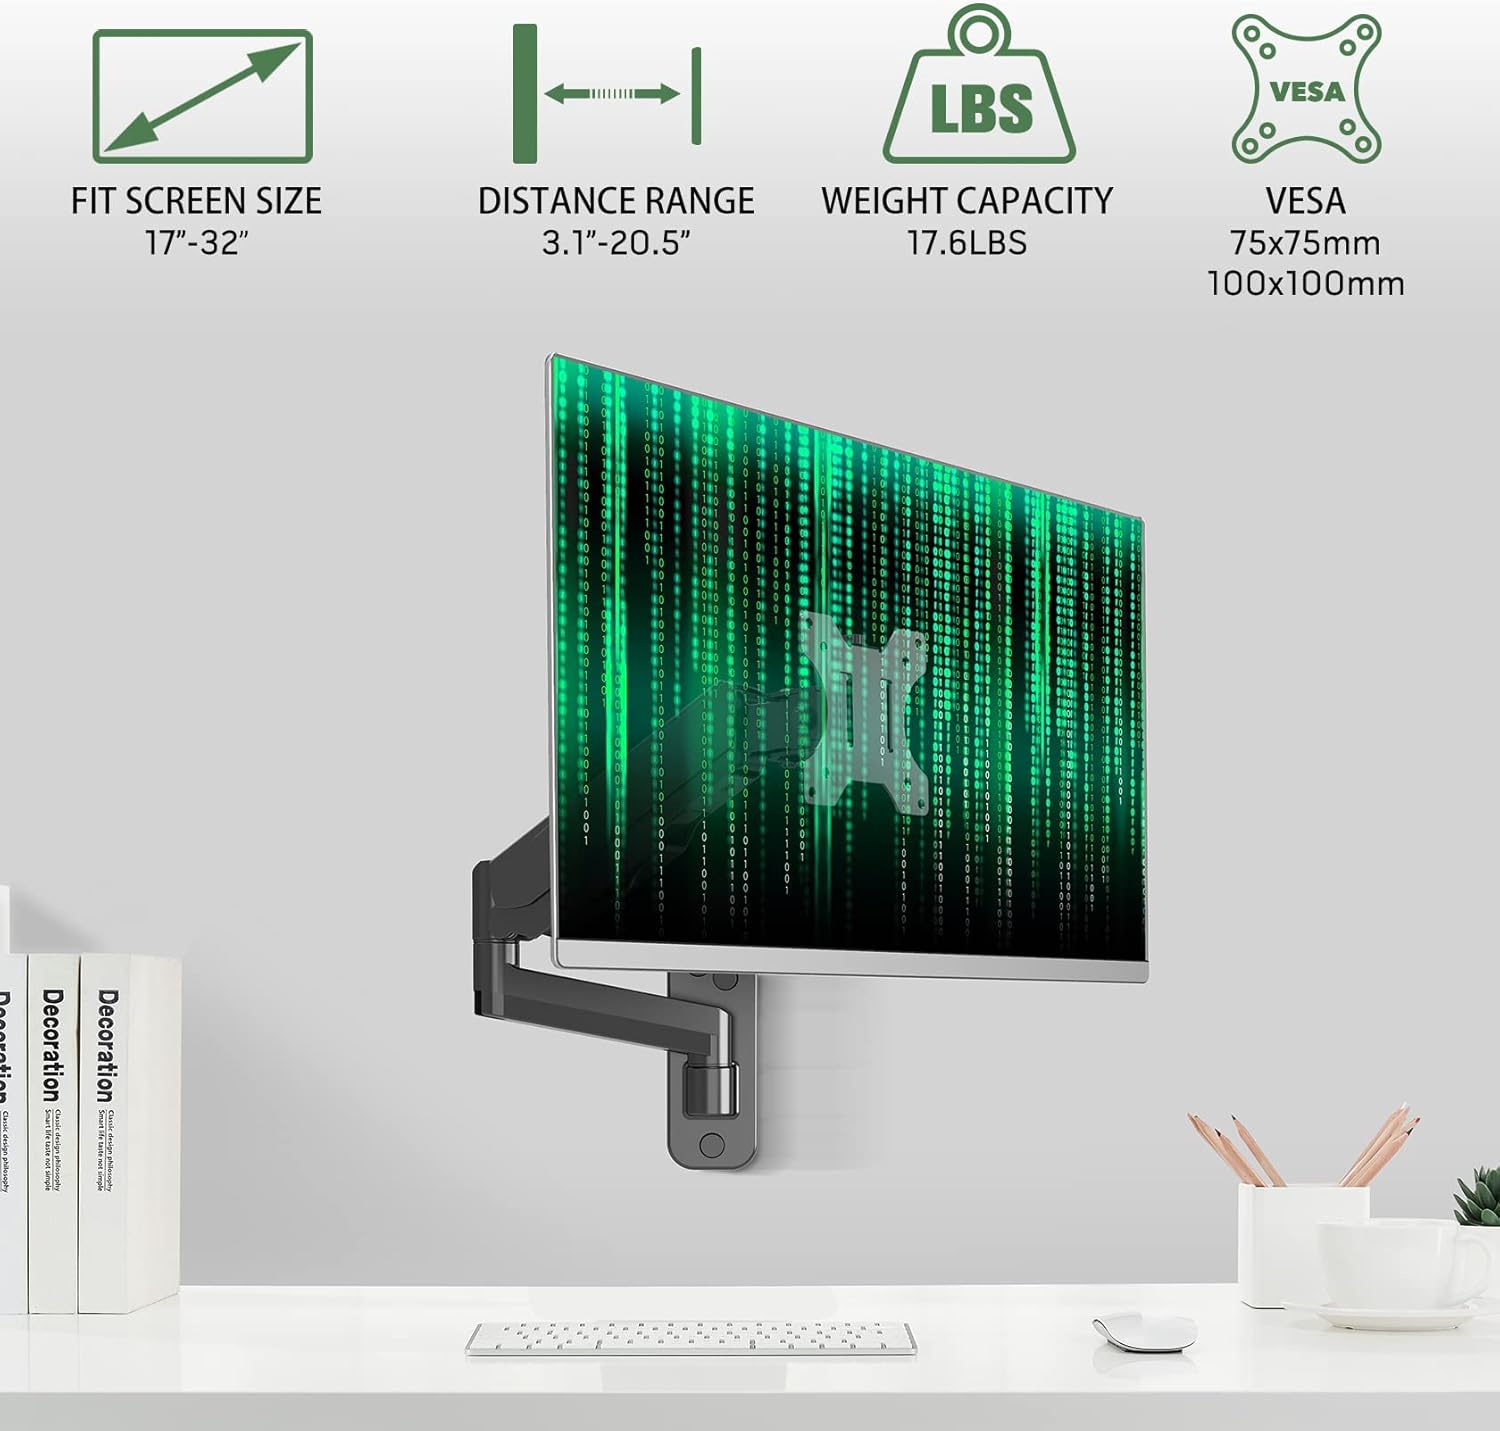
Image: Diagram illustrating specifications for the single monitor mount, including fit screen size (17"-32"), distance range (3.1"-20.5"), weight capacity (17.6 lbs), and VESA patterns (75x75mm/100x100mm).
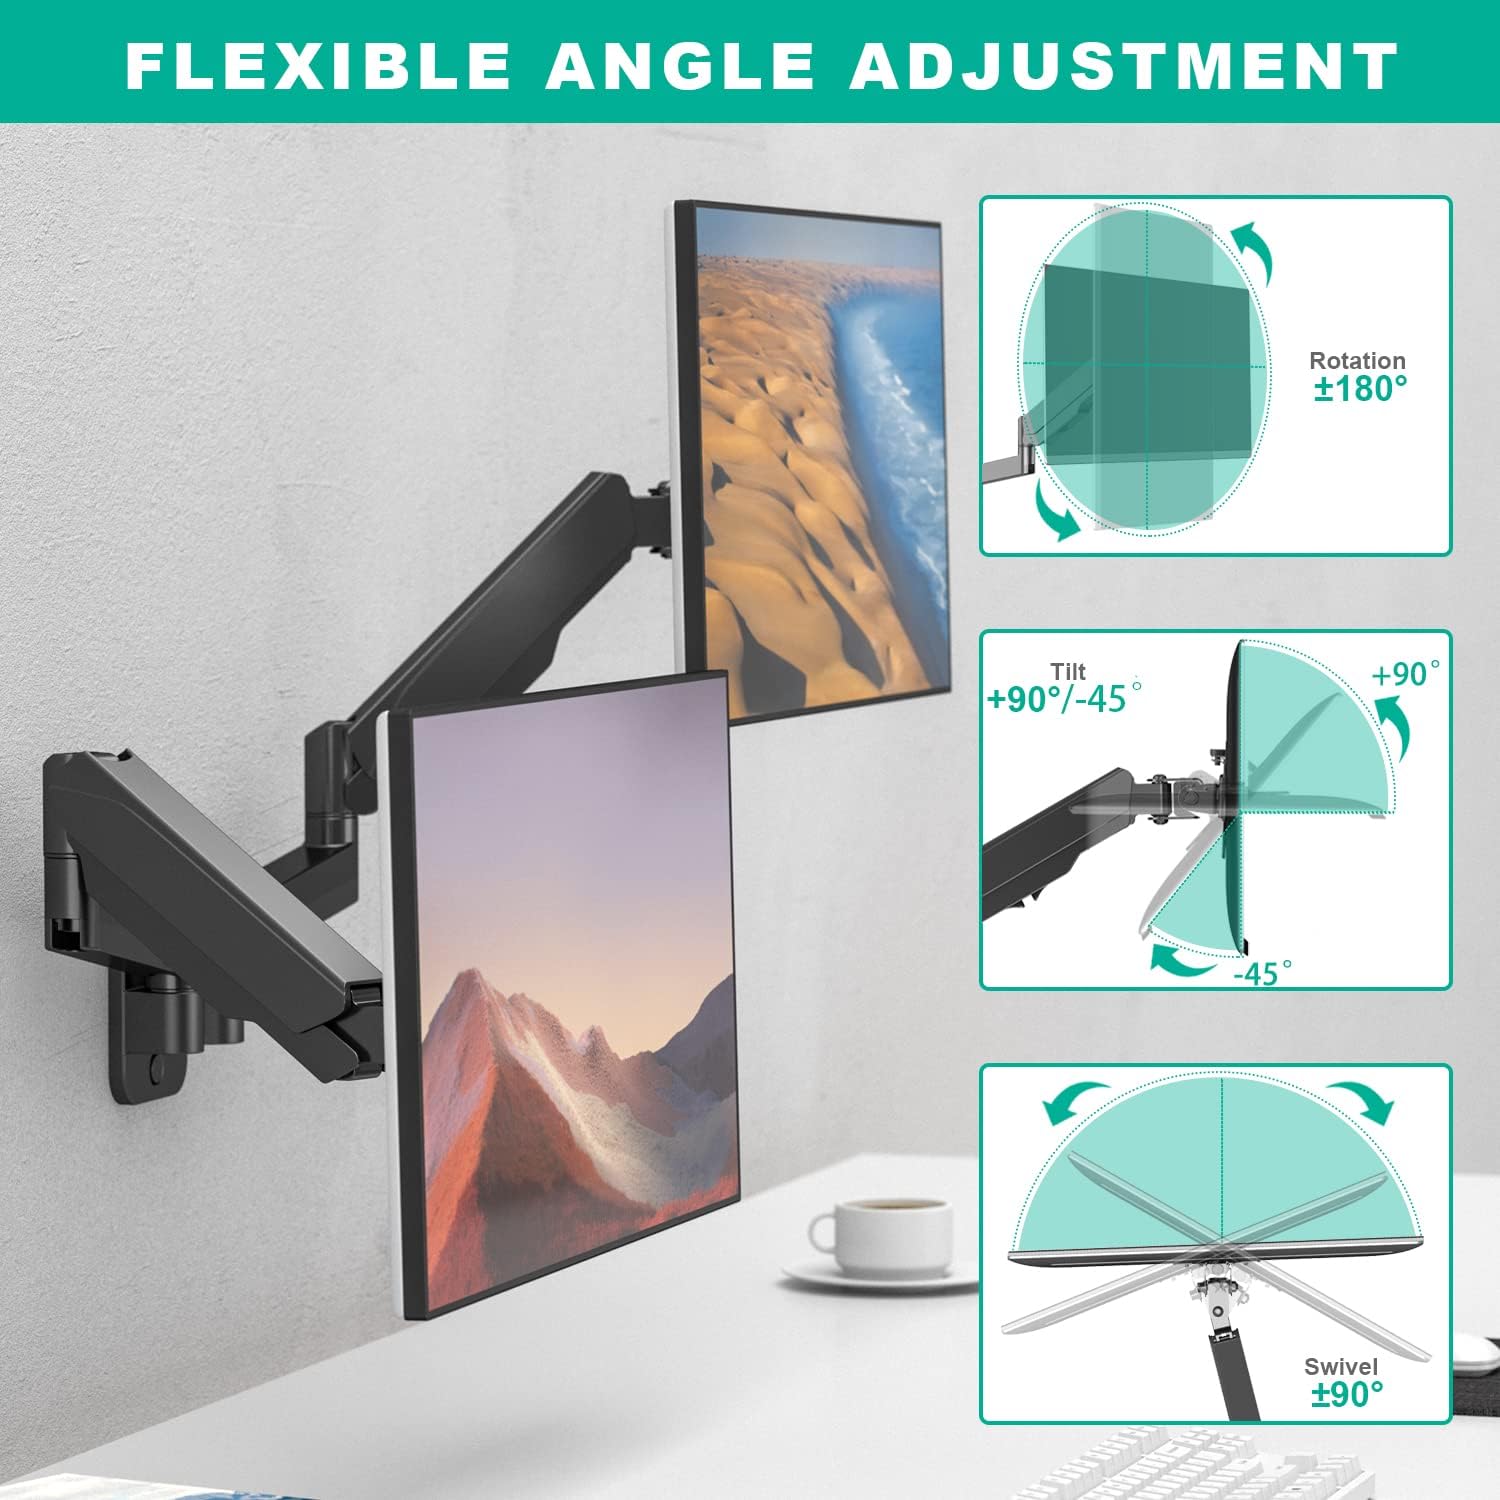
Image: Illustrations showing the flexible angle adjustments for the dual monitor mount, including rotation (±180°), tilt (+90°/-45°), and swivel (±90°).

Image: Illustrations showing the flexible angle adjustments for the single monitor mount, including rotation (±180°), tilt (+90°/-45°), and swivel (±90°).
Setup and Installation
Follow these steps carefully for secure installation:
- Choose Mounting Location: Select a sturdy wall location. This mount is suitable for cement walls, wood studs, or concrete brick walls. Do NOT install into drywall alone.
- Attach Wall Plate: Position the wall plate at the desired height. Mark the drilling points. Drill pilot holes and secure the wall plate using the appropriate screws and anchors for your wall type.
- Assemble Arm to Wall Plate: Slide the monitor arm assembly onto the secured wall plate. Ensure it clicks into place or is fastened according to the specific model's instructions.
- Attach VESA Plate to Monitor: Secure the VESA plate to the back of your monitor using the provided screws. Ensure the screws are tightened but do not overtighten.
- Mount Monitor to Arm: Carefully lift the monitor with the attached VESA plate and slide it onto the VESA head of the monitor arm. Secure it with the locking mechanism or screw.
- Adjust Gas Spring Tension: Before use, adjust the gas spring tension to match your monitor's weight. Turn "+" to increase tension for heavier monitors and "-" to reduce tension for lighter monitors. Press the arm to a horizontal position for easier adjustment.
- Cable Management: Route monitor cables through the integrated cable management channels on the arm to maintain a tidy workspace.

Image: Visual guide showing suitable wall types for installation: brick, cement, and wood, with a clear warning not to install on drywall alone.

Image: Diagram illustrating how to adjust the gas spring tension using an Allen wrench, with instructions to turn "+" for heavier monitors and "-" for lighter monitors.

Image: Illustration demonstrating the cable management system, showing cables routed along the arm for a clean setup, along with maximum extension distance and height range.
Operating and Adjustments
Once installed, you can easily adjust your monitors for optimal viewing comfort:
- Height Adjustment: Gently push or pull the monitor up or down to adjust its height. The gas spring will hold it in place.
- Tilt Adjustment: Tilt the monitor screen forward or backward to reduce glare and find your preferred viewing angle. The tilt range is +35° to -35°.
- Swivel Adjustment: Swivel the monitor left or right to share your screen or adjust your viewing position. The swivel range is +90° to -90°.
- Rotation: Rotate the monitor 360° to switch between landscape and portrait modes.
- Extension/Retraction: Extend or retract the arm to bring the monitor closer or push it further away from the wall. Maximum extension is 20.5 inches.

Image: Diagram illustrating the dynamic height adjustability and maximum extension of the monitor arm.
Maintenance
To ensure the longevity and proper function of your monitor mount:
- Cleaning: Wipe the mount with a soft, dry cloth. Do not use abrasive cleaners or solvents.
- Periodic Checks: Periodically check all screws and connections to ensure they remain tight. Re-tighten if necessary.
- Gas Spring Adjustment: If the monitor sags or rises too easily, re-adjust the gas spring tension as described in the "Setup" section.
Troubleshooting
| Problem | Possible Cause | Solution |
|---|---|---|
| Monitor sags or drops | Gas spring tension is too low for monitor weight. | Increase gas spring tension by turning the adjustment screw towards "+". |
| Monitor is difficult to push down | Gas spring tension is too high for monitor weight. | Decrease gas spring tension by turning the adjustment screw towards "-". |
| Mount feels unstable | Mounting screws are loose or wall is not suitable. | Check all mounting screws and re-tighten. Ensure installation on a solid wall (wood stud, concrete, brick). Do not install on drywall alone. |
| Limited range of motion | Joints are too tight or obstructed. | Check for obstructions. Loosen joint screws slightly if necessary, but ensure stability. |
Specifications
| Feature | Detail |
|---|---|
| Brand | UPGRAVITY |
| Model | Dual Monitor Wall Mount and Single Monitor Wall Arm Bundle |
| Mounting Type | Wall Mount |
| Material | Steel or Metal Alloy |
| Compatible Screen Size | 17 - 32 inches |
| Weight Capacity (per arm) | 2.2 - 17.6 lbs (1 - 8 kg) |
| VESA Compatibility | 75x75mm, 100x100mm |
| Tilt Angle | +35° / -35° |
| Swivel Angle | +90° / -90° |
| Rotation | 360° |
| Max Extension | 20.5 inches |
Warranty and Support
For warranty information and technical support, please refer to the UPGRAVITY official website or contact their customer service directly. Keep your purchase receipt for warranty claims.
Manufacturer: UPGRAVITY
Date First Available: June 27, 2023
Ask a question about this manual
Ask about setup, troubleshooting, compatibility, parts, safety, or missing instructions. Manuals+ will review the question and use this page’s manual context to help answer it.