1. Introduction
The RAYZEEK RZ036-12/24V is a ceiling-mounted Passive Infrared (PIR) occupancy motion detector designed for lighting control. This device utilizes advanced PIR and microcontroller technology to provide stable and accurate motion detection. It is suitable for various indoor applications such as warehouse aisles, offices, hallways, garages, utility rooms, basements, storage areas, and laundry rooms, helping to conserve energy by automatically controlling lighting based on occupancy.

Figure 1: RAYZEEK DC 12/24V 10A Low Voltage Ceiling Sensor
2. Product Features
- Advanced PIR Technology: Incorporates a built-in detector for accurate and high-sensitivity performance.
- 360-Degree Detection: Offers comprehensive coverage up to 1600 sq ft (approximately 8-12 meters detection diameter).
- Adjustable Settings: Easy and precise adjustment of Time Delay, Detection Sensitivity, and Light Sensor (Lux) values via integrated buttons.
- Energy Saving: Supports Auto-ON/Auto-OFF occupancy mode to optimize energy consumption.
- Durable Construction: Made from high-security fireproof material.
- Magnetic Latching Relay: Features a built-in magnetic latching relay for enhanced performance compared to traditional relays.
- Low Voltage Operation: Designed for DC 12V/24V systems.

Figure 2: 360-Degree Detection Range
3. Package Contents
Verify that all items are present in the package before installation:
- 1 x RAYZEEK Motion Sensor Switch (Model RZ036-12/24V)
- 1 x User Instruction Manual (This document)
- 3 x Mounting Screws
- 3 x Wall Anchors
- 1 x Installation Positioning Sticker

Figure 3: Included Components
4. Specifications
| Parameter | Value |
|---|---|
| Model | RZ036-12/24V |
| Operating Voltage | DC 12V / 24V |
| Maximum Load Current | 10A |
| Detection Angle | 360 degrees |
| Detection Range | 8-12 meters (26-39 feet) diameter |
| Mounting Type | Ceiling Mount |
| Time Delay Adjustment | 15s, 30s, 1min, 3min, 5min, 10min, 30min (Default: 1min) |
| Light Sensor (Lux) Adjustment | Off, 15Lux, 25Lux, 35Lux (Default: 25Lux) |
| Sensitivity Adjustment | High / Low |
| Dimensions | Approximately 3.94 x 3.94 x 1.61 inches |
| Color | White |
| Material | Fireproof material |
| Usage Environment | Indoor Use Only |
5. Installation
Important Safety Information: Before beginning installation, ensure the power supply to the circuit is turned OFF at the circuit breaker or fuse box. Installation should be performed by a qualified electrician or in accordance with local electrical codes.
- Choose Mounting Location: Select a ceiling location that provides the desired detection coverage. The sensor offers a 360-degree detection pattern. Avoid mounting near heat sources, air vents, or areas with significant air movement that could cause false triggers.
- Prepare Wiring: This is a low-voltage DC 12V/24V sensor. Connect the power input wires (positive and negative) and the load output wires (to your lighting fixture) according to the wiring diagram provided with the product. Ensure proper polarity.
- Mount the Sensor:
- Use the provided positioning sticker to mark the screw holes on the ceiling.
- Drill pilot holes at the marked locations. Insert wall anchors if necessary.
- Secure the sensor base to the ceiling using the provided screws.
- Ensure the wiring is neatly tucked into the ceiling box or cavity.
- Attach Cover: Once wiring is complete and the base is secured, align the sensor's top cover and rotate it clockwise to lock it into place.
- Restore Power: Turn the power supply back ON at the circuit breaker.

Figure 4: Typical Installation Environment
6. Setup and Adjustment
The sensor features easily accessible buttons for adjusting its operational parameters. To access the adjustment buttons, gently rotate the top cover counter-clockwise to remove it.
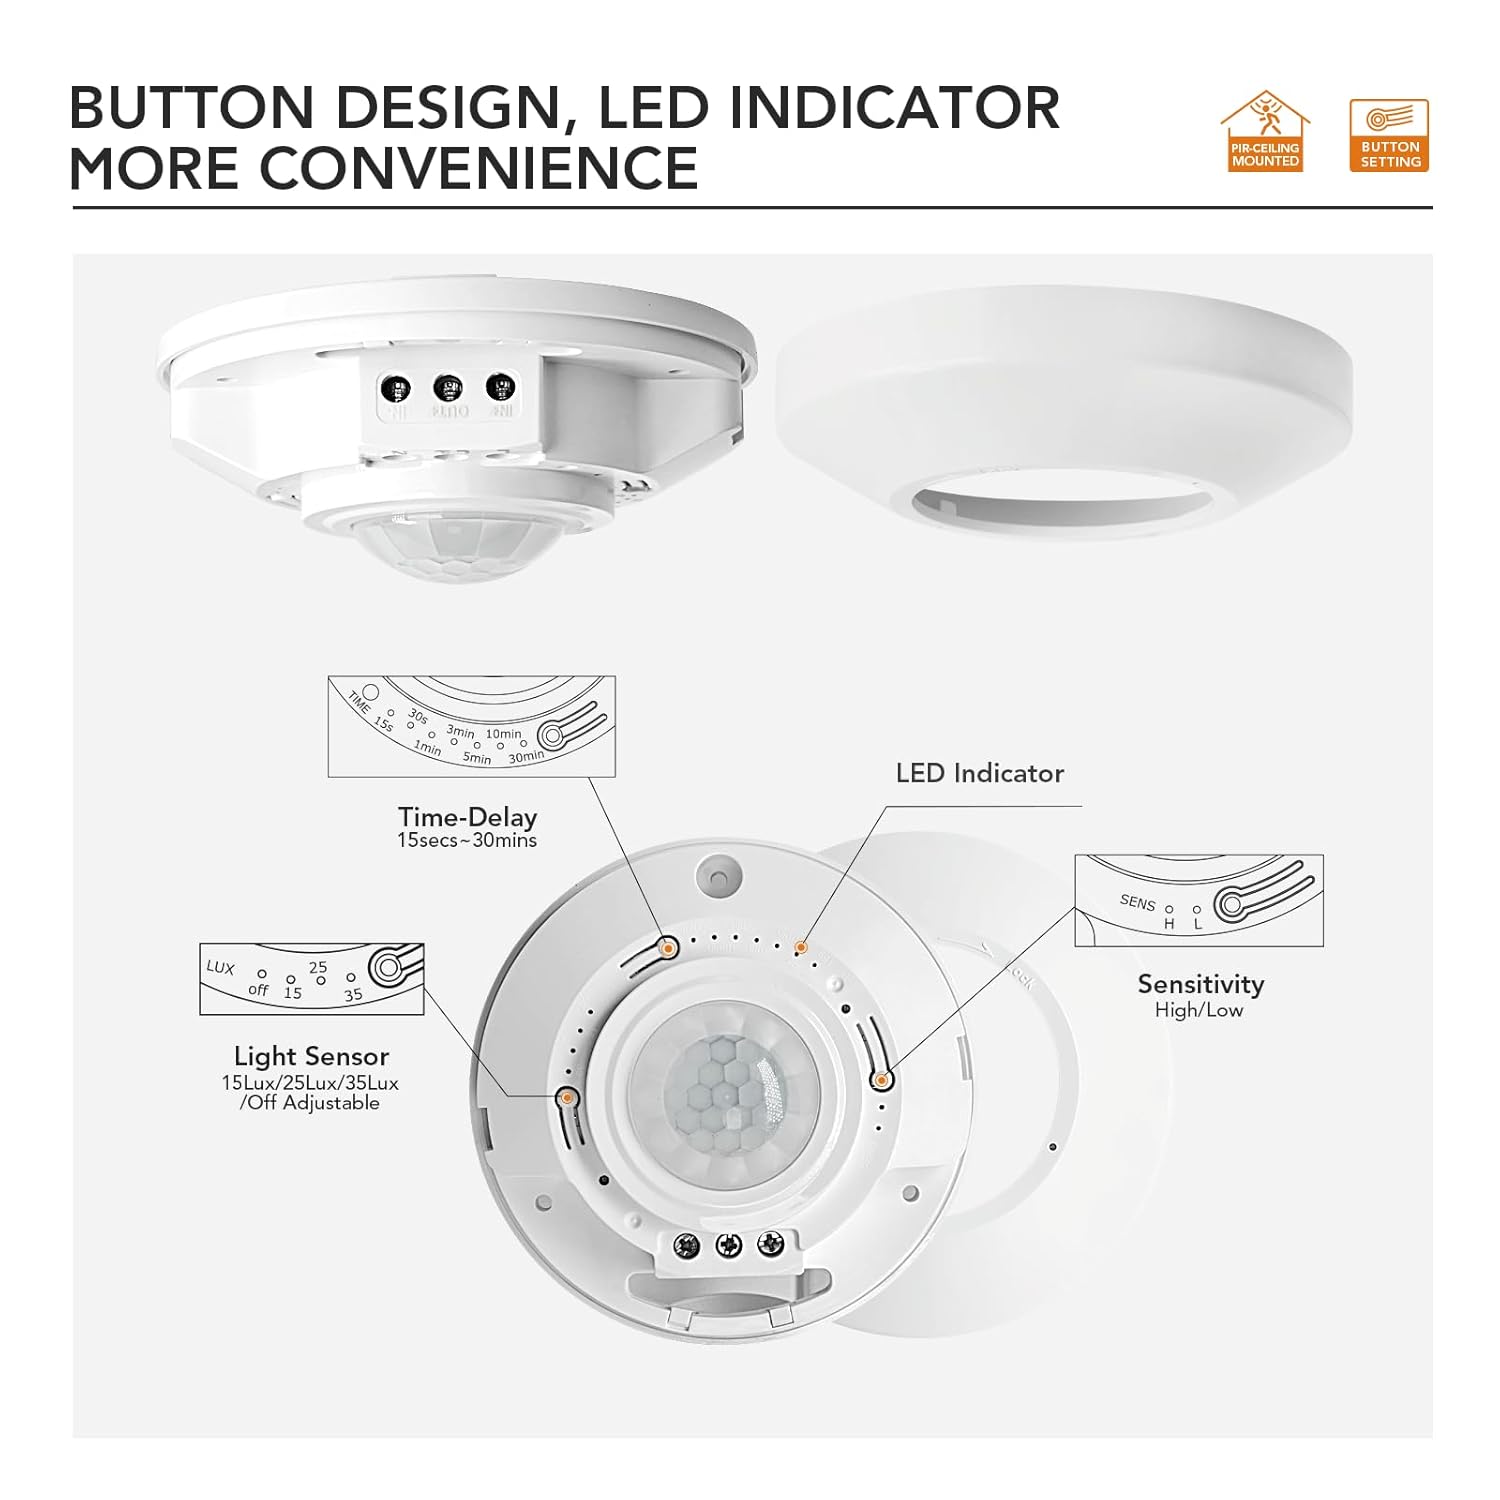
Figure 5: Adjustment Controls
6.1. Time Delay Adjustment
This setting determines how long the connected light remains ON after the last detected motion. Press the "Time-Delay" button to cycle through the available options:
- 15 seconds
- 30 seconds
- 1 minute (Default)
- 3 minutes
- 5 minutes
- 10 minutes
- 30 minutes
6.2. Light Sensor (Lux) Adjustment
This setting controls the ambient light level at which the sensor will activate. If the ambient light is above the set Lux value, the sensor will not turn on the light, even if motion is detected. Press the "Light Sensor" button to cycle through the options:
- Off (Sensor will always activate with motion, regardless of ambient light)
- 15 Lux (Activates only when ambient light is below 15 Lux)
- 25 Lux (Default - Activates only when ambient light is below 25 Lux)
- 35 Lux (Activates only when ambient light is below 35 Lux)
6.3. Detection Sensitivity Adjustment
This setting adjusts the sensor's responsiveness to motion. Press the "Sensitivity" button to choose:
- High Sensitivity (More responsive, detects smaller movements or at greater distances)
- Low Sensitivity (Less responsive, requires larger movements or closer proximity)
After making adjustments, replace the top cover by aligning and rotating it clockwise until it locks securely.
7. Operation
Once installed and configured, the RAYZEEK motion sensor operates automatically:
- When motion is detected within the sensor's range and the ambient light level is below the set Lux threshold (if Lux is not set to "Off"), the connected lighting will turn ON.
- The light will remain ON as long as motion is continuously detected.
- After the last detected motion, the light will remain ON for the duration of the set Time Delay, then turn OFF automatically.
- If the Lux setting is "Off", the light will turn ON with motion regardless of ambient light conditions.


Figure 6: Various Application Scenarios
8. Troubleshooting
If the motion sensor is not functioning as expected, refer to the following common issues and solutions:
| Problem | Possible Cause | Solution |
|---|---|---|
| Light does not turn ON with motion. |
|
|
| Light stays ON constantly. |
|
|
| Light turns ON/OFF too frequently (false triggers). |
|
|
| Detection range is too small. |
|
|
9. Maintenance
To ensure optimal performance and longevity of your RAYZEEK motion sensor, follow these maintenance guidelines:
- Cleaning: Periodically wipe the sensor lens and housing with a soft, dry cloth to remove dust and debris. Avoid using abrasive cleaners or solvents, as these can damage the unit.
- Inspection: Regularly check for any visible damage to the sensor or its wiring. If any damage is found, disconnect power and have it inspected by a qualified professional.
- Environmental Conditions: Ensure the sensor is used within its specified indoor operating environment. Exposure to excessive moisture, extreme temperatures, or direct sunlight can affect performance and lifespan.
10. Warranty and Support
RAYZEEK products are designed for reliability and performance. For specific warranty details, please refer to the warranty card included with your purchase or visit the official RAYZEEK website. If you encounter any issues or require technical assistance, please contact RAYZEEK customer support through the retailer where the product was purchased or via the contact information provided on the official RAYZEEK website.


