1. Introduction
Thank you for choosing the YONISEE Power Lift Recliner with Massage and Heat. This manual provides essential information for the safe assembly, operation, and maintenance of your new recliner. Please read all instructions carefully before use and retain this manual for future reference.
2. Safety Instructions
- Weight Capacity: Do not exceed the maximum weight capacity of 330 pounds (150 kg). Exceeding this limit may cause damage to the chair and potential injury.
- Children and Pets: Keep children and pets away from the chair's moving parts, especially during operation. Ensure they do not play on or under the chair.
- Power Cord: Ensure the power cord is not pinched, tangled, or placed under the chair where it could be damaged. Keep the cord away from heat sources and sharp edges.
- Liquid Exposure: Avoid spilling liquids on the chair, especially near electrical components. If a spill occurs, immediately unplug the chair and allow it to dry completely before use.
- Stable Surface: Place the chair on a level and stable surface to prevent tipping.
- Clearance: Ensure adequate clearance around the chair when reclining or lifting to prevent obstruction or damage to surrounding objects.
- Unplug When Not in Use: Unplug the chair from the power outlet when not in use or before cleaning and maintenance.
- Professional Repair: Do not attempt to repair the chair yourself. Contact customer support for any repairs or service.
3. Package Contents
Your YONISEE Power Lift Recliner is shipped in two boxes. Please ensure all components are present before beginning assembly.
- Backrest
- Base
- Left Armrest
- Right Armrest
- Accessories Box (includes power adapter, remote controls, and other small parts)
- User Manual

Image: Components are typically shipped in two separate boxes (Box A and Box B).
4. Setup and Assembly
Assembly of your YONISEE Power Lift Recliner is designed to be straightforward and does not require special tools. Follow these steps:
- Unpack Components: Carefully remove all parts from the packaging. Place them on a soft, clean surface to prevent scratches.
- Attach Backrest: Slide the backrest onto the base until it clicks securely into place. Ensure both sides are fully engaged.
- Attach Armrests: Slide the left and right armrests onto their respective slots on the base. Ensure they are firmly attached.
- Connect Wiring: Locate the electrical cables extending from the backrest, base, and armrests. Connect them according to the color-coded or labeled connectors. Ensure all connections are secure.
- Connect Power Adapter: Plug the power adapter into the chair's main power input, then plug the adapter into a standard wall outlet.
- Test Functions: Before sitting, briefly test the lift, recline, massage, and heat functions using the remote controls to ensure proper operation.

Image: Visual guide for assembling the recliner chair.
5. Operating Instructions
Your recliner comes with two remote controls to manage its various functions.
5.1. Power Lift and Recline Functions
Use the remote with two large buttons (up and down arrows) to control the lift and recline mechanisms.
- To Lift/Stand Assist: Press and hold the UP arrow button. The chair will slowly tilt forward and rise, assisting you to a standing position. Release the button when you reach the desired height.
- To Recline: Press and hold the DOWN arrow button. The chair will slowly recline backward and extend the footrest. Release the button when you reach your preferred reclining angle.
- To Return to Seated Position: Press and hold the UP arrow button from a reclined position. The footrest will retract, and the backrest will return to an upright position.

Image: Remote control for lift and recline functions, demonstrating different chair positions.
5.2. Massage and Heat Functions
Use the remote with multiple buttons for massage intensity, modes, and heat control.
- Power Button: Press to turn the massage function ON/OFF.
- Heat Button: Press to activate or deactivate the lumbar heating function. An indicator light will show when heat is active.
- Intensity: Adjust massage intensity (Low, Pulse, Press, Auto, Normal) using the corresponding buttons.
- Mode: Select from various massage modes (e.g., Wave, Auto, Normal).
- Zone Selection: Target specific massage zones (Back, Lumbar, Thigh, Leg) by pressing the respective buttons.
- Time Control: Set the duration of the massage session.

Image: Massage and heat remote control with active massage zones highlighted.
5.3. Side Pockets
The recliner features convenient side pockets for storing remote controls, magazines, or other small items.

Image: Detail of the recliner's integrated side pocket.
6. Maintenance
Proper care will extend the life and appearance of your recliner.
- Cleaning Fabric: For general cleaning, use a soft, damp cloth to wipe the fabric. For spills, spot clean immediately with a mild detergent and water solution. Blot the area gently; do not rub vigorously. Allow to air dry completely.
- Vacuuming: Regularly vacuum the chair using a soft brush attachment to remove dust and debris.
- Avoid Harsh Chemicals: Do not use abrasive cleaners, solvents, or harsh chemicals, as these can damage the fabric and finish.
- Inspect Connections: Periodically check all electrical connections and cables for any signs of wear or damage. Ensure they are securely plugged in.
- Moving the Chair: When moving the chair, lift it rather than dragging it to prevent damage to the base and flooring.
7. Troubleshooting
If you encounter issues with your recliner, refer to the following common problems and solutions:
| Problem | Possible Cause | Solution |
|---|---|---|
| Chair does not move or respond to remote. | Power cord unplugged; loose connection; power outage. | Ensure power cord is securely plugged into the wall outlet and the chair. Check for power to the outlet. Verify all internal connections are secure. |
| Massage or heat function not working. | Massage/heat remote not powered on; loose connection. | Press the power button on the massage remote. Check the connection of the massage unit to the main power. |
| Chair makes unusual noises during operation. | Loose components; obstruction in mechanism. | Inspect for any loose bolts or screws and tighten if necessary. Check for any objects obstructing the lift or recline mechanism. If noise persists, contact customer support. |
| Chair is unstable or wobbles. | Uneven floor; loose assembly. | Ensure the chair is on a flat, level surface. Recheck all assembly connections to ensure they are tight. |
If these solutions do not resolve the issue, please contact YONISEE customer support for further assistance.
8. Specifications
| Feature | Detail |
|---|---|
| Brand | YONISEE |
| Model Name | US-RC03-DG |
| Color | Grey |
| Product Dimensions (D x W x H) | 27.5" x 32.8" x 42" |
| Seat Height | 16.2 Inches |
| Seat Depth | 22.5 Inches |
| Maximum Weight Recommendation | 330 Pounds |
| Material | Textile (Suede Upholstery), Sponge Fill |
| Special Features | Power Lift, Reclining, Massage, Heat, Adjustable Backrest, Arm Rest, Ergonomic, Foot Rest |
| Included Components | Accessories box, Manual, Backrest, Base, Left armrest, Right armrest |
| Power Source | Corded Electric |
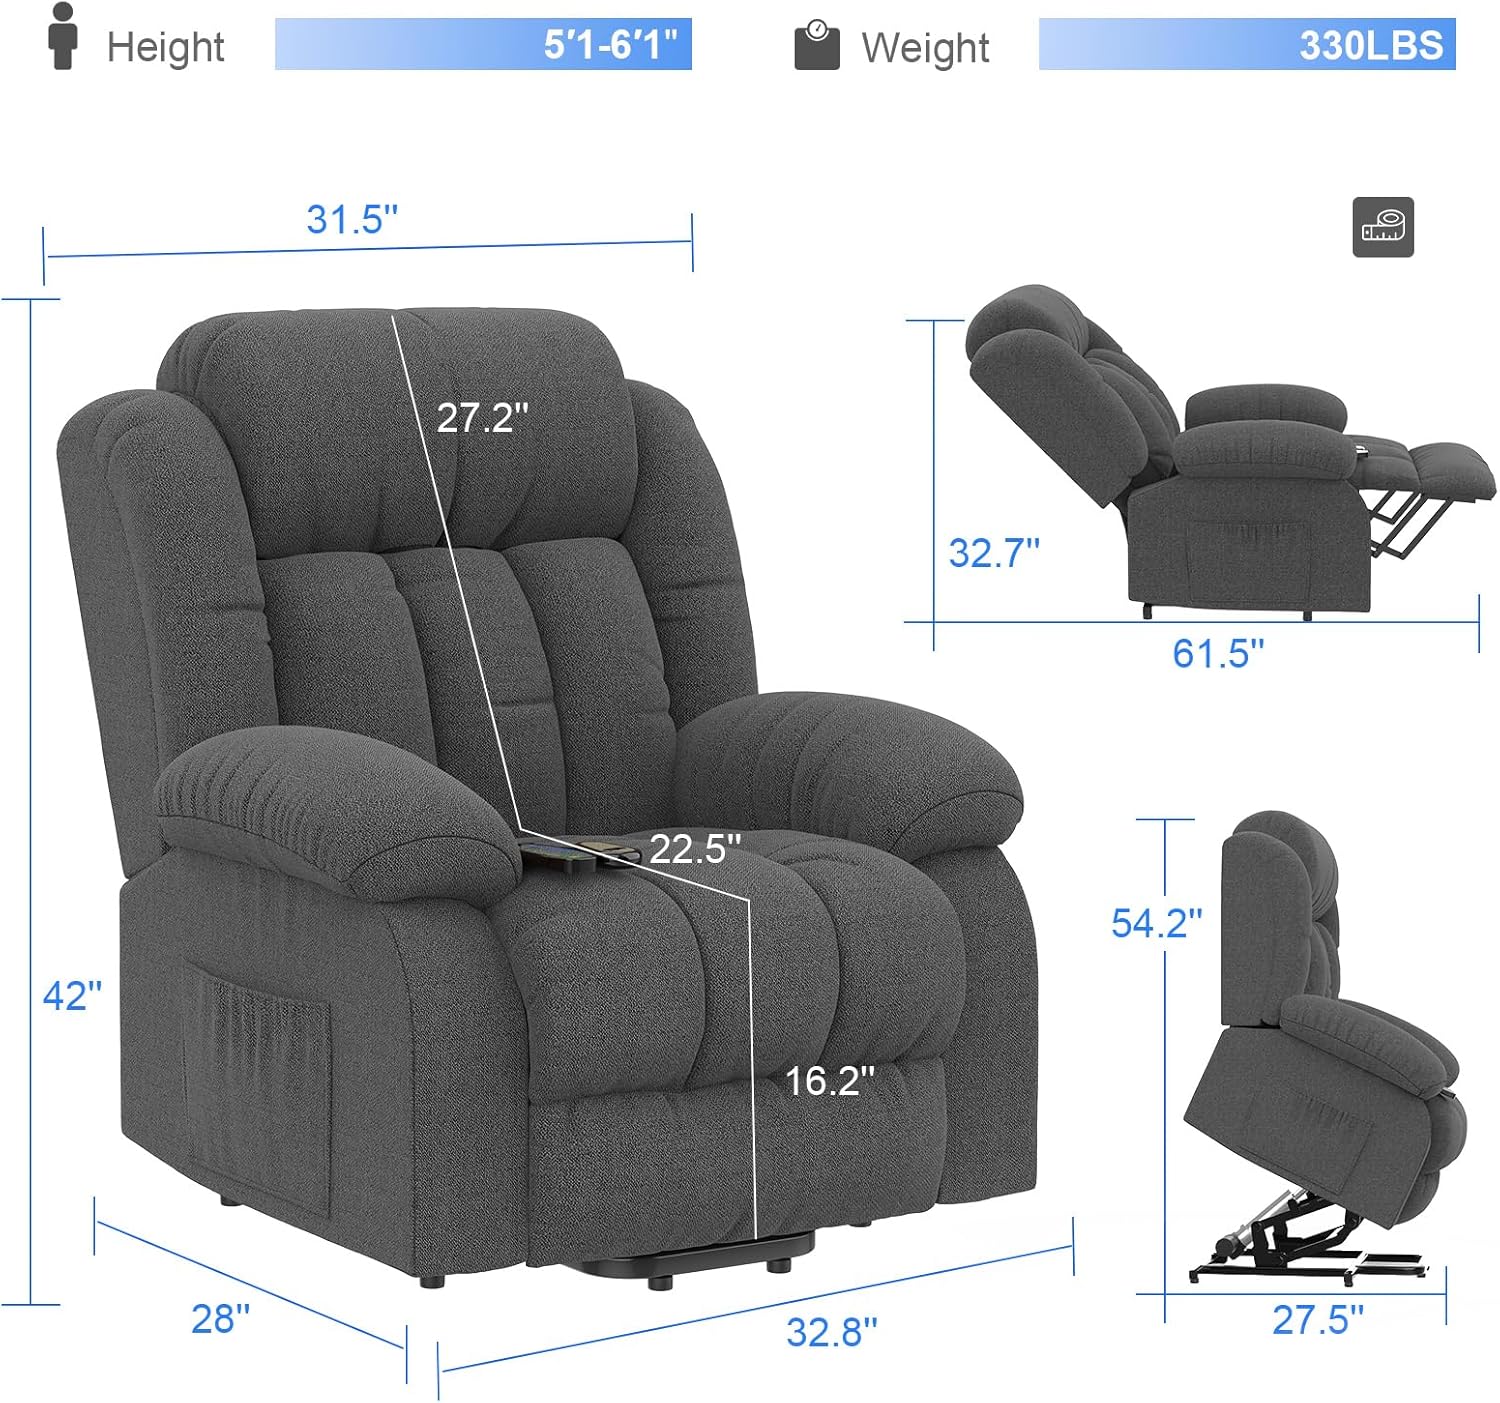
Image: Detailed dimensions of the recliner.
9. Warranty and Customer Support
9.1. Warranty Information
YONISEE provides a limited warranty for this product. Please refer to the warranty card included in your package for specific terms, conditions, and duration. Keep your purchase receipt as proof of purchase for warranty claims.
9.2. Customer Support
If you have any questions, require assistance with assembly, or need troubleshooting support, please contact YONISEE customer service. For the quickest resolution, please have your order ID and product model number (US-RC03-DG) ready.
To contact customer support via Amazon:
- Log in to your Amazon account.
- Go to 'Your Orders'.
- Find the relevant order ID for your YONISEE recliner.
- Click 'Contact Seller'.

Image: Steps to contact YONISEE customer support through Amazon.