1. Product Overview
The De'Longhi All-in-One Combination Coffee Maker and Espresso Machine (Model RM, also referred to as COM532M) offers a versatile solution for preparing both drip coffee and espresso-based beverages. This appliance features a dual heating system, a digital touchscreen, and an advanced steam wand for milk frothing. It is designed to accommodate both ground coffee and espresso pods.

Figure 1: De'Longhi All-in-One Combination Coffee Maker and Espresso Machine, accompanied by the stainless steel milk frothing pitcher and coffee tamper.
1.1 Included Components
The following items are typically included with your De'Longhi All-in-One Combination Coffee Maker and Espresso Machine:
- Combination Coffee and Espresso Machine
- Glass Coffee Pot (10-cup capacity)
- Gold Tone Coffee Filter
- Single & Double Shot Filter Basket
- POD Filter Basket
- Measuring Spoon
- Descaling Solution
- Charcoal Water Filter
- Instruction Manual & Quick Start Guide (this document)
- Stainless Steel Milk Frothing Pitcher (12 oz / 350 ml)
- DLSC058 Coffee Tamper
2. Important Safeguards
When using electrical appliances, basic safety precautions should always be followed to reduce the risk of fire, electric shock, and/or injury to persons. Read all instructions carefully before using the appliance.
- Read all instructions.
- Do not touch hot surfaces. Use handles or knobs.
- To protect against fire, electric shock, and personal injury, do not immerse cord, plugs, or appliance in water or other liquid.
- Close supervision is necessary when any appliance is used by or near children.
- Unplug from outlet when not in use and before cleaning. Allow to cool before putting on or taking off parts, and before cleaning the appliance.
- Do not operate any appliance with a damaged cord or plug or after the appliance malfunctions, or has been damaged in any manner. Return appliance to the nearest authorized service facility for examination, repair or adjustment.
- The use of accessory attachments not recommended by the appliance manufacturer may result in fire, electric shock, or personal injury.
- Do not use outdoors.
- Do not let cord hang over edge of table or counter, or touch hot surfaces.
- Do not place on or near a hot gas or electric burner, or in a heated oven.
- Always attach plug to appliance first, then plug cord into the wall outlet. To disconnect, turn any control to "off", then remove plug from wall outlet.
- Do not use appliance for other than intended use.
3. Setup
3.1 Unpacking
- Carefully remove all components from the packaging.
- Remove any protective films or stickers from the appliance.
- Retain packaging materials for future transport or storage.
3.2 Initial Cleaning
- Wash the glass coffee pot, filter basket, portafilter, and milk frothing pitcher with warm soapy water. Rinse thoroughly and dry.
- Wipe the exterior of the machine with a damp cloth.
3.3 Water Reservoir Filling
- Ensure the machine is unplugged.
- Open the water reservoir lid located at the top of the machine.
- Fill the reservoir with fresh, cold water up to the MAX level indicator (47 oz capacity).
- Close the water reservoir lid securely.
3.4 First Use Cycle (Priming)
Before first use, it is recommended to run a priming cycle to clean the internal components and prepare the machine.
- Fill the water reservoir as described above.
- Place an empty carafe under the drip coffee outlet and a cup under the espresso spouts.
- Plug the machine into a grounded electrical outlet.
- Turn on the machine using the power button.
- Initiate a drip coffee cycle without coffee grounds and an espresso cycle without coffee in the portafilter. Allow water to run through both systems.
- Empty and rinse the carafe and cup. The machine is now ready for use.
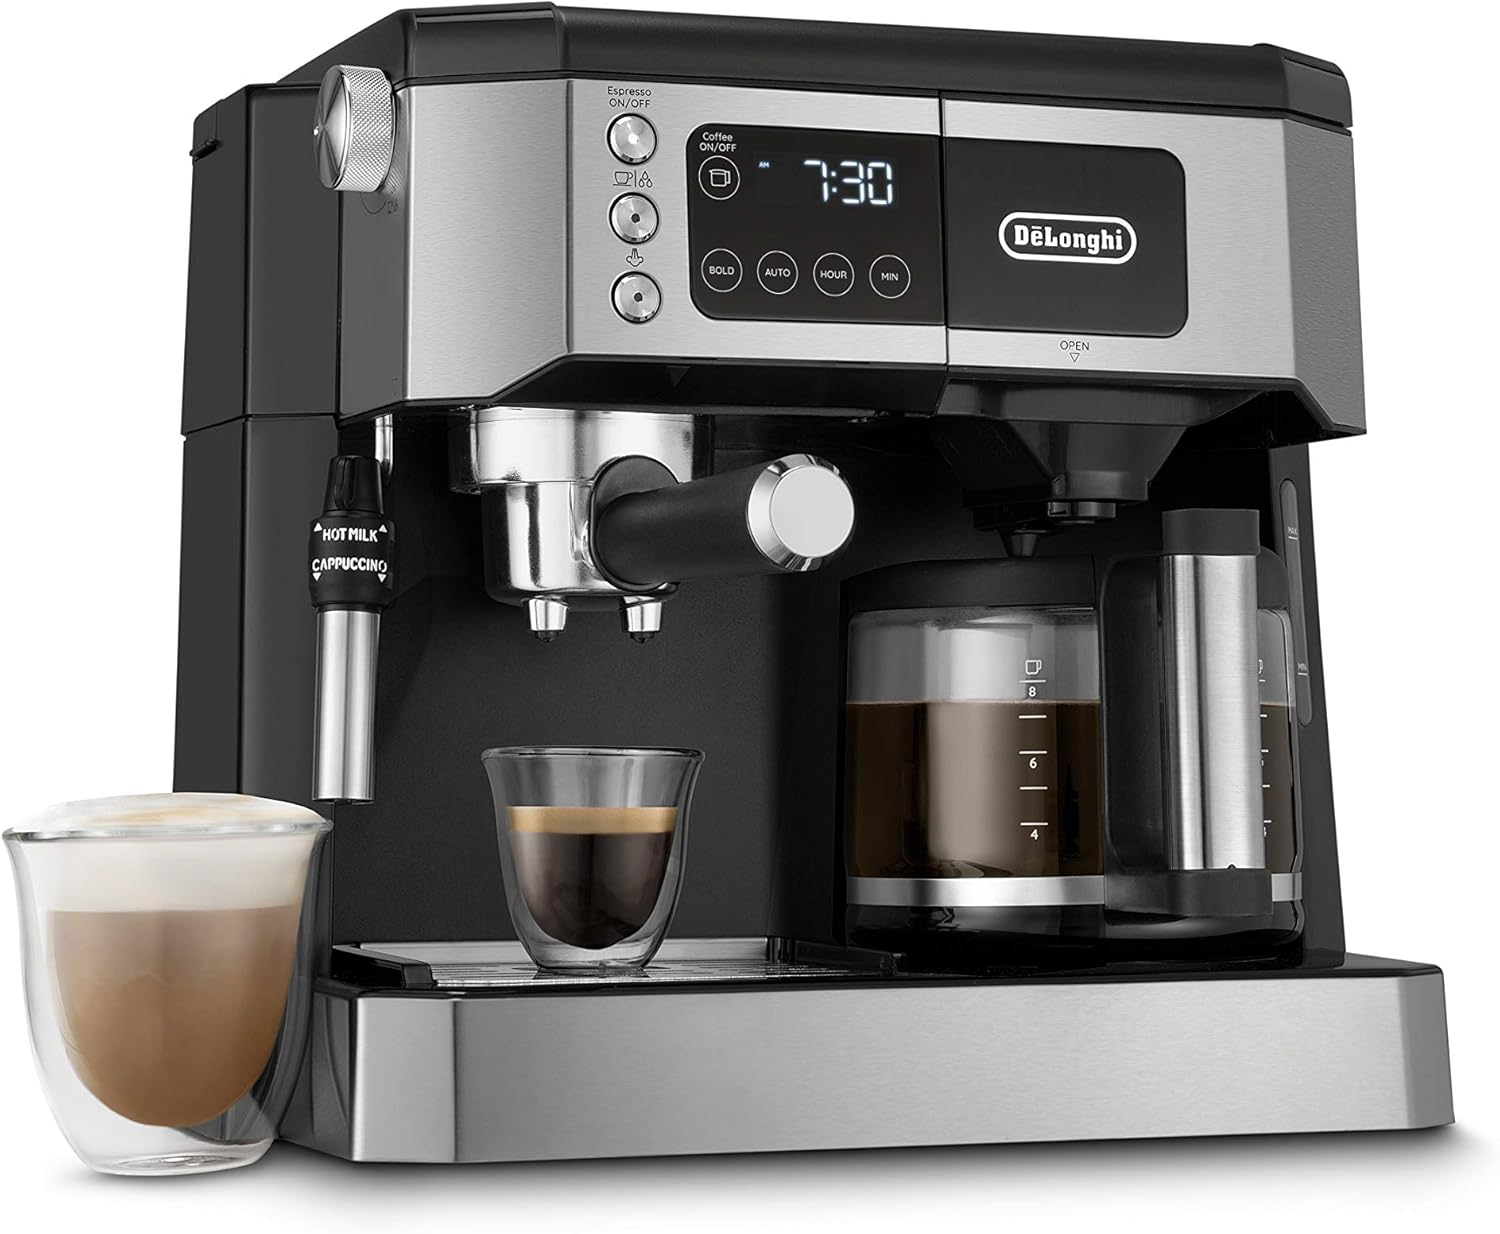
Figure 2: Front view of the De'Longhi All-in-One machine, showing the water reservoir and control panel.
4. Operating Instructions
4.1 Drip Coffee Preparation
- Ensure the water reservoir is filled.
- Open the drip coffee filter basket and insert the gold-tone permanent filter.
- Add desired amount of ground coffee to the filter. Close the filter basket.
- Place the glass coffee pot on the warming plate.
- Select the desired brew strength (e.g., using the BOLD setting for stronger coffee).
- Press the Coffee brew button to start brewing.
- The machine will keep the coffee warm on the carafe warmer after brewing.
4.2 Espresso Preparation
- Ensure the water reservoir is filled.
- Insert the appropriate filter basket (single shot, double shot, or POD) into the portafilter.
- For ground coffee, add finely ground espresso coffee to the filter basket. For pods, insert an espresso pod.
- Use the DLSC058 Coffee Tamper to gently tamp the ground coffee evenly.
- Attach the portafilter to the espresso group head by aligning and twisting it firmly into place.
- Place an espresso cup(s) under the portafilter spouts.
- Press the Espresso ON/OFF button to heat the system, then press the desired espresso button (single or double) to start brewing.

Figure 3: Detailed view of the digital control panel, showing various brewing options and settings.
4.3 Milk Frothing (Cappuccino/Latte)
- Fill the stainless steel milk frothing pitcher with cold milk (dairy or non-dairy). Do not fill more than one-third full.
- Position the advanced steam wand into the milk, just below the surface.
- Turn the steam knob to activate the steam.
- Move the pitcher up and down gently to create foam. For latte, keep the wand deeper for less foam. For cappuccino, keep it closer to the surface for more foam.
- Once desired texture and temperature are reached, turn off the steam knob.
- Wipe the steam wand immediately with a damp cloth to prevent milk residue from drying.

Figure 4: The 12 oz (350 ml) stainless steel milk frothing pitcher, ideal for creating smooth milk foam.
4.4 Using the DLSC058 Coffee Tamper
The DLSC058 Coffee Tamper is essential for achieving optimal espresso extraction by ensuring a smooth and evenly graded coffee bed in the portafilter.
- After adding ground coffee to the filter basket, place the tamper squarely on top of the coffee.
- Apply firm, even pressure to compress the coffee grounds. The tamper is calibrated to provide the correct pressure.
- Twist slightly as you lift the tamper to ensure a clean, level surface.

Figure 5: The DLSC058 Coffee Tamper, designed for consistent espresso tamping.
4.5 Programmable Digital Timer
The machine features a 24-hour programmable digital timer and an auto-shut off function. Refer to the digital display and control panel (Figure 3) for setting the time and programming automatic brewing cycles.
5. Maintenance and Cleaning
Regular cleaning and maintenance ensure optimal performance and longevity of your De'Longhi appliance.
5.1 Daily Cleaning
- Glass Coffee Pot and Filter: Wash with warm soapy water after each use.
- Portafilter and Filter Baskets: Rinse under warm water to remove coffee grounds.
- Steam Wand: Wipe immediately after frothing milk with a damp cloth. Periodically remove the nozzle and rinse thoroughly.
- Drip Tray: Empty and clean the drip tray regularly.
- Exterior: Wipe the machine's exterior with a soft, damp cloth. Do not use abrasive cleaners.
5.2 Descaling
Descaling is crucial to remove mineral buildup and maintain machine efficiency. The frequency depends on water hardness and usage.
- Use the provided De'Longhi Descaling Solution. Follow the instructions on the descaling solution packaging carefully.
- Typically, mix the descaling solution with water in the reservoir according to instructions.
- Run the descaling cycle as indicated in the machine's specific instructions (refer to the Quick Start Guide for model-specific steps).
- After descaling, run several cycles with fresh water to rinse the system thoroughly.
5.3 Charcoal Water Filter Replacement
The charcoal water filter helps improve water quality and should be replaced regularly, typically every two months or as indicated by the machine.
- Remove the old charcoal water filter from the water reservoir.
- Soak the new filter in cold water for a few minutes.
- Insert the new filter into its holder in the water reservoir.
6. Troubleshooting
Refer to the table below for common issues and their potential solutions.
| Problem | Possible Cause | Solution |
|---|---|---|
| Coffee not brewing / Espresso not dispensing | Water reservoir empty; Clogged filter; Machine not primed. | Fill water reservoir; Clean filter basket; Perform first use priming cycle. |
| Weak coffee / Espresso | Insufficient coffee grounds; Coarse grind; Improper tamping; Descaling needed. | Increase coffee amount; Use finer grind; Tamp firmly and evenly; Descale the machine. |
| No steam from wand | Steam wand clogged; Not enough heating time; Water reservoir empty. | Clean steam wand nozzle; Allow machine to heat up fully; Fill water reservoir. |
| Machine leaks water | Water reservoir not seated correctly; Drip tray full; Loose connections. | Ensure reservoir is properly seated; Empty drip tray; Check all connections. |
| Coffee grounds in cup | Filter basket overfilled; Too fine grind; Damaged filter. | Do not overfill filter; Use appropriate grind size; Replace damaged filter. |
7. Specifications
- Brand: De'Longhi
- Model Number: RM (COM532M)
- Color: Black
- Coffee Maker Type: Combination Espresso Machine & Drip Coffee Maker
- Special Feature: Milk Frother, Programmable Digital Timer, Carafe Warmer
- Operation Mode: Fully Automatic
- Water Reservoir Capacity: 47 oz (approx. 1.4 liters)
- Coffee Pot Capacity: 10-Cup Glass Carafe
- Included Components: Carafe, Gold Tone Filter, Single & Double Shot Filter Baskets, POD Filter Basket, Measuring Spoon, Descaling Solution, Charcoal Water Filter, Milk Frothing Pitcher, Coffee Tamper
- Item Weight: Machine weight not specified; Frothing Pitcher: 12 ounces
- ASIN: B0C9999Y32
- Date First Available: June 25, 2023
8. Warranty and Support
8.1 Product Warranty
This De'Longhi appliance comes with a 1 Year Limited Warranty from the date of purchase. Please retain your proof of purchase for warranty claims. The warranty covers defects in materials and workmanship under normal use.
8.2 Customer Support
For technical assistance, troubleshooting beyond this manual, or warranty service, please contact De'Longhi Customer Service. Visit the official De'Longhi website for contact information and support resources.
Online Resources: www.delonghi.com