
1. Introduction and Overview
The KeaBabies Pulse S10 Pro is a hands-free, wearable electric breast pump designed for convenience and efficiency. This manual provides essential information for the safe and effective use of your breast pump, ensuring a comfortable and productive breastfeeding journey.
Key features include:
- Quiet Operation: Designed for discreet use, ensuring a calm experience.
- Optimized Milk Output: Features 9 levels of rhythmic suction, mimicking a baby's natural suckling, along with stimulation massage and dual modes to maximize expression.
- Hands-Free Portability: Sits comfortably within your nursing bra, allowing for pumping anytime, anywhere.
- Quality Materials: Made from easy-to-wash, BPA-free silicone. Each milk chamber holds up to 6 fl oz (180ml).
- Fast Charging & Long Battery Life: A 2-hour charge provides up to 12 expressions.
- Smart LCD Display: Easy navigation through modes day or night, even in dark rooms.
- Automatic Shutdown: An auto 20-minute shutdown feature conserves power.

Image: Woman using the KeaBabies Pulse S10 Pro breast pumps, highlighting the 9 suction intensity levels.
2. Product Components
Your KeaBabies Pulse S10 Pro package includes the following components:
- 2 x Pulse Cores (Motor Units)
- 2 x Milk Chambers (6 fl oz / 180ml capacity each)
- 2 x Flanges (24mm standard size)
- 2 x Connectors
- 2 x Membranes
- 4 x Valves
- 6 x Silicone Seal Rings
- 2 x Bra Adjustment Buckles
- 2 x USB Charging Cables

Image: All included components of the KeaBabies Pulse S10 Pro.
3. Setup and Assembly
Before first use and after each use, ensure all parts that come into contact with breast milk are cleaned and sterilized. Refer to the 'Cleaning and Maintenance' section for detailed instructions.
3.1 Assembly Steps:
- Insert the valve into the bottom of the connector.
- Place the membrane securely onto the top of the connector.
- Attach the assembled connector with valve and membrane to the flange. Ensure a tight seal.
- Connect the assembled flange unit to the milk chamber.
- Finally, attach the pulse core (motor unit) to the top of the milk chamber, ensuring it is firmly seated.
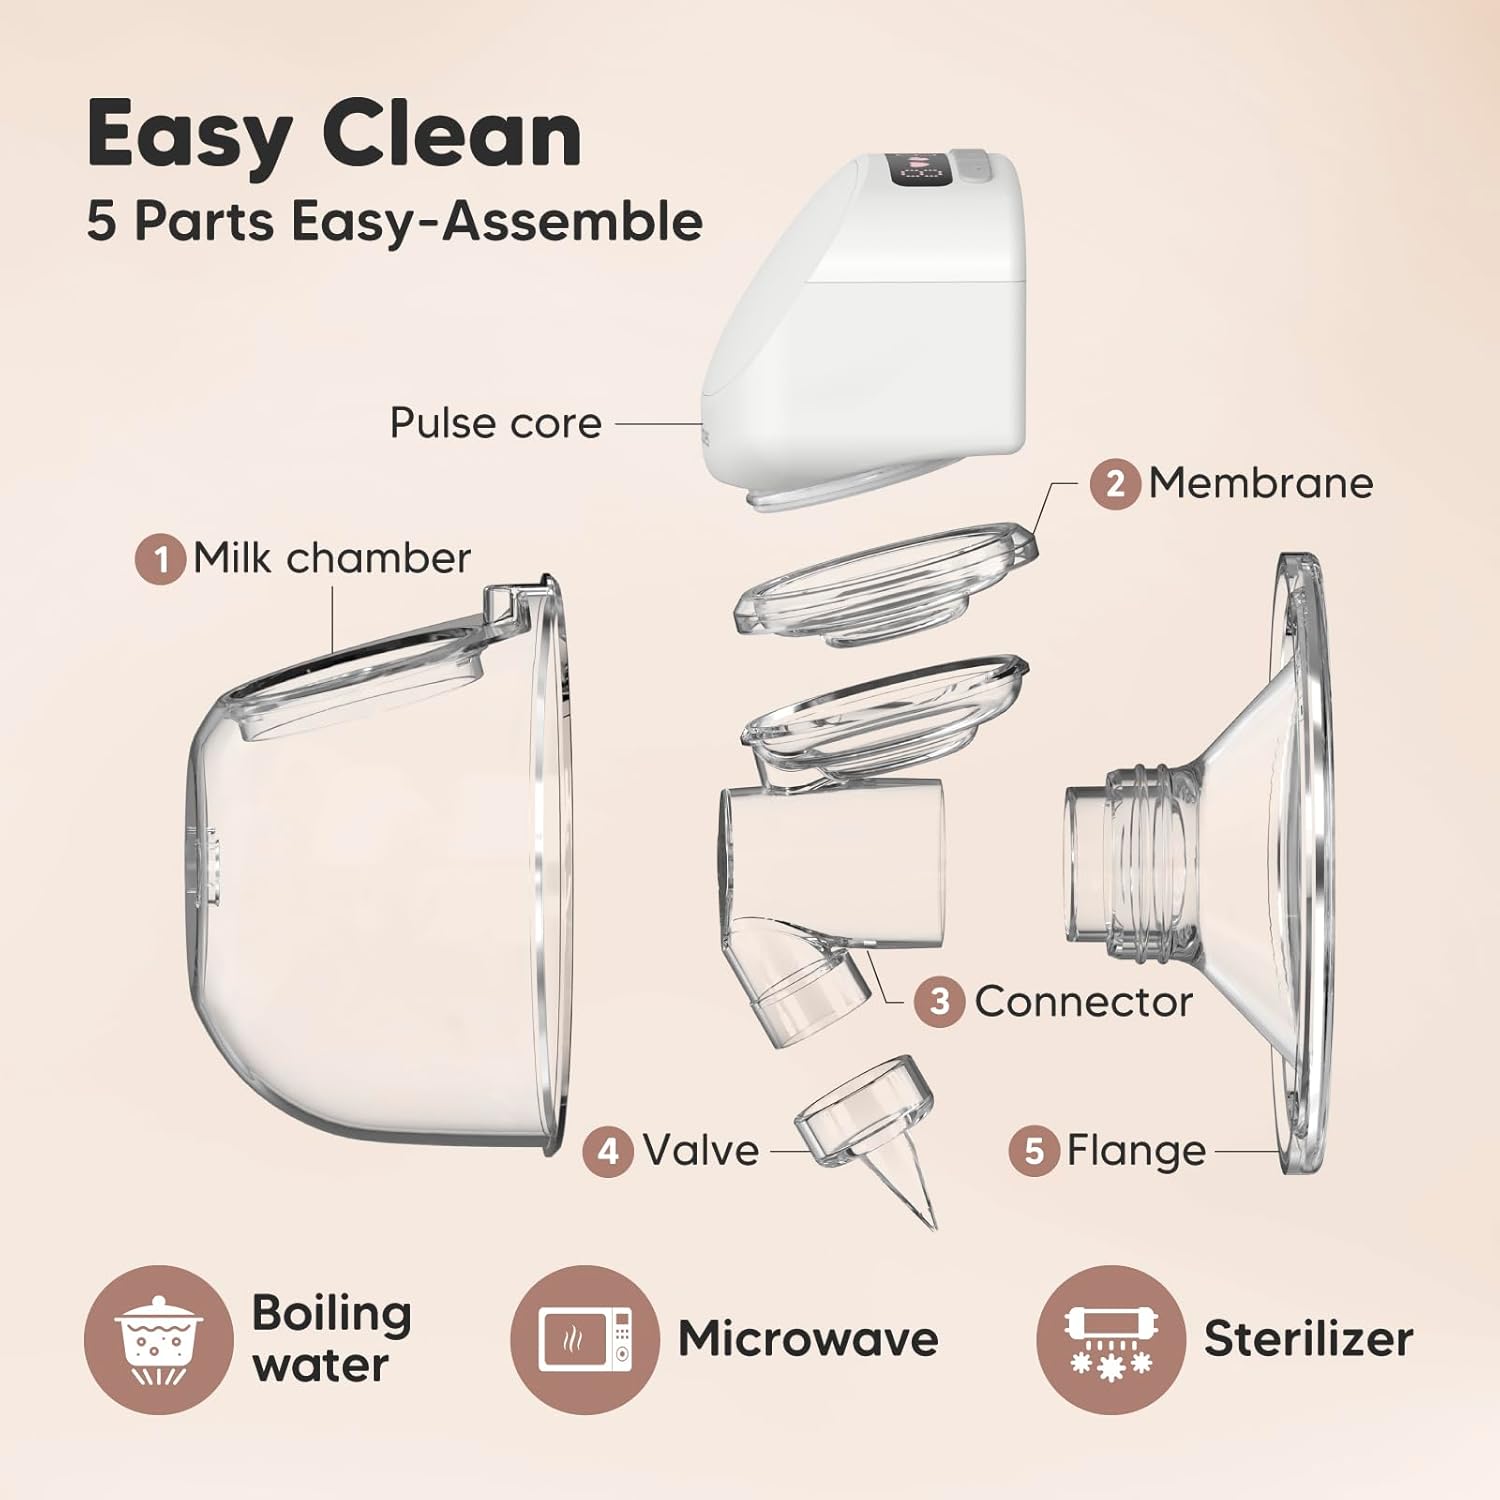
Image: Exploded view of the pump components for easy assembly.
3.2 Flange Sizing:
Correct flange sizing is crucial for comfort and efficient milk expression. Use the guide below to determine your appropriate flange size. The KeaBabies Pulse S10 Pro comes with 24mm flanges. Other sizes may be purchased separately.

Image: Guide for choosing the correct flange size based on nipple measurement.
3.3 Charging the Pump:
Connect the provided USB charging cable to the pulse core and a suitable USB power adapter (not included). A full charge takes approximately 2 hours and provides power for up to 12 pumping sessions.
Video: Official KeaBabies video demonstrating the assembly, usage, and cleaning of the wearable breast pump.
4. Operating Instructions
The KeaBabies Pulse S10 Pro features a smart LCD display and multiple modes to customize your pumping experience.
4.1 Understanding the LCD Display:

Image: Detailed view of the LCD display and control buttons.
- Power Button (6): Press and hold to turn the pump on or off.
- Mode Selection Button (7): Press to cycle through Stimulation, Expression, and Dual modes.
- Intensity Level Up/Down Buttons (8, 9): Adjust suction intensity from level 1 to 9.
- Time (4): Displays the duration of the current pumping session.
- Battery Level (5): Indicates remaining battery charge.
4.2 Pumping Modes:
The pump offers three distinct modes, each with 9 adjustable intensity levels:

Image: Explanation of the three pumping modes and their functions.
- Stimulation Mode: Provides a gentle massage to help initiate milk flow.
- Expression Mode: Uses deep pulse suction to maximize milk expression once milk flow has started.
- Dual Mode: Combines massage and pumping rhythms for effective lactation.
4.3 Pumping Session:
- Ensure the pump is fully charged and assembled correctly.
- Place the assembled pump securely inside your nursing bra, ensuring the flange is centered on your nipple.
- Press and hold the Power button to turn on the pump.
- Select your desired mode (Stimulation, Expression, or Dual) using the Mode button.
- Adjust the suction intensity to a comfortable yet effective level using the Up/Down buttons.
- The pump will automatically shut off after 20 minutes. You can manually stop it at any time by pressing the Power button.
- After pumping, carefully remove the pump from your bra. Detach the pulse core and pour the expressed milk into a storage bag or bottle.
5. Cleaning and Maintenance
Proper cleaning and maintenance are essential for hygiene and the longevity of your breast pump. All parts that come into contact with breast milk are made from BPA-free silicone and are easy to clean.
5.1 Disassembly:
Carefully disassemble all parts of the pump: separate the pulse core, milk chamber, flange, connector, membrane, and valve.
5.2 Cleaning:
- Rinse all disassembled parts immediately after use with cold water to remove milk residue.
- Wash parts in warm, soapy water using a dedicated brush.
- Rinse thoroughly with clean water.
5.3 Sterilization:
The pump parts (excluding the pulse core) can be sterilized using:
- Boiling Water: Place parts in boiling water for 5 minutes.
- Microwave Sterilizer: Follow the manufacturer's instructions for your microwave sterilizer.
- Electric Sterilizer: Follow the manufacturer's instructions for your electric sterilizer.
Do not wash or sterilize the pulse core (motor unit). Wipe it clean with a damp cloth if necessary.
5.4 Drying and Storage:
Allow all parts to air dry completely on a clean surface or drying rack before reassembling or storing. Store the pump in a clean, dry place away from direct sunlight.
6. Troubleshooting
If you encounter issues with your KeaBabies Pulse S10 Pro, please refer to the following common solutions:
| Problem | Possible Cause | Solution |
|---|---|---|
| No suction or weak suction | Improper assembly, damaged valve/membrane, low battery. | Check all parts are assembled correctly and securely. Inspect valve and membrane for tears or damage; replace if necessary. Ensure pump is fully charged. |
| Low milk output | Incorrect flange size, insufficient stimulation, stress, low battery. | Verify correct flange size (refer to Section 3.2). Try Stimulation mode first. Ensure you are relaxed. Fully charge the pump. |
| Pump not turning on | Low or depleted battery. | Charge the pump for at least 2 hours. |
| Leakage during pumping | Improper assembly, incorrect flange size, bending over. | Ensure all parts are securely connected. Check flange fit. Avoid bending forward excessively while pumping. |
If the issue persists after attempting these solutions, please contact customer support.
7. Specifications
| Feature | Detail |
|---|---|
| Product Dimensions | 4.3 x 3 x 5.6 inches (10.9 x 7.6 x 14.2 cm) |
| Item Weight | 1.72 Pounds (0.78 Kilograms) |
| Model Number | Pulse S10 Pro |
| Batteries | 2 Lithium Polymer batteries required (included) |
| Material Type | Silicone |
| Unit Count | 2.00 Count (Two pumps included) |
| Additional Features | Double Pump, Hands Free Usage, Portable, Smart Display, Wearable |
| Dishwasher Safe | Yes (for non-electrical parts) |
8. Warranty and Support
8.1 Warranty Information:
The KeaBabies Pulse S10 Pro comes with a 365-Day Pulse Core Warranty. This warranty covers manufacturing defects in the pulse core (motor unit) for one year from the date of purchase. Please retain your proof of purchase for warranty claims.
8.2 Customer Support:
For any questions, concerns, or warranty claims, please contact KeaBabies customer support through their official website or the retailer where the product was purchased. Provide your product model and purchase details for efficient assistance.