1. Introduction
This manual provides detailed instructions for the installation, operation, and maintenance of the EVURU Single Phase LCD Digital Energy Meter, Model DDS662 (110V). This device is designed to accurately measure and display electrical energy consumption (kWh), voltage, current, and power in single-phase AC circuits. Please read this manual thoroughly before installation and use to ensure safe and efficient operation.
2. Safety Information
WARNING:
Electrical installation should only be performed by qualified personnel. Failure to follow these instructions may result in electric shock, fire, or serious injury.
- Always disconnect power before installing or servicing the meter.
- Ensure all wiring connections are secure and correct according to the wiring diagram.
- Do not operate the meter in environments exceeding its specified temperature and humidity ranges.
- Do not attempt to open or repair the meter. Refer all servicing to qualified personnel.
- This meter is designed for indoor use in a dry environment.
3. Product Overview
The EVURU DDS662 is a compact, single-phase digital energy meter featuring an LCD display. It is designed for DIN rail mounting and provides accurate measurements of various electrical parameters.
Key Features:
- LCD display with backlight for clear readings.
- Measures total Energy (kWh), temporary Energy (kWh), real Voltage, real Current, and real Power.
- Pulse LED indicator for meter operation.
- 35mm DIN rail installation.
- Temporary kWh reset function.

Image 3.1: Overview of DDS662, DDS667, and DDS668 models, showing their LCD displays and basic information. The DDS662 model is on the left.
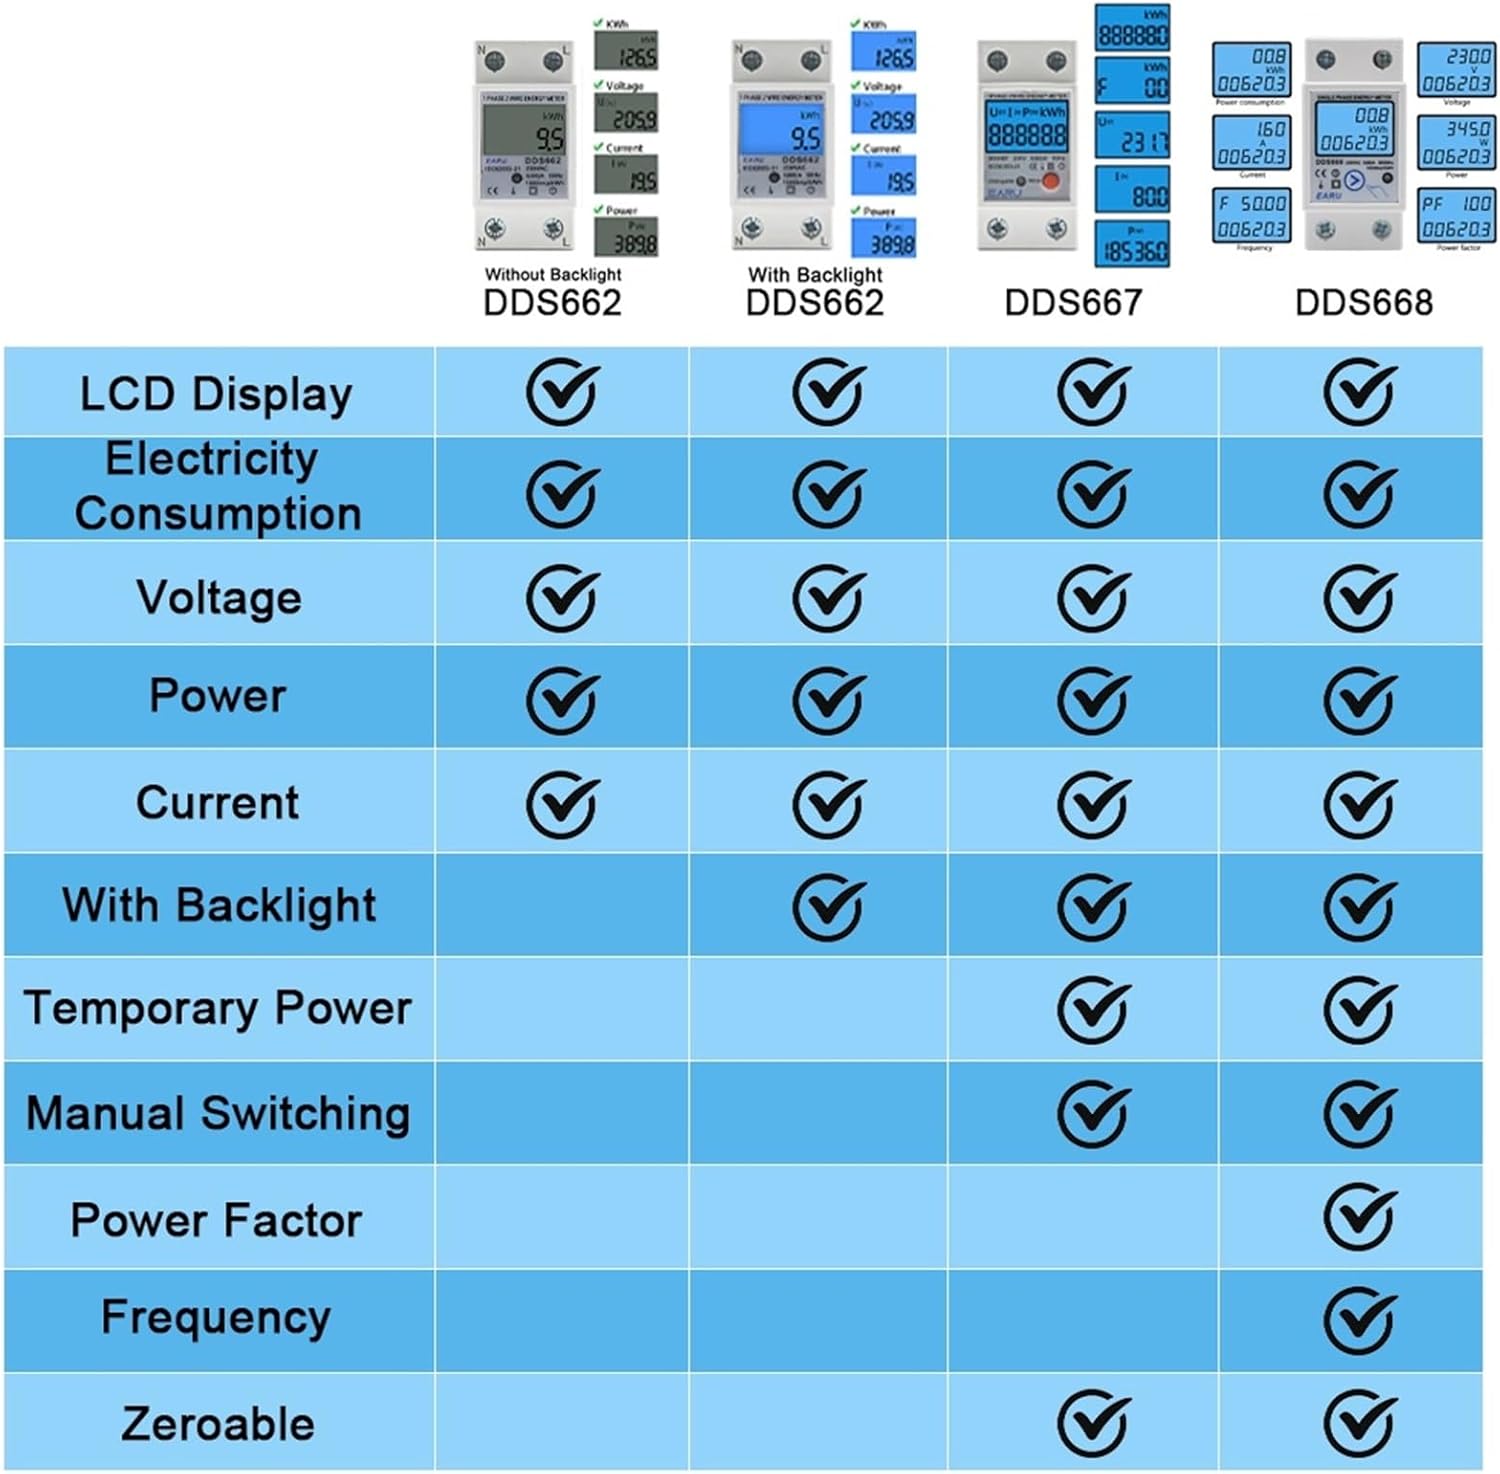
Image 3.2: Feature comparison table highlighting capabilities like LCD display, electricity consumption, voltage, power, current, backlight, temporary power, manual switching, power factor, frequency, and zeroable functions across DDS662, DDS667, and DDS668 models.
4. Specifications
| Parameter | Value |
|---|---|
| Model | DDS662 |
| AC Voltage | 110V (also available in 230V variants) |
| Maximum Current | 80A |
| Load | 0.05Ib-Imax |
| Pulse Frequency | 1000imp / kWh |
| Installation | 35mm DIN Rail |
| Ambient Temperature | -35°C to +65°C |
| Relative Humidity | No more than 95% |
| Measuring Range | Functional Loss at 50Hz or 60Hz Rated Frequency |
| Item Weight | Approximately 0.035 ounces (unit weight may vary) |

Image 4.1: Detailed dimensions (36mm width, 78.5mm height, 45mm depth, 65.8mm height from rail) and a parameter table for DDS667/DDS668, which are largely applicable to the DDS662 model.
5. Installation
The EVURU DDS662 energy meter is designed for 35mm DIN rail mounting. Ensure power is disconnected before proceeding with installation.
5.1 Mounting on DIN Rail
- Locate a suitable 35mm DIN rail within your electrical panel.
- Align the meter's mounting clips with the DIN rail.
- Press the meter firmly onto the rail until it clicks into place. Ensure it is securely fastened.

Image 5.1: The DDS662 meter shown securely mounted on a standard 35mm DIN rail, illustrating the ease of installation.
5.2 Wiring Connections
The DDS662 meter supports two primary wiring modes. Always refer to the diagram and ensure correct polarity (Neutral 'N' and Live 'L').
- Mode 1: Upper Input, Lower Output - Power enters the top terminals and exits the bottom terminals.
- Mode 2: Lower Input, Upper Output - Power enters the bottom terminals and exits the top terminals.
For the DDS662, the standard wiring is typically upper input and lower output, as depicted in the product images. Connect the Neutral (N) and Live (L) wires from your power source to the input terminals, and connect your load to the output terminals.
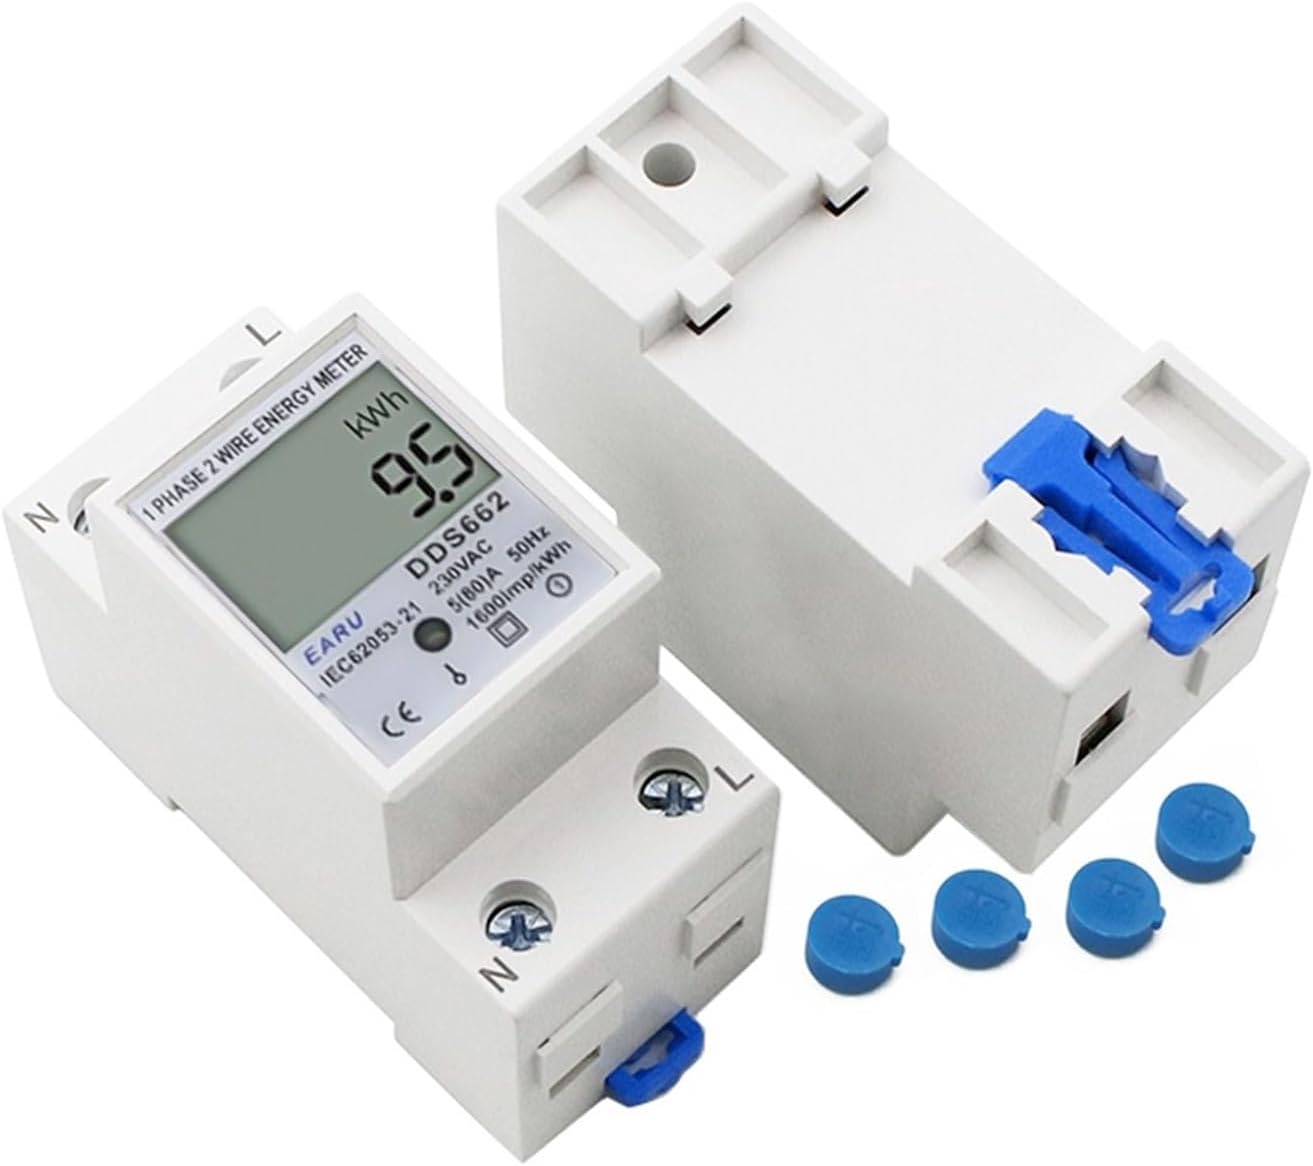
Image 5.2: A close-up view of the DDS662 meter, showing the input/output terminals labeled 'N' and 'L', along with protective caps for unused terminals.

Image 5.3: Wiring methods for similar models (DDS667 and DDS668), demonstrating the two common wiring configurations: upper input/lower output and lower input/upper output. The DDS662 follows similar principles.
After wiring, ensure all terminal screws are tightened to prevent loose connections and potential hazards. Replace any protective terminal caps if provided.
6. Operating Instructions
Once installed and powered, the meter will automatically begin measuring. The LCD display shows various parameters which can be cycled through.
6.1 Display Functions
The meter is designed to display the following parameters:
- Total Energy (kWh): This value accumulates and cannot be reset.
- Temporary Energy (kWh): This value can be reset to zero.
- Real Voltage (V): Instantaneous voltage reading.
- Real Current (A): Instantaneous current reading.
- Real Power (W): Instantaneous power reading.
The pulse LED will flash to indicate the meter is actively measuring energy consumption.
6.2 Resetting Temporary kWh
To reset the temporary kWh reading to zero:
- Locate the "PRESS" button on the front of the meter (if applicable for DDS662, some models like DDS667 have it). For DDS662, manual switching between parameters is typically automatic or via a hidden button if present. The product description states "manual pressing" for display, and "Hold the button for 6 seconds to Reset the temporary kWh". If no visible button, it might be an internal or less obvious control. Assuming a button exists for this function.
- Press and hold the button for approximately 6 seconds.
- The temporary kWh value will reset to 0.0.
Note: The total kWh value cannot be reset.
7. Maintenance
The EVURU DDS662 energy meter requires minimal maintenance.
- Keep the meter clean and free from dust. Use a soft, dry cloth for cleaning. Do not use abrasive cleaners or solvents.
- Periodically check wiring connections to ensure they remain tight and secure.
- Ensure the operating environment remains within the specified temperature and humidity ranges.
- Do not expose the meter to direct sunlight or extreme heat sources.
8. Troubleshooting
| Problem | Possible Cause | Solution |
|---|---|---|
| Meter display is blank. | No power supply; incorrect wiring. | Check power source. Verify wiring connections according to the diagram. |
| Readings are incorrect or erratic. | Loose wiring connections; meter fault; incorrect voltage/current for meter model. | Ensure all wires are securely connected. Verify the meter model matches your electrical system (110V). If problem persists, contact support. |
| Pulse LED not flashing. | No load connected; meter fault. | Ensure there is an active electrical load connected and drawing power. If load is present and LED still not flashing, contact support. |
| Cannot reset temporary kWh. | Button not held long enough; meter fault. | Ensure the button is held for the full 6 seconds. Confirm you are attempting to reset the temporary kWh, not the total kWh. |
9. Warranty and Support
EVURU products are manufactured to high-quality standards. For warranty information and technical support, please refer to the documentation provided with your purchase or contact your retailer. Keep your purchase receipt as proof of purchase.
For further assistance, please visit the EVURU official website or contact their customer service department.