1. Product Overview
The BT100 100cc complete 2-stroke engine kit is designed for motorized bicycles. It features a single-piece cylinder with open transfer ports, a silver metallic enamel finish, and is engineered for performance. This kit includes all necessary components for assembly onto a compatible bicycle frame.
2. What's Included
The BT Super Sport Complete 100cc Motorized Bicycle Engine Kit includes the following components:
- 100cc BT engine (78.6cc actual) with 3 HP+ average power.
- Three-ring piston with low wrist pin and short connecting rod.
- Open transfer port single-piece cylinder.
- Large 45mm exhaust port.
- Standard NT racing carburetor.
- Chrome muffler with clamps and copper gasket.
- Standard CDI and spark plug.
- 2-liter black teardrop fuel tank with mounting hardware, fuel cap, fuel valve, inline fuel filter, and fuel line.
- Twist throttle with kill switch, matching left grip, and gooseneck style throttle cable.
- Quick release push-button clutch lever with clutch cable.
- 44-tooth rear drive sprocket (36-tooth available upon request) with standard rear wheel installation kit.
- 415 Heavy duty chain, chain guard, and ball bearing chain tensioner.
- Large front mount for bicycles with large down tubes.
3. Setup and Installation
Follow these steps for proper installation of your motorized bicycle engine kit. For a visual guide, refer to the installation video below.
Video Description: This video provides a comprehensive step-by-step guide for installing the motorized bicycle engine kit, covering all major components and assembly procedures.
Step 1: Install The Sprocket
Begin by installing the rear drive sprocket onto the bicycle's rear wheel. Ensure all mounting hardware is securely fastened.

Image Description: Various components for sprocket installation, including bolts, washers, and specialized tools, laid out on a grey surface.

Image Description: A person's hands are shown attaching the large drive sprocket to the spokes of a bicycle's rear wheel, using mounting plates and bolts.
Step 2: Installation of Engine and Carburetor
Mount the 100cc engine securely to the bicycle frame using the provided front mount. Install the spark plug and attach the carburetor to the engine intake, ensuring all connections are tight.
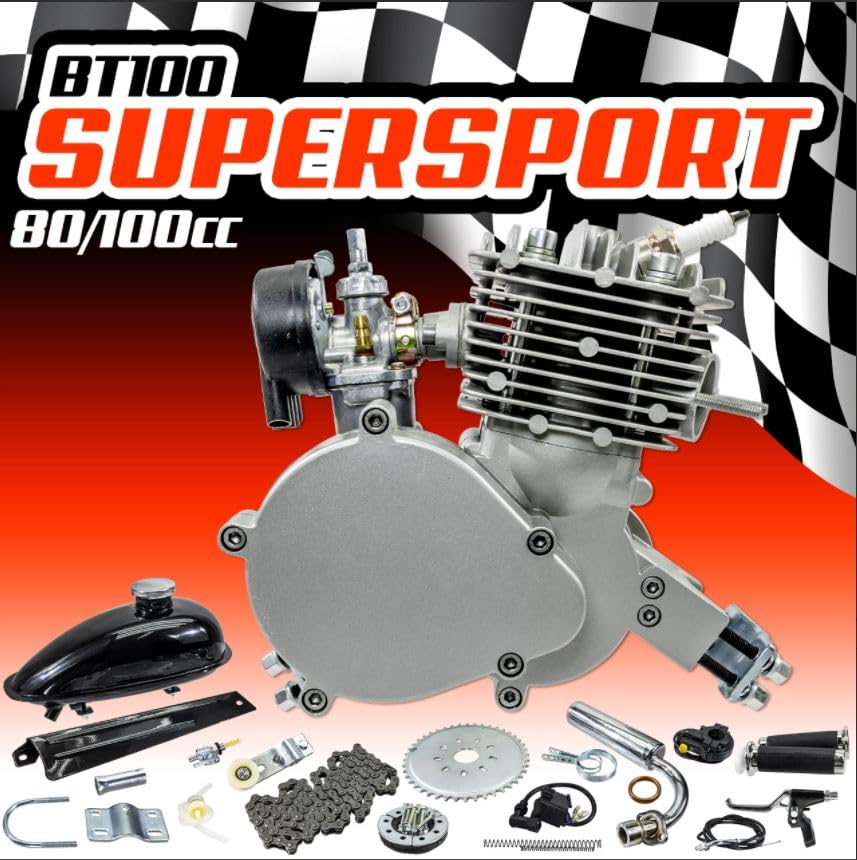
Image Description: A complete view of the BT100 100cc motorized bicycle engine kit, showcasing the engine block, cylinder head with spark plug, and various connections.

Image Description: A close-up view of the engine's cylinder head, highlighting the spark plug and cooling fins.
Step 3: Installation of Chain
Install the heavy-duty chain, connecting the engine's drive sprocket to the rear wheel sprocket. Adjust the chain tensioner for optimal chain slack.
Step 4: Installation of The Throttle Handle
Attach the twist throttle with kill switch to the bicycle handlebars. Route the throttle cable to the carburetor and ensure smooth operation.
Step 5: Installation of Clutch Lever and Clutch Cable
Mount the quick-release push-button clutch lever on the handlebars. Connect the clutch cable to the engine's clutch mechanism and adjust for proper engagement and disengagement.
Step 6: Installing The Ignition
Connect the CDI unit and spark plug wire to the engine and secure the CDI unit to the bicycle frame. Ensure all electrical connections are firm.
Step 7: Installation of Fuel Tank/Exhaust/Chain Cover
Install the fuel tank onto the bicycle frame, connecting the fuel line with the inline fuel filter to the carburetor. Attach the chrome muffler to the exhaust port and install the chain guard.
4. Operating Instructions
Recommended Break-In Procedures
Proper engine break-in is crucial for longevity and performance. Follow these guidelines:
- Always use professional synthetic 2-stroke oil.
- Maintain the correct fuel-to-oil mixture ratio:
- 0-50 miles: 8 oz of oil per gallon of fuel.
- 50-100 miles: 6 oz of oil per gallon of fuel.
- ≥100 miles: 4 oz of oil per gallon of fuel.
- Regularly check the color of the spark plug electrode to ensure the correct mixture ratio:
- Black electrode: Indicates too much engine oil; decrease the mixture ratio.
- Off-white electrode: Indicates insufficient engine oil; increase the mixture ratio.
5. Maintenance
Regular maintenance ensures optimal performance and extends the life of your engine kit. Key maintenance tasks include:
- Spark Plug Inspection: Periodically check the spark plug for wear and proper gap. Replace as needed.
- Fuel Filter: Inspect and clean or replace the inline fuel filter to prevent fuel delivery issues.
- Chain Tension: Ensure the drive chain has proper tension to prevent slippage or excessive wear. Adjust the chain tensioner as necessary.
- Fastener Checks: Regularly inspect all bolts and nuts for tightness, especially after initial rides.
6. Troubleshooting
If you encounter issues with your motorized bicycle engine kit, consider the following common troubleshooting steps:
- Engine Not Starting: Check fuel level, spark plug condition, and ignition connections. Ensure the kill switch is in the 'run' position.
- Loss of Power: Verify the fuel-to-oil mixture ratio, inspect the carburetor for blockages, and check the exhaust for restrictions.
- Excessive Smoke: Often indicates an incorrect fuel-to-oil mixture (too much oil). Adjust the ratio according to break-in procedures.
- Unusual Noises: Investigate for loose components, chain issues, or internal engine problems. Discontinue use if severe.
7. Specifications
| Feature | Detail |
|---|---|
| Brand Name | Generic |
| Model Name | BT100 |
| Engine Type | 100cc 2-Stroke |
| Actual Displacement | 78.6cc |
| Horsepower | 3 HP+ |
| Bore and Stroke | 50mm x 40mm |
| Piston Type | Three Ring Piston |
| Cylinder Type | Single piece with Open Transfer Port |
| Exhaust Port Size | 45mm |
| Carburetor | Standard NT Racing Carburetor |
| Muffler | Chrome |
| Fuel Tank Capacity | 2 Liters |
| Sprocket Size | 44 tooth (36 tooth optional) |
| Chain Type | 415 Heavy Duty |
| Material | Aluminum |
| Color | Silver |
8. Warranty and Support
This product comes with a 30-day warranty from the date of purchase. For any support inquiries or warranty claims, please contact the seller directly.


