1. Product Overview
The KEZERS KL-1D Laser Level Receiver is designed to detect green and red pulsing line laser beams, enhancing visibility and accuracy in various working conditions. It features dual-sided level bubbles and LCD displays for precise leveling and easy readout.

Image 1.1: Front and back view of the KEZERS KL-1D Laser Level Receiver with key components labeled, including the sensing window, magnets, power indicator, built-in bubbles, ON/OFF sound switch, buzzer indicator, middle datum slot, front datum line, back datum line, 1/4"-20 thread mount, and battery compartment. An adjustable clamp is also shown.
2. Package Contents
Verify that all items listed below are included in your package:
- 1 x KL-1D Laser Level Receiver
- 1 x Clamp
- 2 x AAA 1.5V Batteries
- 1 x User Manual

Image 2.1: The complete package contents, including the KL-1D receiver, adjustable bracket (clamp), two AAA 1.5V batteries, and the user manual.
3. Key Features
- Red and Green Pulse Laser Compatibility: Detects both red and green pulsed laser beams.
- Extended Working Range: Detects laser beams up to 200 feet (60 meters) in various lighting conditions.
- Dual-Sided Level Bubbles: Features level bubbles on both the front and top for enhanced accuracy.
- Multiple Mounting Options: Includes double-sided magnets for attachment to metal surfaces and a 1/4" thread for tripod mounting. A heavy-duty clamp is also provided for attaching to grade rods or poles.
- Two-Sided LCD Display: Equipped with smart LCD displays on the front and back for clear visual readouts.
- Audible Signals: Provides sound signals to quickly locate the laser plane.
- Long Battery Life: Operates for up to 20 hours with the included 2 AAA batteries.
- Automatic Power-Off: Powers off automatically after 10 minutes of no signal detection to conserve battery life.
4. Setup
4.1 Battery Installation
- Locate the battery compartment on the back of the receiver (refer to Image 1.1).
- Open the battery compartment cover.
- Insert the two AAA 1.5V batteries, ensuring correct polarity (+/-).
- Close the battery compartment cover securely.
4.2 Powering On
Press the power button to turn on the receiver. The power indicator light will illuminate.
4.3 Compatibility Note
For proper operation, ensure that your laser level is set to pulse mode and has a frequency of 10K. The KEZERS KL-1D receiver may not be compatible with laser levels that do not meet these specifications.
5. Operating Instructions
5.1 Detecting Laser Beams
When working with the receiver, ensure your laser level is in pulse mode. Position the receiver so that the sensing window faces the laser beam. The receiver will detect the laser line and provide visual and audible feedback.

Image 5.1: The KEZERS KL-1D receiver detecting a laser line from a laser level, illustrating its working distance of 2-60 meters (6-200 feet).
5.2 Interpreting LCD Displays and Indicators
The KL-1D receiver features two LCD displays (front and back) and LED indicators to guide you to the laser line.

Image 5.2: The front and back LCD displays of the receiver, showing visual indicators for laser detection.
The LED indicators and LCD arrows will show whether the receiver needs to be moved up or down to align with the laser line. When the receiver is perfectly aligned, the central indicator will light up green, and a steady beep will sound.

Image 5.3: Illustration of precise optical signals. If the datum is lower than the laser line, move up. If the datum is higher, move down. When in line, the LED indicator is green.
5.3 Audible Signals
The receiver provides audible beeps to assist in locating the laser plane, especially in conditions where the visual display might be difficult to see. A continuous beep indicates that the receiver is aligned with the laser line.

Image 5.4: The receiver's 90dB buzzer provides clear audible signals for easy identification, even in noisy environments. Long press the ON/OFF sound switch to adjust buzzer volume (Loud/Soft/Mute).
5.4 Using Level Bubbles
The integrated dual-sided level bubbles (front and top) assist in ensuring the receiver is held perfectly level or plumb for accurate measurements.
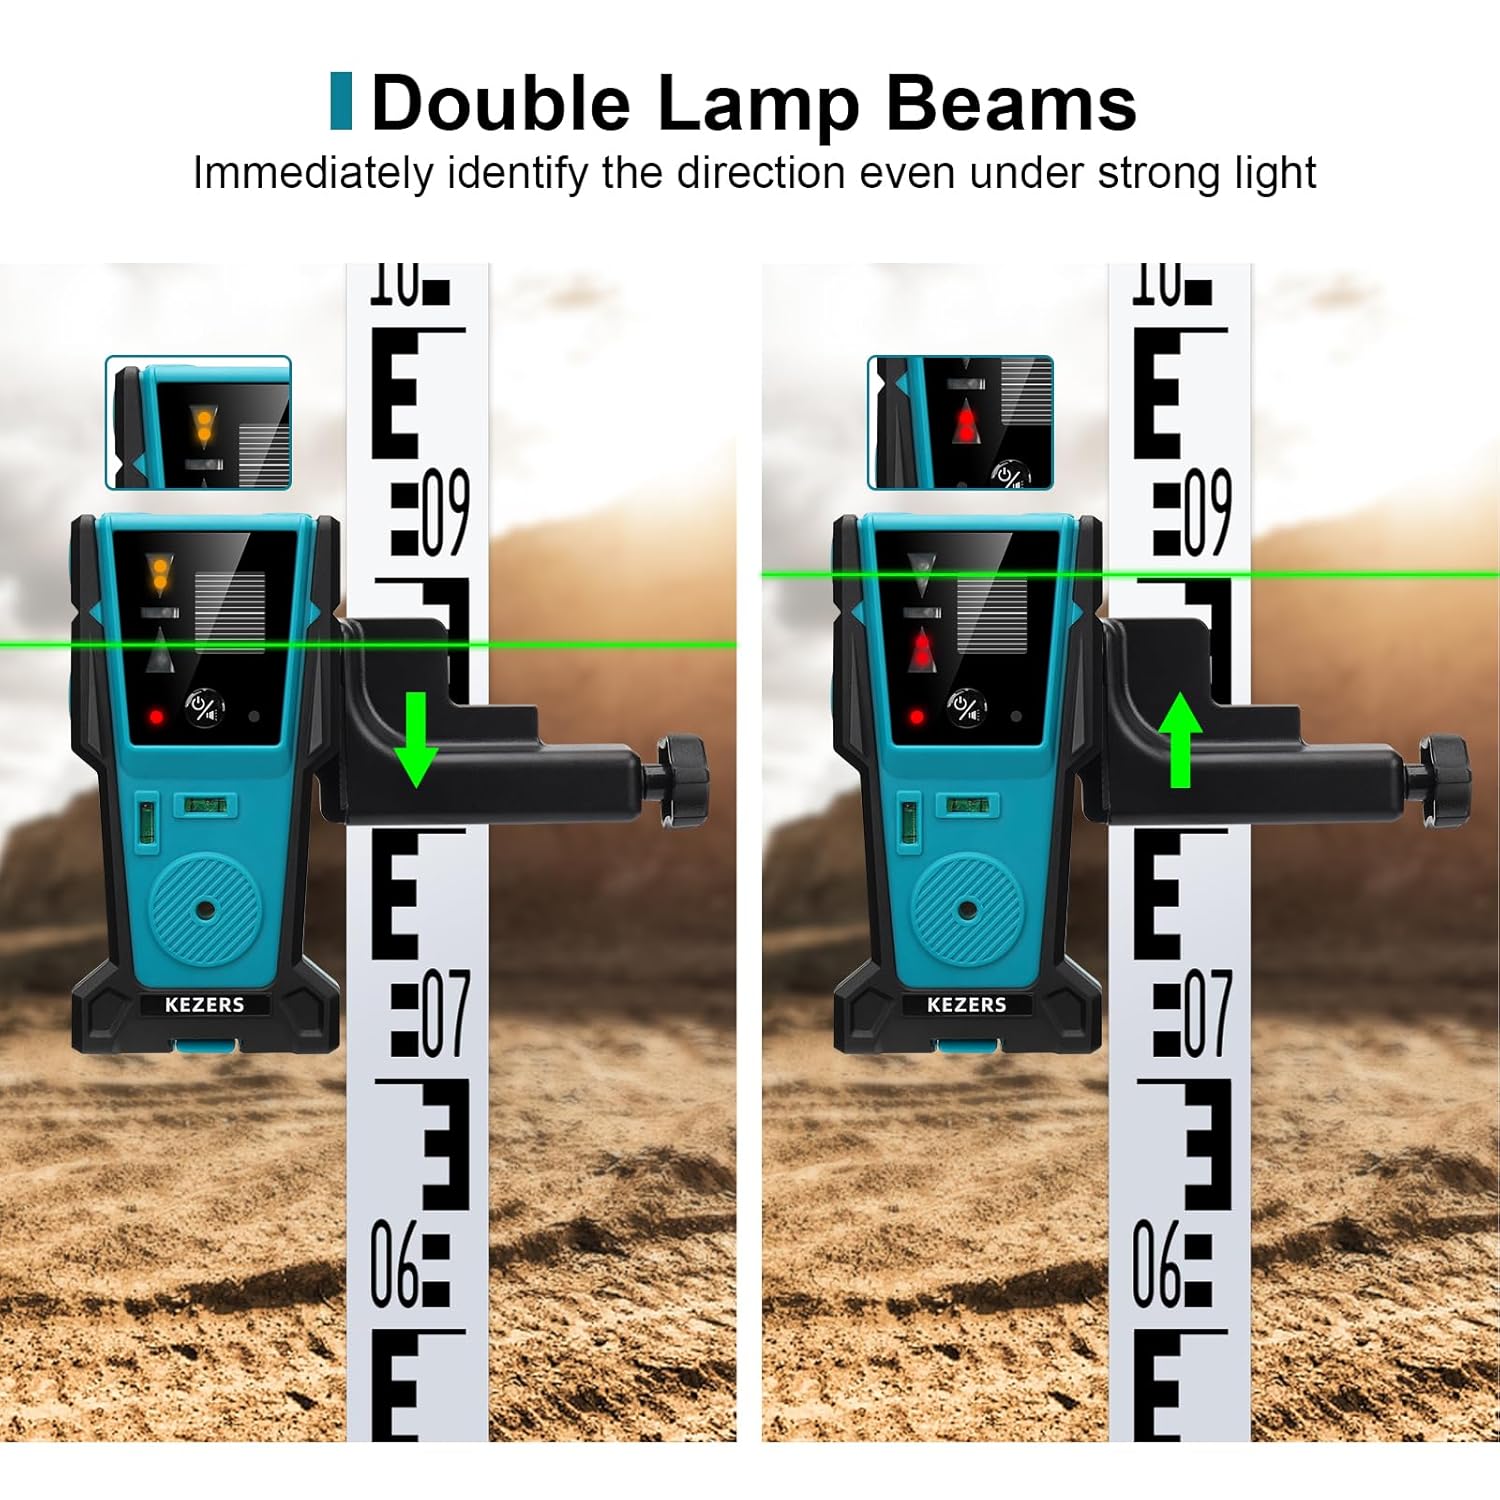
Image 5.5: The receiver indicating the direction of the laser line using double lamp beams, useful for immediate identification even under strong light.
6. Mounting Methods
The KEZERS KL-1D receiver offers versatile mounting options:
- Magnetic Attachment: Double-sided magnets allow for secure attachment to ceiling tracks or steel studs.
- Tripod Mounting: A 1/4" thread at the bottom enables mounting on a standard tripod.
- Clamp Attachment: Use the included heavy-duty clamp to attach the receiver to a grade stick or other target points.

Image 6.1: Illustrations of multiple mounting methods: magnetic attachment to a pole or ceiling, attachment to a grade stick with the clamp, and mounting on a tripod using the 1/4" thread.
7. Maintenance
7.1 Cleaning
Wipe the receiver with a soft, dry cloth. Do not use abrasive cleaners or solvents, as they may damage the casing or sensing window.
7.2 Battery Replacement
Replace the AAA batteries when the low battery indicator appears or when the receiver fails to power on. Always use fresh, high-quality batteries.
7.3 Storage
Store the receiver in a dry, cool place away from direct sunlight and extreme temperatures when not in use for extended periods. Remove batteries if storing for several months.
8. Troubleshooting
8.1 Receiver Not Detecting Laser
- Check Laser Level Mode: Ensure your laser level is set to pulse mode.
- Verify Laser Frequency: Confirm that your laser level operates at a 10K frequency. Incompatible frequencies will prevent detection.
- Battery Check: Ensure batteries are correctly installed and have sufficient charge. Replace if necessary.
- Obstructions: Ensure there are no obstructions between the laser level and the receiver's sensing window.
- Distance: Confirm the receiver is within the operational range of 2-60 meters (6-200 feet) from the laser level.
8.2 No Audible Signal
- Buzzer Status: Check if the buzzer has been muted. Long press the ON/OFF sound switch to cycle through volume settings (Loud/Soft/Mute).
- Laser Detection: Ensure the receiver is actively detecting the laser line. The buzzer only sounds when a laser is detected.
9. Specifications
| Feature | Specification |
|---|---|
| Brand | KEZERS |
| Model Number | KL-1D (FD30) |
| Material | Metal, Plastic |
| Color | Green, Red (for laser detection) |
| Operation Mode | Automatic |
| Laser Class | Class 2 (IEC/EN60825-1/2014) <1mW power output |
| Detection Range | Up to 200 feet (60 meters) |
| Power Source | 2 x AAA 1.5V batteries |
| Working Time | Up to 20 hours (continuous use) |
| Automatic Shut-off | After 10 minutes of no signal detection |
| Product Dimensions | 17.2 x 9.3 x 0.25 cm |
| Item Weight | 272 g |
10. Important Compatibility Notes
The KEZERS KL-1D Laser Level Receiver is specifically designed to work with pulsing line lasers. For optimal performance and compatibility, it is crucial that the laser level you are using:
- Is capable of emitting a pulsing laser beam.
- Operates at a laser frequency of 10K.
Using the receiver with laser levels that do not meet these frequency requirements may result in inaccurate detection or no detection at all. While designed to work with KEZERS Laser Level series, compatibility with other brands is dependent on these specific technical parameters.