Introduction
Thank you for choosing the Timegyro Digital LED Alarm Clock CRS13. This battery-powered alarm clock is designed for convenience and clarity, offering both LED and LCD display options, adjustable brightness, and essential features like time, date, temperature display, and an alarm with snooze function. Please read this manual carefully to ensure proper use and optimal performance of your new clock.

Image: The Timegyro Digital LED Alarm Clock CRS13 on a nightstand, highlighting its compact dimensions (5 inches wide, 3 inches high, 1.6 inches deep) and key functionalities through icons.
Product Features
- Battery Powered: Operates solely on 2 or 4 AA batteries (not included), providing portability and eliminating cord clutter.
- Switchable LED/LCD Display: Manually switch between LED and LCD display modes. The LED display offers two brightness levels (Low-High) and an AUTO option that automatically switches from LED to LCD between 8:00 PM and 6:00 AM.
- Detailed LCD Information: While the LED display shows only the time, the LCD display provides comprehensive information including time, month, day, and indoor temperature.
- Adjustable Temperature Units: Easily switch between Celsius (°C) and Fahrenheit (°F) temperature display.
- Bedroom Alarm with Snooze: Features a daily alarm with an automatic snooze function. The alarm sounds for 90 seconds, and the snooze interval is 7 minutes, repeating up to 3 times.
- 12/24 Hour Format: Select between 12-hour (with AM/PM indicator) and 24-hour (military) time formats.
- Clear and Concise Display: Both display modes offer a neat and clean presentation, ensuring time is visible at a glance from various angles.
Package Contents
- 1 x Timegyro Digital LED Alarm Clock CRS13
- 1 x User Manual
Note: AA batteries are not included and must be purchased separately.
Setup
1. Battery Installation
- Locate the battery compartment on the back of the clock.
- Open the battery compartment cover.
- Insert 2 or 4 new AA batteries, ensuring correct polarity (+/-). For extended battery life, 4 AA batteries are recommended.
- Close the battery compartment cover securely.
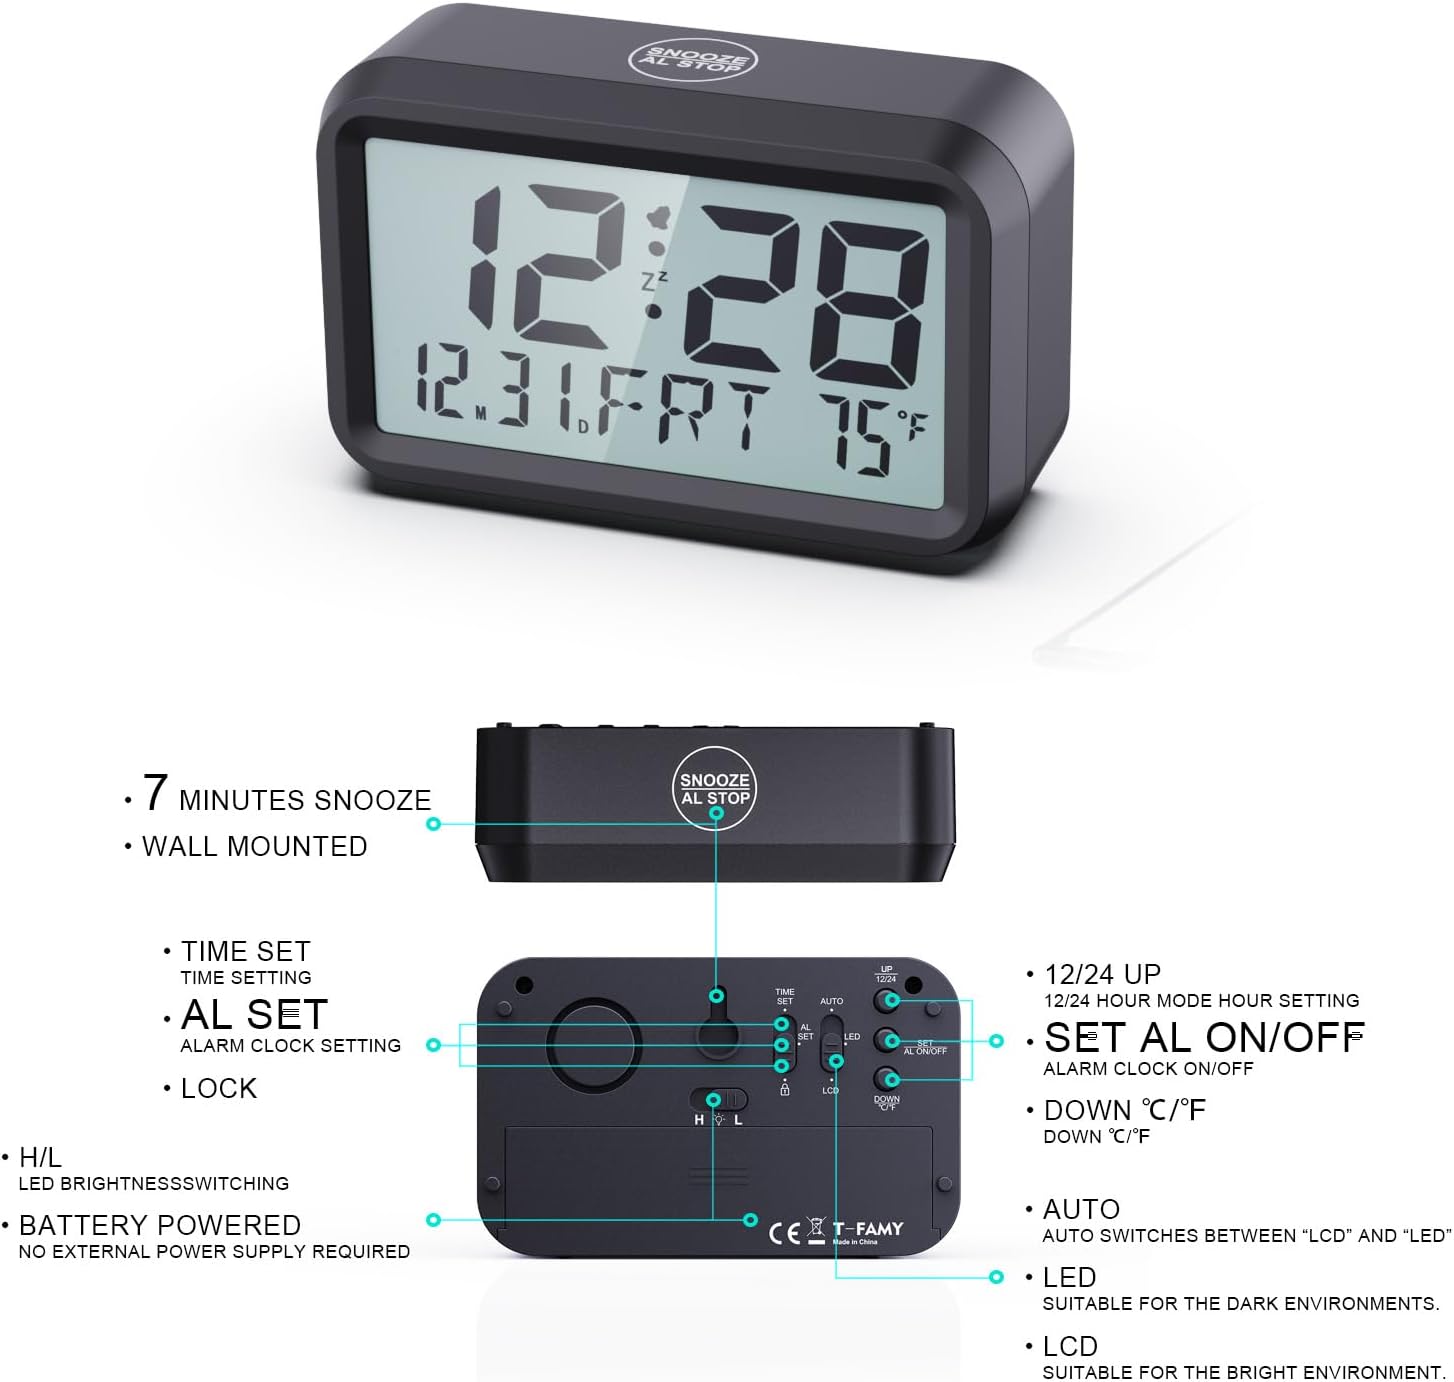
Image: Rear view of the alarm clock, illustrating the battery compartment and the various control buttons and switches for time setting, alarm setting, brightness, and display mode.
2. Initial Power-On
Once batteries are installed, the clock will power on automatically. The display will show default time and date settings. You can now proceed to set the correct time and preferences.
Operating Instructions
Refer to the back panel diagram (Image: 61bPvTfAMkL._AC_SL1500_.jpg) for button locations.
1. Setting Time
- Slide the LOCK switch to the TIME SET position.
- Use the UP and DOWN buttons to adjust the hour.
- Press the TIME SET button again to move to minute adjustment. Use UP and DOWN to adjust minutes.
- Continue pressing TIME SET to adjust year, month, and day. Use UP and DOWN for adjustments.
- Once all settings are correct, slide the LOCK switch back to the LOCK position to save.
2. Setting Alarm
- Slide the LOCK switch to the AL SET position.
- Use the UP and DOWN buttons to adjust the alarm hour.
- Press the AL SET button again to move to alarm minute adjustment. Use UP and DOWN to adjust minutes.
- Once the alarm time is set, slide the LOCK switch back to the LOCK position.
- To activate or deactivate the alarm, use the AL ON/OFF switch on the back. When the alarm is active, an alarm icon will appear on the display.
3. Snooze Function
When the alarm sounds, press the large SNOOZE/AL.STOP button on the top of the clock. The alarm will pause for 7 minutes and then sound again. This can be repeated up to 3 times. To stop the alarm completely, slide the AL ON/OFF switch to OFF.

Image: A user's hand pressing the large button on top of the clock, labeled 'SNOOZE AL.STOP', demonstrating the snooze function during an active alarm.
4. LED/LCD Display Switching & Brightness
- Use the H/L switch on the back to adjust the LED display brightness between High (H) and Low (L).
- Use the LED/LCD DISPLAY switch on the back to manually toggle between LED and LCD display modes.
- For automatic switching, set the LED/LCD DISPLAY switch to AUTO. In this mode, the clock will automatically switch to LCD display from 8:00 PM to 6:00 AM to conserve battery and reduce light in dark environments, and switch back to LED during the day.

Image: A visual representation of the clock's display capabilities, showing the difference between LED (bright, green digits) and LCD (subtler, grey digits) modes, and the two levels of LED brightness (Low and High).
5. 12/24 Hour Format
While in Time Set mode, press the UP button to toggle between 12-hour (with AM/PM indicator) and 24-hour formats.
6. Temperature Unit (Celsius/Fahrenheit)
While in Time Set mode, press the DOWN button to toggle between Celsius (°C) and Fahrenheit (°F) temperature units.
Maintenance
1. Cleaning
Wipe the clock with a soft, dry cloth. Do not use abrasive cleaners or solvents, as they may damage the surface.
2. Battery Replacement
When the display dims significantly or functions become erratic, it's time to replace the batteries. Always replace all batteries at the same time with new AA batteries. Dispose of old batteries responsibly according to local regulations.
Troubleshooting
- Display is blank or dim:
- Check if batteries are installed correctly and are not depleted. Replace if necessary.
- Ensure the LED/LCD DISPLAY switch is not set to a mode that makes it appear off in current lighting conditions (e.g., LCD in very dark room).
- If in LED mode, check the H/L brightness switch.
- Alarm does not sound:
- Ensure the AL ON/OFF switch is in the ON position.
- Verify the alarm time is set correctly.
- Time is incorrect:
- Re-set the time following the 'Setting Time' instructions.
- Ensure the LOCK switch is in the LOCK position after setting.
- Temperature reading is inaccurate:
- Ensure the clock is not placed near heat sources or in direct sunlight, which can affect temperature readings.
Specifications
| Brand | Timegyro |
| Model Number | CRS13 |
| Color | Black-Green |
| Display Type | Digital (LED/LCD Switchable) |
| Power Source | Battery (2/4 x AA, not included) |
| Special Features | Alarm, Adjustable Brightness, Illuminated, Snooze, Silent Clock, Temperature Display |
| Product Dimensions | 14 cm (width) x 8.5 cm (height) |
| Mounting Type | Tabletop |
| Material | Acrylonitrile Butadiene Styrene (ABS Plastic) |
Warranty and Support
This product is covered by a standard manufacturer's warranty. For specific warranty details, please refer to the documentation provided with your purchase or contact the retailer. For technical support or inquiries, please reach out to your point of purchase or visit the official Timegyro website for contact information.