1. Introduction
This manual provides instructions for the installation and maintenance of YAXRO compatible replacement parts for Cecotec Conga Eternal, Pet Max, X-Treme, Ultimate, Titanium, and Vital series robot vacuum cleaners. Regular replacement of these accessories is crucial for maintaining the optimal cleaning performance and longevity of your robot vacuum.
2. Product Overview
The YAXRO replacement kit (Set H) includes essential components designed to fit various Cecotec Conga Eternal series robot vacuums. These parts are manufactured from high-strength, environmentally friendly materials to ensure durability and effective cleaning.
2.1 Included Components (Set H)
- HEPA Filters: Designed to capture fine dust particles and allergens, improving air quality.
- Side Brushes: Essential for sweeping debris from edges and corners into the main cleaning path.
- Mop Cloths: For wet cleaning functions, effectively removing stains and footprints from hard floors.

Figure 1: Overview of the YAXRO replacement kit (Set H), including HEPA filters, side brushes, and mop cloths.

Figure 2: Close-up of the various components: HEPA filters (top), mop cloths (middle), and side brushes (right).
2.2 Individual Component Details
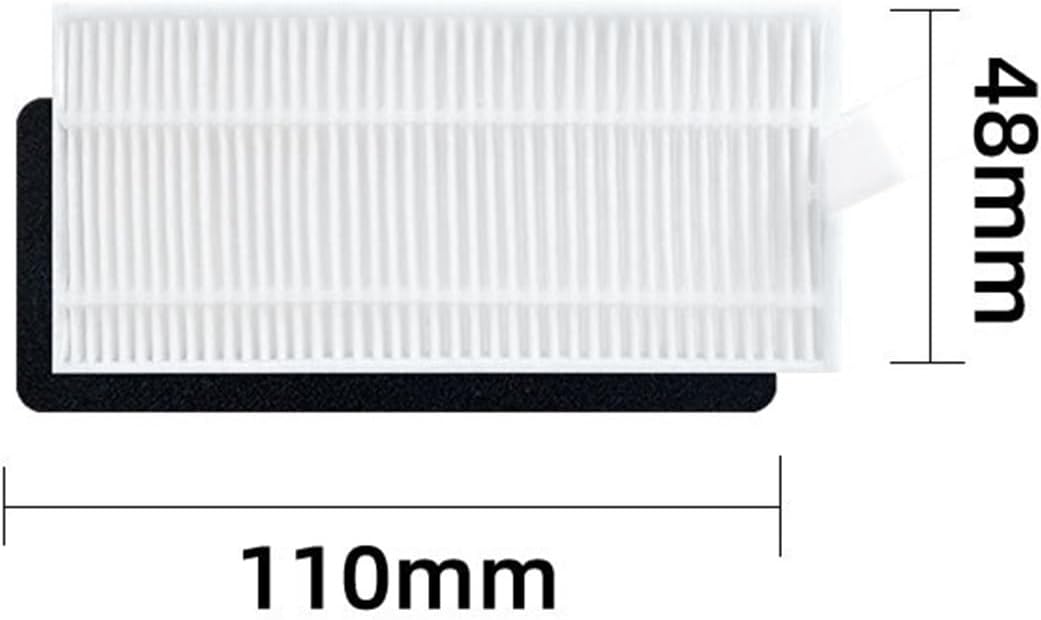
Figure 3: Side brushes, typically color-coded for easy identification and correct installation (e.g., left and right).

Figure 4: HEPA filter dimensions, approximately 110mm in length and 48mm in height.
Figure 5: Mop cloth dimensions, approximately 275mm in length and 95mm in width.

Figure 6: Multiple mop cloths, highlighting their design for attachment to the robot vacuum's mopping module.
3. Installation
Before installing any replacement parts, ensure your robot vacuum cleaner is powered off and disconnected from its charging base. Refer to your robot vacuum's original user manual for specific instructions on accessing component compartments.
3.1 Installing HEPA Filters
- Locate the dustbin on your robot vacuum. This is typically found by lifting the top cover or by removing a compartment from the side/rear.
- Open the dustbin and remove the old filter. Dispose of the old filter responsibly.
- Insert the new HEPA filter into the designated slot within the dustbin. Ensure it is seated correctly and securely.
- Close the dustbin and reinsert it into the robot vacuum.
3.2 Installing Side Brushes
- Turn the robot vacuum upside down to access the underside.
- Locate the side brushes. They are usually held in place by a screw or a snap-on mechanism.
- If secured by a screw, use a screwdriver to remove it. Carefully pull off the old side brush.
- Align the new side brush with the corresponding post. Some brushes are color-coded (e.g., green for left, red for right) or have specific shapes to ensure correct orientation.
- Push the new brush firmly into place and re-secure it with the screw if applicable.
3.3 Installing Mop Cloths
- Locate the mopping module or water tank on your robot vacuum. This is typically a removable component.
- Remove the old mop cloth if one is attached.
- Attach the new mop cloth to the mopping module. Mop cloths usually attach via Velcro or slide into designated grooves. Ensure it is securely fastened and flat.
- Reinstall the mopping module or water tank into the robot vacuum.
4. Maintenance
Regular cleaning and timely replacement of these accessories are vital for optimal performance of your robot vacuum. The frequency of maintenance depends on usage and environment (e.g., presence of pets, carpeted areas).
4.1 HEPA Filter Maintenance
- Cleaning: Tap the filter gently over a trash can to dislodge dust. You can also use a small brush or a vacuum cleaner with a brush attachment to clean the filter surface. Do not wash HEPA filters with water unless explicitly stated by the robot vacuum manufacturer, as this can damage the filter material.
- Replacement: Replace HEPA filters every 1-3 months, or more frequently if you have pets or allergies, to maintain filtration efficiency.
4.2 Side Brush Maintenance
- Cleaning: Regularly check side brushes for tangled hair or debris. Use scissors to carefully cut away any tangled hair. Wipe the brushes with a damp cloth if necessary.
- Replacement: Replace side brushes every 3-6 months, or when they become visibly worn, bent, or damaged, as this affects their ability to sweep effectively.
4.3 Mop Cloth Maintenance
- Cleaning: After each mopping cycle, remove the mop cloth and wash it thoroughly with water and mild detergent. Rinse until clean.
- Drying: Allow the mop cloth to air dry completely before reattaching it to the mopping module or storing it.
- Replacement: Replace mop cloths every 1-2 months, or when they show signs of significant wear, reduced absorbency, or stubborn stains, to ensure effective cleaning.
5. Troubleshooting
If you encounter issues after installing the replacement parts, consider the following:
- Parts don't fit: Double-check the compatibility of the parts with your specific Cecotec Conga model. Ensure you have purchased the correct set for your robot vacuum.
- Reduced cleaning performance: Verify that all parts are installed correctly and securely. Ensure filters are clean and brushes are free of tangles.
- Unusual noises: Ensure side brushes are properly seated and not obstructed. Check for any debris caught in the brush mechanism.
If problems persist, refer to your robot vacuum's original user manual or contact customer support.
6. Specifications
| Component | Approximate Dimensions | Material |
|---|---|---|
| HEPA Filter | 110mm (L) x 48mm (H) | High-strength, environmentally friendly materials |
| Mop Cloth | 275mm (L) x 95mm (W) | Highly absorbent fabric |
| Side Brush | Standard fit for compatible models | Durable plastic and bristles |
Note: Dimensions are approximate and may vary slightly.
7. Warranty and Support
For any questions regarding the YAXRO replacement parts or if you require assistance with installation or compatibility, please contact the seller directly through the platform where the purchase was made. The seller is committed to providing high-quality products and support.
Please refer to your purchase documentation for specific warranty information, if applicable.