1. Introduction
This manual provides detailed instructions for the installation, operation, and maintenance of your new ASURE 9.1-inch Android GPS Navigation Dash Unit. This unit is specifically designed as an upgrade for Dodge Ram 1500, 2500, and 3500 Pickup models from 2013 to 2018 equipped with Manual AC. It features an 8-Core 1.6Ghz CPU, 4GB RAM, 64GB ROM, and a 1280x720 HD Touchscreen IPS display, offering a smooth and responsive user experience with advanced connectivity options.

Figure 1.1: Front view of the ASURE 9.1-inch Car Radio Upgrade unit.
2. Package Contents
Please verify that all items listed below are included in your package:
- 1x 8-Core Car Stereo Radio Unit
- 1x Installation Bezel
- 1x Wiring Harness Kit
- 1x GPS Antenna
- 1x USB Cable
- 1x Audio Video Cables
- 1x Microphone
- 1x CAN BUS Decoder
- 1x User Manual (this document)
- Mounting Brackets and Screws

Figure 2.1: Overview of the main unit, wiring, and accessories included in the package.

Figure 2.2: Detailed visual representation of all included accessories.
3. Specifications
| Feature | Description |
|---|---|
| Display Size | 9.1 Inches |
| Resolution | 1280x720 HD IPS Touchscreen |
| Processor | 8-Core 1.6Ghz CPU |
| RAM | 4GB |
| ROM | 64GB |
| Operating System | Customization Android System |
| Connectivity | Bluetooth, USB, Wi-Fi (2.4G & 5G) |
| Special Features | Wireless CarPlay, Wireless Android Auto, DSP, Dual Navigation, Steering Wheel Control |
| Vehicle Service Type | Dodge Ram 1500 2500 3500 Pickup 2013-2018 (Manual AC version) |
| Dimensions | 9.4 x 5.7 x 1.6 inches |
| Item Weight | 4.24 pounds |

Figure 3.1: Illustration of the high-performance 8-Core CPU, 4GB RAM, and 64GB ROM.

Figure 3.2: Visual representation of the Octa-Core Processor, 4GB RAM for speed, and 64GB ROM for storage.

Figure 3.3: Comparison of screen resolutions across different generations, highlighting the 1280x720 3rd Generation IPS screen.
4. Installation
Important Reminder: Before installing the unit, please disconnect the battery from the car. Failure to do so may result in burning out the original car fuse.
4.1 Pre-Installation Steps
- Ensure the vehicle's battery is disconnected.
- Carefully remove the existing car radio and surrounding trim panel. Refer to your vehicle's specific service manual for detailed instructions on panel removal and screw locations.
- Unscrew all small screws holding the original components in place.

Figure 4.1: The vehicle dashboard with the original radio and surrounding panel removed, showing the internal structure.
4.2 Wiring Connections
The unit comes with a plug-and-play wired harness. Connect the main wiring harness to your vehicle's factory plug. Ensure all necessary connections are made securely.
- Connect the main power supply harness to the unit and the vehicle's wiring.
- Connect the GPS antenna to the designated port on the unit.
- Connect the radio antenna.
- For steering wheel control, connect the 8-Pin plug (integrated in the power harness) to the radio's rear 8-Pin socket. Some cars may require manual wiring for SWC.
- If installing a rear view camera, connect the camera input cable. The CAN-BUS works to automatically shift the screen to the rear view interface when you put into Reverse gear.
- Ensure the white plug is connected to the main device for proper Bluetooth and Wi-Fi signals.

Figure 4.2: Detailed wiring diagram showing connections for power, GPS, camera, and other peripherals.

Figure 4.3: Close-up view of the wiring harness and specific connections for various functions.
4.3 Final Assembly
- Carefully place the new ASURE unit into the dashboard opening.
- Secure the unit using the provided screws and mounting brackets.
- Reinstall the trim panel, ensuring it fits perfectly and all clips are engaged.
- Reconnect the vehicle's battery.

Figure 4.4: The ASURE unit seamlessly integrated into the Dodge Ram dashboard, appearing as an original component.
5. Operating Instructions
5.1 Initial Power-Up and Setup
- After installation, turn on your vehicle's ignition. The unit should power on automatically.
- Follow the on-screen prompts for initial setup, including language selection and time zone.
- Steering Wheel Control Configuration: To program or customize steering wheel control buttons, navigate to "Settings" in the main menu. Go to "Factory" and input password 3368 or 8888. Click "Car Model" and select "XC(BSJ)->Dodge->coov->XC(BSJ)" or "Simple->dodge->ram1500->13".

Figure 5.1: Screenshot showing the menu path for configuring steering wheel controls.
5.2 Wireless CarPlay & Android Auto
The unit features built-in wireless CarPlay and Android Auto for seamless smartphone integration.
- On the unit's main interface, click the "CarLink" icon to initiate the CarPlay or Android Auto function.
- Ensure your smartphone's Bluetooth and Wi-Fi are enabled.
- Follow the on-screen instructions to connect your phone via USB or Bluetooth.
- Once connected, you can use GPS navigation, make calls, send/receive messages, and listen to music directly from your phone's interface displayed on the unit.
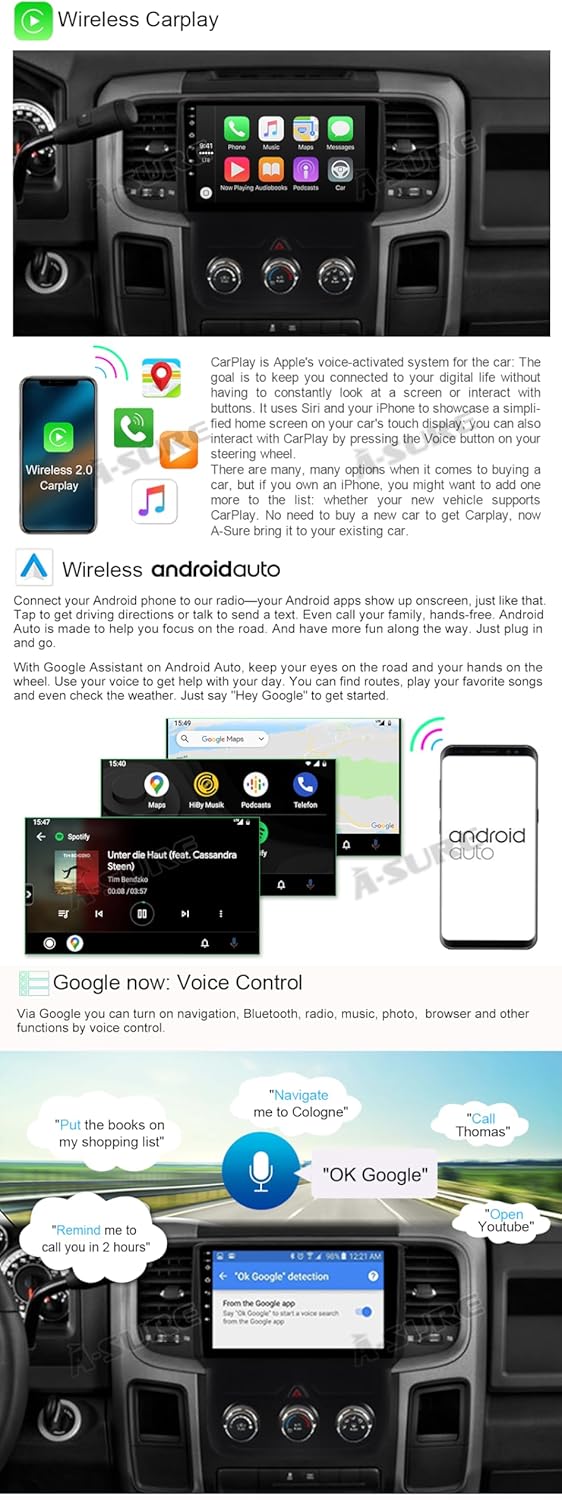
Figure 5.2: Display showing the Wireless CarPlay and Android Auto interfaces, including voice control features.

Figure 5.3: Comparison highlighting wireless connection methods for CarPlay, Android Auto, and Screen Mirroring.
5.3 Navigation
The unit supports both online and offline navigation.
- Online Navigation: Connect to Wi-Fi or a mobile hotspot to use online mapping applications like Google Maps.
- Offline Navigation: Download offline maps for use without an internet connection. The unit supports internet location and GPS satellite positioning for precise navigation.

Figure 5.4: Examples of online navigation via CarPlay and offline navigation using apps like iGo on Android Auto.
5.4 Bluetooth, DSP, and Wi-Fi
- Bluetooth: Enable hands-free calling and answer functions for safer driving. The unit has a built-in microphone, and an external microphone is optional.
- DSP (Digital Sound Processing): Customize the audio output for optimal music playback from different seating positions.
- Wi-Fi: Connect to Wi-Fi or a mobile hotspot to download apps, offline maps, and access online content.
5.5 Customization Features
The Android system allows for various customizations:
- Day/Night Mode: Adjust screen backlight settings for optimal visibility in different lighting conditions.
- Customized Radio Station Name: Personalize the names of your saved radio stations.
- Customized APP List Interface: Organize and customize the applications displayed on the main interface.
- Car Battery Voltage Info: Monitor your vehicle's battery voltage directly on the screen.
6. Maintenance
To ensure the longevity and optimal performance of your ASURE car radio unit, follow these general maintenance guidelines:
- Cleaning: Use a soft, dry cloth to clean the touchscreen and unit surface. Avoid abrasive cleaners or solvents.
- Software Updates: Periodically check for and install software updates provided by ASURE to ensure the unit has the latest features and bug fixes.
- Environmental Conditions: Avoid exposing the unit to extreme temperatures or direct sunlight for prolonged periods.
7. Troubleshooting
If you encounter any issues with your ASURE unit, please refer to the following common troubleshooting steps:
- Unit Not Powering On: Check all power connections and ensure the vehicle's battery is properly connected and charged. Verify the car's fuse is intact.
- No Sound: Check speaker connections and audio output settings. Ensure the volume is not muted or set too low.
- CarPlay/Android Auto Connection Issues: Ensure your phone's Bluetooth and Wi-Fi are on. Try restarting both the unit and your phone. Verify the "CarLink" app is active.
- GPS Signal Loss: Ensure the GPS antenna is securely connected and has a clear view of the sky.
- Steering Wheel Controls Not Working: Re-verify the wiring connections for SWC. Re-enter the factory settings password (3368 or 8888) and reconfigure the car model and button assignments.
- Screen Unresponsive: Try restarting the unit. If the issue persists, a factory reset might be necessary (consult the full digital manual for instructions).
For persistent issues or problems not covered here, please contact ASURE customer support.
8. Warranty and Support
Your ASURE 9.1-inch Car Radio Upgrade comes with a warranty to cover manufacturing defects.
- Warranty Period: 1 year repair warranty.
- Returns/Replacements: 30 days free return and replacement.
For warranty claims, technical support, or any inquiries, please contact ASURE customer service through the platform where you purchased the product or visit the official ASURE website for contact information.