Important Safety Instructions
When using electrical appliances, basic safety precautions should be followed, including the following:
- Read all instructions before using the appliance.
- Do not operate the oven if the door or door seals are damaged. Contact qualified service personnel for repair.
- Do not heat liquids or other foods in sealed containers as they are liable to explode.
- Do not attempt to service or repair the oven yourself.
- Ensure proper ventilation around the microwave oven.
- Always use microwave-safe cookware.
Setup and Installation
Unpacking
Carefully remove the microwave oven from its packaging. Remove all packing materials, including the turntable, turntable ring, and any protective film from the oven surfaces. Inspect the oven for any damage, such as dents or a misaligned door. Do not operate the oven if it appears damaged.

Interior view of the microwave oven with the door open, showing the glass turntable and roller ring in place.
Placement
Place the microwave oven on a flat, stable, heat-resistant surface. Ensure there is adequate ventilation around the oven. Maintain a minimum clearance of 4 inches (10 cm) from the rear and sides, and 12 inches (30 cm) from the top to allow for proper airflow. Do not block any ventilation openings.
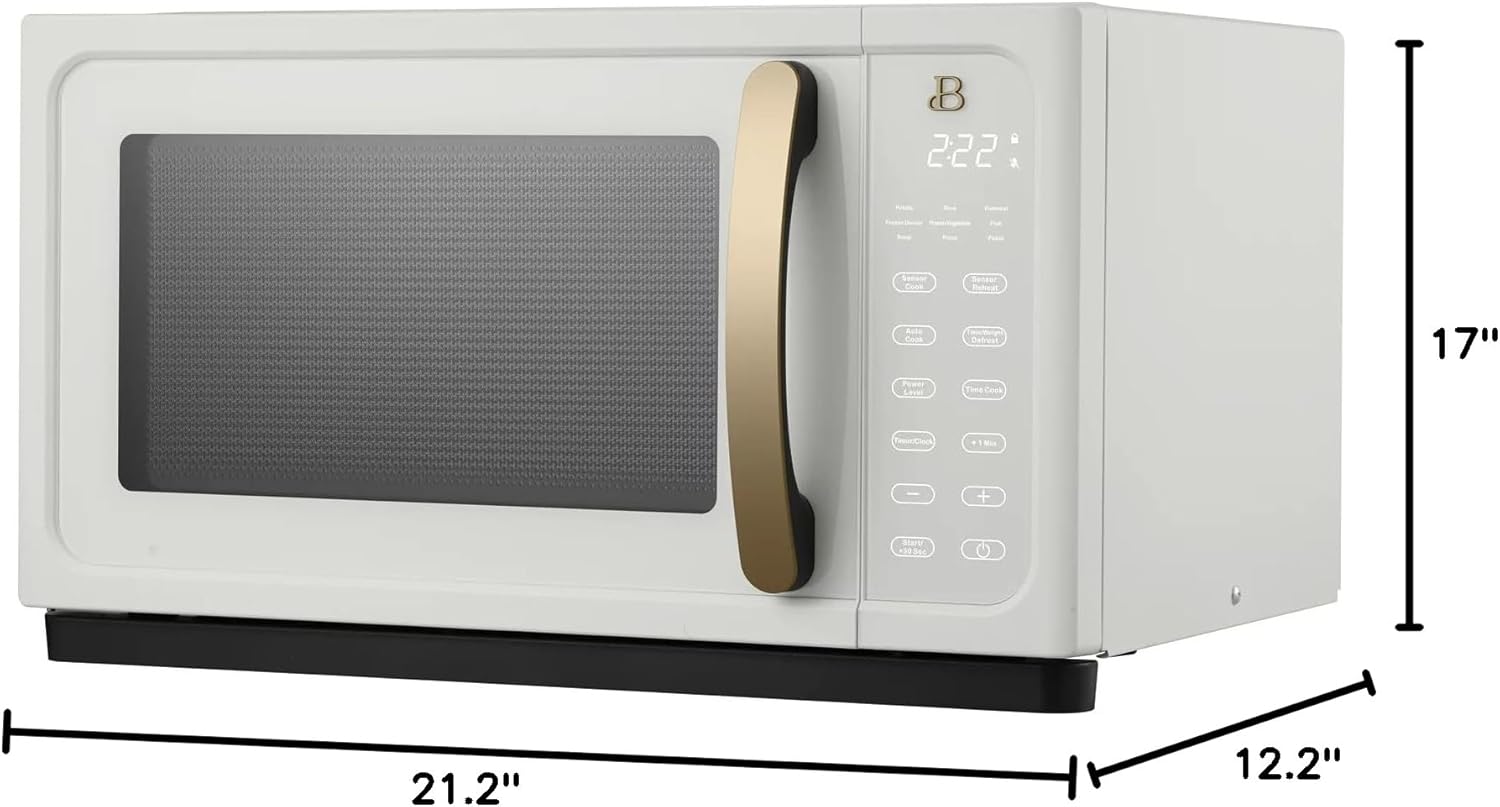
Dimensions of the microwave oven for proper placement: 21.2" W x 12.2" H x 17" D.
Electrical Connection
Plug the oven into a standard 120V, 60Hz, AC-only electrical outlet. Ensure the outlet is properly grounded. Do not use extension cords or adapters.
Initial Use
Before first use, wipe the interior and exterior with a damp cloth. Set the clock by pressing the 'Time/Clock' button and following the instructions on the display.
Operating Instructions
Control Panel Overview
The microwave features a touch-activated display and intuitive buttons for various functions.

Front view of the microwave oven, showing the touch-activated control panel.
- Sensor Cook: Automatically adjusts cooking time based on food moisture.
- Sensor Reheat: Automatically reheats food to an optimal temperature.
- Power Level: Adjusts the microwave power output.
- Time/Clock: Sets the current time and cooking duration.
- +1 Min / +30 Sec: Adds cooking time quickly.
- Stop/Cancel: Stops cooking or clears settings.
- 15 Digital Preset Functions: Pre-programmed settings for common foods.
Basic Cooking (Time Cook)
- Place food in a microwave-safe dish inside the oven.
- Close the door securely.
- Press the 'Time Cook' button.
- Use the number pad or '+' / '-' buttons to enter the desired cooking time.
- Press 'Start' to begin cooking.
Using Sensor Cook and Sensor Reheat
The Sensor Cook and Sensor Reheat functions detect steam emitted from food to determine the optimal cooking or reheating time. This eliminates guesswork and helps prevent over or undercooking.
- Place food in the oven.
- Press 'Sensor Cook' or 'Sensor Reheat'.
- The oven will automatically start and adjust the cooking time.
Using Preset Functions
The oven includes 15 digital preset functions for convenience. Refer to the label inside the oven door for a list of specific presets and their usage.
- Place food in the oven.
- Select the desired preset function from the control panel.
- Press 'Start'.
Care and Maintenance
Cleaning the Interior
Clean the oven interior regularly with a mild detergent and a soft cloth. For stubborn stains, place a bowl of water with lemon slices inside and microwave for a few minutes to loosen food particles, then wipe clean.
Cleaning the Exterior
Wipe the exterior surfaces with a soft, damp cloth. Avoid abrasive cleaners or harsh chemicals that could damage the finish.
Cleaning the Turntable
The glass turntable and roller ring can be removed for cleaning. Wash them in warm, soapy water or in the dishwasher. Ensure they are completely dry before placing them back in the oven.
Troubleshooting
| Problem | Possible Cause | Solution |
|---|---|---|
| Oven does not start | Door not closed properly; Power cord unplugged; Blown fuse/tripped circuit breaker. | Ensure door is securely closed; Check power cord connection; Check household fuse/circuit breaker. |
| No heat | Incorrect power level set; Door not fully closed. | Verify power level setting; Ensure door is securely closed. |
| Turntable does not rotate | Turntable or roller ring not positioned correctly; Obstruction under turntable. | Reposition turntable and roller ring; Remove any obstructions. |
| Food is unevenly cooked | Food not stirred or rotated; Improper power level or cooking time. | Stir or rotate food during cooking; Adjust power level and cooking time as needed. |
Specifications
- Model Number: BTFCMS811WEST10
- Capacity: 1.1 Cubic Feet
- Wattage: 1000 Watts
- Product Dimensions: 17"D x 21.2"W x 12.2"H
- Material: Glass, Metal
- Installation Type: Countertop
- Special Features: Programmable, Turntable, Touch Control, Sensor Cook, Sensor Reheat
- Included Components: Large 12.4" glass turntable